Skip navigation

The G400 was Matrox’s “Gamer card”. For years the company was known for producing graphics cards like the Matrox Mystique and G200 which offered superior 2D image quality but generally fell behind the competition when it came to producing high FPS or reliable and compatible drivers. The G400 released in 1999 was Matrox’s answer to this and offered 16 and 32 bit color modes in the excellent image quality Matrox was known for as well as touting an AGP x4 interface. The high end of the G400 family was the G400 MAX with 32MB of 200mhz SGRAM and a core clock speed of 150mhz giving competition like the TNT2 and Voodoo 3 a run for their money.

One feature the G400 featured that the competition did not was hardware support for EMBM or Environmental Mapped Bump Mapping. This is a method of detailing textures which a few games at the time supported. Some of these games like “Expendable” also known as “Millennium Soldier: Expendable” could only be run with EMBM mode on by a Matrox card of the G400 family as well as a few other Matrox cards. In this article I want to take a look at the fastest of the G400 family, the G400 MAX as well as the game Expendable and just show what the EMBM did as well as discus at the end a recent patch that allows you to experience this effect on non Matrox cards.

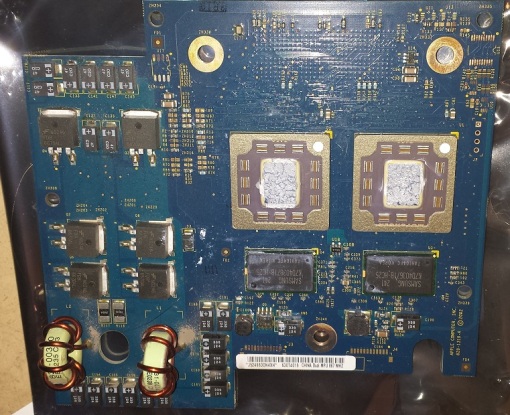
First lets take a look at the card in question.

g400max

Readers may recognize this image as I once had my G400 MAX installed in my dual Tualatin machine. The MAX is the fastest of the G400 cards which includes later versions such as the G450 and thus was the preferred card to play games such as Expendables with EMBM enabled. The G400 MAX is usually fairly easy to spot among other G400 cards on places like EBay due to the fact that unlike the other cards it came with a cooling fan stock. The G400 MAX only comes in AGP form so make sure your motherboard that your using has an AGP slot.

As I said before the hardware EMBM feature of this card was supposed to be a big selling point as other cards on the market were not able to perform this ability. Nvidia didn’t have EMBM features until the Geforce 3 several years later. Unfortunately the list of games that supported this feature is short and usually the effect isn’t used to a large extent and many times limited to making water look more realistic. I’ve read gamers have really struggled to see any difference when EMBM is activated in a number of games.

Here is an old list from Matrox of games that were slated to support EMBM, though if all of these titles did implement it is questionable.

Ace of Angels™
Aquarius™
Battlezone II: Combat Commander™
Battle Isle: The Andosia war
BITM
Carmageddon®: TDR 2000™
Colin McRae Rally 2
Descent 3™
Descent 3™: Mercenary
Destroyer Command™
Drakan™
Dungeon Keeper™ 2
Echelon®
Echelon®: Wind Warriors
Expendable™
F1 World Grand Prix
Far Gate
Fur Fighters
Hard Truck II™
Hired Team™ Gold
Hired Team™: Trial
Incoming Forces
Parkan: Iron Strategy™
Ka-52 Team Alligator™
Kyodai
Off Road: Redneck Racing
Offshore2000: Pro Surf Tour
Planet Heat
PowerRender™ engine V 3.0*
Private Wars™
Rollcage® Stage II
Silent Hunter II
Silent Space (cancelled)
Silex engine
Slave Zero™
Speed Busters™
Spirit of Speed 1937
Sub Command
Jugular® Street Luge Racing
Totaled™
Warm Up
Wild Metal Country™*

Command & Conquer Renegade also used it for water effects but it was not restricted to using Matrox cards and that’s the catch with EMBM. It’s not that later cards could not perform the feature but many times the game executable would search for a Matrox card when executed and if one was not found the game would not run or would not run with EMBM enabled even if you had a EMBM capable card installed like the Geforce 3. This is what made having something like the G400 MAX in a collection interesting since it was the only means to fully experience some of these titles. Now lets talk about the game in question. Expendables was released by RAGE in 1999 and was an arcade port. From what I understand it was only released in “big box” form in Europe and not North America. I had to import my version from the UK. Expendable is an example of a game that put EMBM to decent use and it’s very noticeable in the water effects as well as some other game textures when activated. For a long time it was also a game that could only run with EMBM effects enabled if run on a Matrox card.20160822_231222

20160822_231233

The game is a Win 98 game but will run on later operating systems. There is also a Dreamcast port of the game titled “Millennium Soldier: Expendable” but from what I can tell it is graphically inferior to the PC port with no EMBM effects, lower resolutions and missing a few effects such as the video billboard seen in stage 1.

The game itself comes with a minimal storyline about aliens or some such thing but really the story isn’t important as the game is just a fun overhead run and gun shooter. The game is done all in 3D polygons but has actually aged pretty well and looks good in my opinion. It’s one of those mindless games where you just shut your mind off and shoot stuff up. On the downside the controls are horrible. Maybe this control scheme works fine on the Dreamcast controller but on a PC it’s frustrating and creates a lot of unneeded difficulty. The best I can describe it is sort of like Resident Evil tank like controls where up and down move you forward and back but left and right rotate your character. The game gives you plenty of options form keyboard and mouse to gamepad but I cant seem to get the full hang of the controls leading to many instances of inadvertently walking into laser fences or onto land mines. Despite the often times infuriating controls the game is still a lot of fun to play and has many levels and interesting bosses.

EMBM though is not activated by default but requires a patch. before that though let me go over the system I used to play this game.

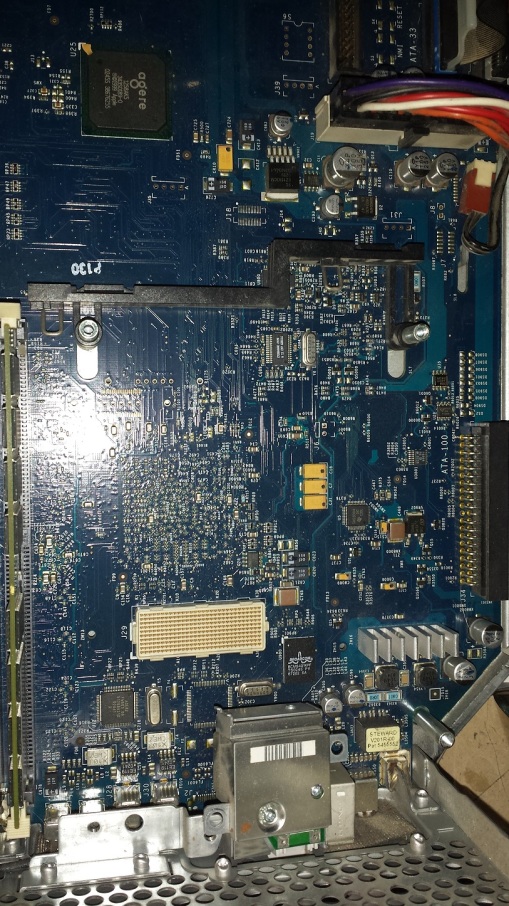
The system I put together for this game almost deserves an article of its own. The motherboard I went with is a very late socket A board, the Asrock K7VT4A PRO. This board sports all the features of a late socket A board such as ATA 133, SATA, AGP X8, DDR memory support and support for Barton core socket A CPU’s.

20160614_195124

For a CPU I went with the Barton core AMD Athlon XP 2500+ running at 1.833mhz and sporting 512kb of L2 cache on the CPU. When looking at the Pentium II requirements for Expendable this is quite an overkill but I wanted to make sure I maxed the Matrox GPU out and left some power to experiment later with non Matrox cards. I’m also running Windows 98SE, 512mb of DDR 400 RAM and a Maxtor ATA 133 hard drive with DMA activated. I’m also running a Diamond Monster MX300 sound card that uses the Vortex2 chip since Expendable takes advantage of this sound chip and its 3D positional audio.

Once you have your setup ready and installed Expendable from the CD you need to do a few things to get the game running with EMBM enabled. first off make sure your using an older version of the Matrox video drivers else you may encounter issues with selecting resolutions. I used drivers ver. 5.52.015

Once those are installed I also suggest getting PowerStrip version 2.78. PowerStrip is a graphics utility that lets you make all kind of tweaks. Go into advanced settings and disable V-sync. disabling this will boost your framerate but increase the possibility of screen tearing though in my many playthroughs of Expendable with V-sync disabled I noticed no tearing.

Next you’ll need to download the EMBM patch from here. From there you simply unzip the patch into the main Expendable directory and your pretty much set. You will get two executables one labeled Expendable and the other “Go”. Run the Expendable.exe first to setup your game. Keep in mind that due to the limit of 32MB of RAM on the G400 MAX you are limited to playing in 1024 x 768 resolution in 32 bit color mode. Anything higher and your game will crash. This is also where you setup your audio so if your using a Vortex2 chip be sure to select that. After this exit out and run the Go.exe and your game should start. keep in mind the patch is oddly picky. I kept getting crashes and memory errors until I updated my motherboards chipset.

So what does all this work get us? the turning off of V-sync helps offset the FPS hit we take from enabling EMBM while enabling EMBM improves textures on some vehicles as well as adds effects such as tread marks in the ground and most notably changes the look of water effects. They go from being a muddy almost mist look to wavy blue.

NO EMBM ENABLED
exp


EMBM ENABLED
expembm


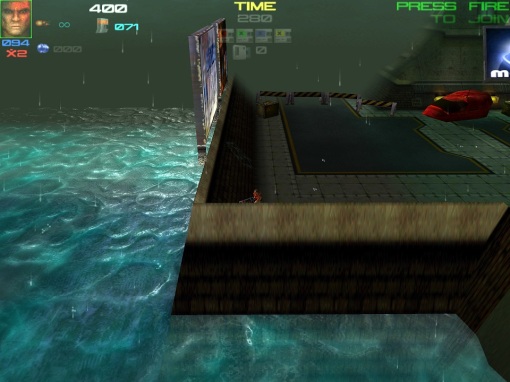
There’s also a few other very minor changes such as the video billboard will now also display the Matrox logo.

So as I mentioned earlier many of these games such as Expendable could only be played on Matrox cards that supported EMBM due to the fact that the game checked for the presence of a Matrox card in the system. Recently a member over at the Vogons forum put together a modified patch that will trick the game into thinking a Matrox card was installed thus letting one use later cards like the Geforce 3 and 4 that have EMBM capabilities but also faster GPU’s and vastly more RAM.

this patch can be found here.

I’ve tested this patch on this same system with a Geforce 4 ti4200 and the game played perfectly. below are some benchmarking results I took using the games built in timedemo. the results compare a Matrox G400 MAX at 1024 x 768 with EMBM enabled and my Geforce 4 ti4200 at 1920 x 1440 with EMBM enabled.

Keep in mind that many of the other early EMBM capable games may also require a Matrox card and have not been patched to use other brand cards so it still may be worth keeping a G400 MAX handy depending on what you want to play.

The time demo for Expendable can be enabled by making a shortcut to the “go.exe” file and entering properties and editing the shortcut by adding -timedemo

G400 MAX, EMBM ENABLED, NO V-SYNC

Running at  – 1024 x 768 x 32
Total Time  – 234 Seconds
Gameframes  – 11226
Lowest FPS  – 17 fps
Highest FPS – 85 fps
Average FPS – 47.957265 fps

GEFORCE 4 TI4200, EMBM ENABLED, NO V-SYNC

Running at  – 1920 x 1440 x 32
Total Time  – 147 Seconds
Gameframes  – 11226
Lowest FPS  – 21 fps
Highest FPS – 131 fps
Average FPS – 76.258503 fps

dlc3

Previously on this blog we have discussed both what I think is an “ultimate” or at least near “ultimate” 386 PC in the Anatomy of a 386 article and we also talked about pushing certain sockets beyond their intended scope such as with the 486 and Socket 3 motherboards and pushing their limits  and I wanted to do something similar with the 386. In this article were going to take a look at the Cyrix 486DLC chip, a drop in replacement chip meant to upgrade a 386 class motherboard with a 486 class CPU. Were going to look at one of the more common DLC chips, the Cyrix DLC-40, run some benchmarks and put it up against the king of the 386 chips the AMD 386-40.

First lets take a look at the test PC and then the CPU’s will be testing.

dlc4

This is the 386 PC will be testing the CPU’s on.

dlc7

I could not identify the motherboard but it’s based off the Opti 495XLC chipset and is loaded with 128kb of L2 cache and 8MB of FPM RAM. For video I am using a Tseng Labs ET4000 ISA video card and I have a Sound Blaster 2.0 installed as well although it will be unused for the benchmark tests. My memory settings are fairly standard and I didn’t mess with them much from the defaults. AT bus divider set at 5, memory timings set at 2-1-1-1 and wait states set to 1.

So lets take a look at the two CPU’s will be testing today.

First up is the king of the 386 chips, the famous and beloved AMD 386DX-40.

dlc6

The 386DX-40 was a very reliable 32 bit 386 chip made by AMD and is very well regarded for its speed and reliability. This is the fastest true 386 made and is overall very capable. It though, like all true 386 chips has no L1 cache memory on board.

The second CPU we will be putting it up against is the Cyrix 486DLC-40.

dlc5

The DLC-40 created by Cyrix was intended to be a drop in upgrade CPU for 32 bit 386 class motherboards which in essence gave 386 PC users a 486 CPU upgrade. It essentially is a supped up 386 with 486 code inserted and 1kb of L1 cache added on the chip. There was also a more common 33mhz version like this guy.

dlc33m

as well as later DLC chips made by Texas Instruments and IBM which added even more L1 cache. The fastest of these chips is an IBM triple clocked DLC rated at 100mhz that supposedly is about equal to an Intel 486DX-66. Due to licensing agreements though I believe IBM was only able to sell these chips imbedded as part of a motherboard or upgrade kit.

There are also SLC variants which are 16/32 bit hybrids designed to be more compatible with older motherboards where as DLC variants are true 32 bit.

The on board L1 cache memory of the DLC is a huge advantage over the AMD 386-40 so on all the benchmarks I tested the DLC chip twice, once with the cache enabled and one again with it disable so we can see how much of a difference this makes.

The unidentified 386 class motherboard I’m using is a later model and supports the DLC chips in BIOS. Here is a shot of the specs as I boot up.

dlc8

Notice the BIOS recognizes the DLC chip as under “main processor” it is listed as a Cx486DLC. Many older 386 motherboards  may not recognize the DLC chip properly and simply report it as a 80486SX. You may also need to run a setup utility with these older boards to fully utilize the DLC chip.

My BIOS also has the option to enable/disable the internal L1 cache on the CPU though for reasons I cant figure out this option does not work and the l1 cache is enabled automatically regardless of how it is set here.

dlc1


Failing this you can always disable/enable the internal L1 cache via software. I used the Cyrix cx486 utility which allows you to easily enable/disable the L1 cache by the C button. Just be sure to hit W to write your choice to the registers before exiting the program.

dlc2

So without further adieu we have the benchmarks. The programs I used were all pretty standard, 3D Bench, PCP Bench and DOOM. Below is a bar chart to better illustrate the performance of the two chips and I also added a 33mhz Intel 486 results from a similarly spec’ed 486 machine using the same amount of L2 cache and the same video card to compare.

dlcgraph

The results are basically what we would expect with the DLC handily defeating the AMD 386-40. DOOM seems to benefit the most from the L1 cache as the difference between the 386-40 and DLC with cache disabled is only .6 FPS but with cache enabled its a 2.5 FPS difference.

you’ll also notice the DLC does pretty well compared to the Intel 486DX-33 even tying it in PCP Bench. After some optimization I managed even more performance gain.

After setting wait states to 0 and the AT bus divider to 3 I was able to get the following results out of the cache enabled DLC-40

3D Bench    – 22.1

PCP Bench –  5.5

DOOM        –  10

You can see with these results the DLC surpasses the DX-33 in all but DOOM.

graphdlc2

The folks over at Red Hill Computing whom I often refer to in my research seem to really love this chip and claim it to be “vastly superior” to a 486DX-33 system though I would have to somewhat disagree. In a very optimized system the DLC can match or beat the DX-33 but I wouldn’t say it’s as fast clock for clock and I wouldn’t call a few frames per second advantage “vastly superior”. At the time though they would of been correct in that verbiage from a fiscal point of view as the DLC was vastly cheaper then a Intel 486DX-33 allowing the buyer to purchase more RAM.

I’m very curious how much the added cache of the later DLC chips such as the ones from TI and IBM affected performance and that may be the bases of an eventual revision to this article. The DLC does do what it claims to do and does increase performance of a 386 to 486 levels as well as being vastly cheaper then an Intel 486 but keep in mind it was still restricted by the 386 architecture and limited to the amount of RAM it could use. Possibly not a bad option for the budget user that already owned a 386 machine but holding out for the pricy 486DX-66 would of been a smarter move for the long run in my opinion.

afb3

I’ve likely mentioned it before on the blog that I’m a bit of a purist. I enjoy playing my games on original hardware so when clone systems come along I usually turn my nose up to them as a professional wine taster would a cheap wine in a box from the local grocery store. I recoil like a vampire from garlic at the site of Atari, Genesis and intellivision flashback consoles at the local Big Lots and even look on at the upcoming NES Mini console with indifference. Therefore I guess it may come as a surprise that I should endorse and even dare I say like the Atari flashback 2 console.

The Atari Flashback was released in 2005 and what makes the Flashback 2 different from the other Atari Flashbacks and for that matter most of the emulation boxes out there? Well first off it’s not actually emulating and is in fact actually more like a revision to the hardware you would find in an actual Atari 2600. Inside the Atari Flashback 2 is an actual single chip hardware reproduction of the TIA chip from the original console. What this means is that the flashback 2 can play 2600 games as they ran on the original hardware with a few exceptions. This works even to the point that one can modify a flashback 2 with a cartridge slot to actually accept and play original 2600 games, but we will touch more on that later.

So first lets have a look at the console and the packaging.

afb1

The box itself is a little reminiscent of console boxes of the 70’s and early 80’s with alternating images of a few games and people having way more fun they probably ever would with the console. opening up the box we get.

afb2

The flashback comes with the console itself, two Atari replica controllers and a power supply. I do not know if a manual was included. Mine did not come with one.

afb6

The flashback console itself is directly modeled after the original 2600 only smaller. The most obvious change other then the size is the replacement of the toggle switches of the original with large plastic buttons. The buttons look kind of cheap but they do the job well enough.

afb4

On the back of the unit we also have something very similar to the original console. We have the interesting inclusion of a switch to toggle between color and black & white displays like the original as well as the power jack. Instead of an RF coaxial cable wire built in we have a very welcomed composite and mono audio cable. It still looks pretty poor on a modern LCD HDTV but looks much better and is more convenient to set up on an older SD CRT set then RF. It even looks pretty nice on my Samsung HD CRT.

we have two controller ports which are the same standard 9 pin ports found on the original 2600 as well as many consoles and computers of the 80’s and early 90’s. joysticks from the original 2600 can be used without any issues on the Flashback 2 as well as the other way around with Flashback 2 joysticks working just fine on an original 2600. You can even use your trusty Sega Genesis controller if you’d like.

afb5

The controllers feel mostly identical though the Flashback controller seen on the right in the image above has some different branding and seems ever so minutely smaller the original.

moving on to the built in games. We have a 40 games split into various categories.

afbx1

Adventure
Adventure II, a sequel to Adventure that is built on its original assembly-based game code
Haunted House
Return To Haunted House, a sequel to Haunted House that is built on the original Adventure’s assembly-based game code combined with graphics from the original Haunted House)
Secret Quest
Wizard (unreleased prototype)

Arcade Asteroids (hack)
Arcade Pong (exclusive to the Flashback 2), a version of Pong which can use paddle controllers if attached
Asteroids Deluxe (exclusive)
Battlezone
Centipede
Lunar Lander (exclusive)
Millipede
Missile Command
Space Duel (exclusive)

3D Tic-Tac-Toe
Aquaventure (unreleased prototype)
Atari Climber (homebrew), released in 2004 as Climber 5
Combat
Combat 2 (unreleased prototype)
Dodge ‘Em
Fatal Run (only released in Europe)
Frog Pond (unreleased prototype)
Hangman
Human Cannonball
Maze Craze
Off The Wall
Outlaw
Pitfall! (originally released by Activision)
Radar Lock
River Raid (originally released by Activision)
Save Mary (unreleased prototype)
Video Checkers
Video Chess
.
Caverns Of Mars (exclusive)
Quadrun (originally sold only by mail order through the Atari fan club)
Saboteur (unreleased prototype)
Space War
Yars’ Return (exclusive sequel to Yars’ Revenge built on its original assembly-based game code)
Yars’ Revenge
.
There are also two hidden paddle games included
.
Super Breakout
Warloads
.
Overall this is a pretty good sampling of 2600 titles in my opinion and the list contains some classics like Yar’s Revenge, Missile Command and Pitfall!. The really nice thing though is the inclusion of a few homebrews, unreleased prototype games and even a EU exclusive. Some of the prototypes such as Aquaventure are excellent 2600 games.
Once you pick a category you just scroll down and choose a game.
.
afb12

.

One thing is there’s no way that I found to exit a game back to the select menu without powering the system off and then back on again.

It’s worth mentioning at this point that in 2010 a Atari Flashback 2+ was released that was mostly the same console with some games changed around. Pitfall!, River Raid, Wizard, Caverns of Mars and Atari Climber were removed and in their place a sports section was added with several 2600 Sports titles. Circus Atari was also added to the hidden paddle game menu. In my opinion the sports games aren’t worth it for the loss of some classics like Pitfall! but if your unlike me and into Atari sports titles the 2+ may be worth the tradeoff.

So lets take a look at the inside of the Flashback 2. Opening the console up is a simple matter of removing a few screws on the underside of the case.

afb7

As you can see in the image above the majority of the case is just and empty shell. Its really pretty amazing how small the motherboard has been refined to.

afb8

afb9

This slideshow requires JavaScript.

Now as this is more or less a revision of the original hardware there is a modification available for the Flashback 2 that allows a cartridge slot to be added allowing the user to play actual 2600 carts. Originally the cart slot was going to be built in but was cut as a supposed cost savings measure. If your interested here is a link to a very good guide on performing the modification

http://portablesofdoom.org/?p=244

I have read that due to some changes with the revised motherboard not all games will work with the cart port so your not exactly getting complete 100% compatibility.

So what is my opinion of the Atari Flashback 2? I don’t think it’s necessarily a good replacement for an original 2600. If your serious about getting into the 2600 library of games get an original model. They still aren’t very expansive and your assured full compatibility that you won’t quite get even with a Flashback with a cart mod. Also unless your good with soldering and electronics your likely going to have to pay someone to do the mod which is money that could be used to get a composite, S-video or better yet RGB mod done to an original 2600. If you do happen to find one cheap for under $20 though I would recommend picking one up. Not as a replacement for a original 2600 but for its collection of games you cant otherwise get such as the hacks, unreleased prototypes and Flashback 2 exclusives.

a10003

Amiga computers hold a place very dear to my heart. Growing up my family did not have an IBM PC or PC compatible until the mid to late 1990’s but what we did have was a Commodore C64 and my dads almighty Amiga 500. Today though we are going to talk about the worlds very first Amiga computer, the Amiga 1000.

The Amiga 1000 was released in 1985 and utilized a Motorola 68000 CPU running at 7.16mhz as well as 256kb of built in RAM (expandable to 8.5MB or possibly more with a CPU accelerator card) and a custom chipset known as the OCS (Original Chip Set) that consisted of special chips known as Agnus (display controller), Denise (graphics), Paula (sound) and Gary (system address decoader) for graphics and sound that blew away anything the IBM PC was capable of doing at the time. The highest Kickstart and workbench version (The name of the Amiga graphical operating system) the A1000 will run without upgrading is ver. 1.3 though the bulk of games were meant to run in this environment so it’s generally not much of an issue.

a10001

The A1000 is a fairly light and low profile desktop machine. It is the only Amiga to use the checkmark logo which you can see on the far upper left of the case. Under the logo and above the power LED my machine has a sticker for the “Insider one meg Ram” expansion which is a third party upgrade the previous owner added. Also on the left side of the case not seen above is a small power switch for turning the A1000 on and off. In the center is a RAM expansion module that can be used to expand the on board RAM but we’ll get to that in a moment. On the far right is a single double density 3 1/2 floppy drive. This is not a standard IBM type drive and uses a special Amiga disk format for 880k disks though a standard PC floppy drive can be modified to run in an Amiga. Also not seen in the image are two 9 pin joystick/mouse ports on the right side near the face of the machine. these are like the ports found on a Atari 2600 and support joysticks such as the Wico commander.

a1000side1

Also on this side is a plastic panel which can be removed to reveal an 86 pin expansion port. This port can be used with various side cart expansions that add things such as RAM, hard drives and SCSI controllers though these sidecars tend to be hard to find and expansive.

a1000side2

We should talk about the Amiga 1000 keyboard as well while were looking at the front since that space you see at the bottom of the machine is actually ment to be a keyboard port to park your keyboard under the Amiga when not in use.

a10004

The A1000 keyboard is actually rather fragile and as you may be able to see here mine is not in the best condition. Here’s also a tip, to restart the Amiga without powering on and off hold down the two “Amiga” keys marked “A” and the control button. The A1000 keyboard also uses a phone jack type cable to connect to the main computer.

a10005

Now lets take a look at the rear of the machine.

a10002

On the back we have a variety of ports. Will start with the ports on the far left. First we have the telephone style keyboard connector jack followed by a printer parallel port and then a port for connecting an external floppy drive followed by a RS-232 serial port that is labeled for modem use. Next we have two stereo RCA jacks for audio and an RGB port for connection to a RGB computer monitor.

The nice thing about the A1000 is besides the RGB port for a monitor is it also has an RF modulator port for connections to most TV’s and a composite RCA jack. The jack for the RF modulator is next to the RGB connector and requires a modulator box to be connected to it like this one.

a1000rfm

From this box one could then connect a coaxial cable. The downside is the box does awkwardly stick out of the back on the machine. Finally next to that is a composite RCA jack so you could hook your Amiga up to a TV for a better picture then RF provided the TV had the jack. Note the A1000 can output video simultaneously through RGB and composite and possibly RF. Under the A/V connectors there is a standard three pronged power jack.

While we are talking about video outputs I want to take a quick look at the monitor.

a100019

I’m using a Commodore 2002 monitor from 1987 which is fairly accurate to what would of been used with the A1000 at the time. Commodore had a habit of giving nearly identical models different names. I don’t believe this was the original model monitor that was sold early on with the A1000 but it’s close.

a100021

This monitor is capable of accepting both digital and analog RGB as well as composite and “sep” video which is basically a early form of S-video that uses two RCA jacks. The 2002 model conveniently has a pretty nice mono speaker built in.

Now remember that RAM expansion module I mentioned that inserts into the front of the machine. Lets take a look at that now. The A1000 comes stock with 256kb of RAM but can be fairly easily expanded to 512kb via adding a 256kb RAM module. Those modules were a very common upgrade and most Amiga games require 512kb RAM at minimum to run.

a100010

Here is the A1000 with the front RAM module removed and below is a better look at the module itself.

a100011Unopened module

a100012Opened module case with RAM board exposed

As I mentioned this upgrade is very recommended and chances are your A1000 quite possibly will already come with this upgrade installed.

Now it’s time to take a peak under the hood. To open the A1000 first remove the several screws on the underside then flip the Amiga back over and remove the top. One cool thing about the North American A1000 that to my knowledge is absent from all but perhaps the very earliest PAL A1000’s is the autographs of the Amiga team on the inside of the case.

a10008

Once open we’re greeted with a large metal shield that has a number of screws to remove.

a10009

Finally once the metal shielding is removed we can see the motherboard inside.

 a100013

Most of the board unfortunately is obscured by two daughterboard’s which I have outlined in red and blue in the image above.

1) This is the daughterboard outlined in red and is present in all North American models of the A1000. This is where the built in RAM is located. On later PAL revisions this memory was placed on the main motherboard removing the need for this daughterboard.

2) The second motherboard is a third party add on board that was installed when I purchased this machine. This is the Insider One-Meg RAM upgrade card. This is what the sticker on the front of the case was referring to.

a10007

As far as I know this was a not so common internal RAM upgrade that when paired with the 256kb on board and the 256kb from the front RAM expansion gives this Amiga a nice 1.5MB of RAM which should be more then enough for Amiga games of the time. I really like this upgrade since it is inside the actual case and leaves the side expansion slot available. This is not a simple upgrade and like many A1000 upgrades required some soldering to be done when it was installed. The Insider daughter board also sockets into the CPU socket so the CPU had to be repositioned into a socket located on the Insider daughterboard.

This slideshow requires JavaScript.

3) The CPU of the A1000 is a Motorola 68000 running at 7.16mhz on NTSC systems and a slightly slower 7.09mhz on PAL systems.

a100017

In my machine the 68000 has been reseated on the Insider one-meg daughterboard.

I honestly could go on and on about the Amiga but seeing as a wide array of information is already available I only wanted to do an overview. The Amiga 1000 is personally not my favorite model and is perhaps even my most disliked model for the expense and difficulty in performing any significant upgrades as well as the inconvenience of not having Kickstart in ROM. It is though the original model which will appeal to collectors and enthusiasts and it also looks really nice set up on a desk for use. If you need an Amiga and come across a 1000 for a good price don’t let my favoritism of later models dissuade you as in my opinion “Any Amiga is better then no Amiga”. It does have its little annoyances but even a stock model with a common upgrade to 512kb of RAM should be enough to play a large percentage of Amiga games. If your feeling adventurous as well an Amiga floppy emulator either internal or external should ease the burden of using Amiga floppy disks, though in my opinion an internal drive destroys the classic look of this machine and many others.

This slideshow requires JavaScript.

a1000g

2861

Continuing with my “anatomy of” series we’re going to take another step back today and jump back one more generation from my previous “anatomy of a 386” article and take a look at the often overlooked 286 based PC and examine what I feel is pretty close to the “ultimate 286” setup.

The 286 was first introduced in 1982 and was widely used in the mid to late 1980s and even into the early 90s. They came in speeds ranging from 4mhz to 25mhz with 20mhz and 25mhz chips being fairly uncommon. For a CPU that existed in such a transitional time for DOS computers it really doesn’t seem to get a lot of love from retro PC enthusiasts and retro PC gamers. I do have a few ideas of why this may be the case though. The first reason I believe has to do with game compatibility and CPU speed. The 286 simply doesn’t fall into a position where many speed sensitive games demand it. For instance there are a number of very early CGA games that demand a 4.77mhz 8088 CPU to run at the intended speed and even on the slowest 286 will simply run too fast. On the other end there are a few games such as Wing Commander and Bubble Ghost that really need a mid range 386 class CPU and on a standard mid range 286 will run a little too slow. I have run into a few instances where a 286 “felt right” speed wise such as Ultima III with the EGA/MIDI patch but these instances seem few and far between. Many later games also need a 386 to run for non speed related reasons so while a 386 will pretty much play everything one may play on a 286 the reverse is not true. I’m guessing most enthusiasts think “why limit myself” and for the most part their right.

The second reason I believe the 286 is passed over is that finding hardware for a 386 is just so much easier and it will still run most games that run on a 286 plus later VGA games just fine. I wouldn’t call the 286 rare but in all my thrifting and buying old PCs as far as x86 machines go I probably see the 286 the least. Even less than early CPU setups like the 8088 and 8086. The hardware is also a bit less user friendly than a 386 setup which could also be a contributing factor.

Now that doesn’t mean the 286 doesn’t have its place or is useless for retro PC gaming. It makes a fun project and it’s nice to sort of see the transition going on from the 8088 to more modern style boards such as with the introduction of 30 pin RAM on motherboards as well as the common ability to address more than 640KB on the board and things like 16 bit ISA slots which appeared on 286 boards. The 286 is also perfect for playing most EGA games and demanding CGA games that may chug a little on a bog standard 8088. a more powerful 286 such as the 16mhz and up with 4MB of RAM are also very capable of playing VGA titles from the late ’80s and early ’90s and you may be surprised how well it can play them especially provided there isn’t a lot of movement going on screen, point and click adventure games run well most of the time. the common 286-16 as well as the uncommon and border line rare 20mhz and 25mhz 286 CPUs generally outperformed early 386SX CPUs.

and now without further delay here’s my 286.

2862

To be perfectly honest I didn’t have to do much to this machine when I acquired it besides adding some bells and whistles such as a VGA card and sound card. The case is that classic beige tower from the late 80s with the large power switch as opposed to a button as well as extra large buttons for reset and turbo options and a nice green LED speed display. The turbo button slows the speed down to 10mhz though this is still too fast for some early speed sensitive games. The floppy drives I have installed are both high density drives and are a 1.44mb 3 1/2 floppy and a 1.2mb 5 1/4 inch floppy drive. In the case of a 286 I feel the 1.2MB drive is a little more important than in other machines since many games were released in that disk format during the 286 era. Obviously, many of those games were also released on 1.44MB floppy and later CD but if your collecting and playing games from this era you’ll find that many picked up randomly “in the wild” will come on 5 1/4 disk. A CD drive is also very useful for a 286 since as stated earlier many games were re-released on CD format thus having a CD drive makes things much more convenient. It is not though a necessity and you can certainly get by on a 286 without one. I’m using a slow and early x4 drive but later ones should work just fine.

Those eagled eyed readers may also notice the faux 3 1/2 floppy panel below the real disk drive. These weren’t uncommon back in the day. I’m not sure what the point of them was though except maybe to fool your buddies into thinking you had a slightly more impressive setup.

2863

Here’s the back of my 286. As you can see it’s pretty much the same as a 386 and 486 would commonly look. A generous number of slots for possible expansions and an AT keyboard port as well as a standard AT power supply.

2865

Here is a rather jumbled image of the machine with the cover removed and all the expansion cards installed.

A) Hard drive – I went with a 2GB 50 pin SCSI hard drive for this machine. They are a little less common than IDE drives but SCSI lets me make larger partitions, is a little faster in theory and takes a tiny bit of load off of the CPU which helps at these lower speeds.

B) SCSI controller – I went with a 16-bit ISA Adaptec controller for the SCSI. This card is a pretty simple Adaptec AHA-1540. My card lacks a floppy controller but simply sports a 50-pin internal connector and an external connector. I didn’t have any issues with this card and it detected my hard drive first try.

28613

Operating System – I have MS-DOS 5.0 installed on my system. 6.22 should work just fine but I wanted to use a little earlier of an OS to be a bit more era accurate and I didn’t want to go all the way back to DOS 3 or use the generally disliked DOS 4.

Here we have the motherboard with the expansion cards removed.

2866

M-209-1

286m

Motherboard – The board I’m using is an Ilon USA, Inc M-209. This is a rather late 286 motherboard so it supports quite a few features and CPU speeds earlier boards in general do not.

1) CPU – The most common of the 286 CPUs were the mid to mid-high range 12mhz and 16mhz 286s. These are the two most commonly used and all and all are not bad performers. I actually wanted a 16mhz 286 when I considered this project but as fate had it I ended up finding a great deal on my 20mhz 286 system that I couldn’t pass up. The CPU I’m currently using is made by Harris who also produced the 25mhz 286 which was the fastest 286 produced. The Harris 20mhz and 25mhz CPUs were fairly rare and are sought after today by those that do want to forge ahead and build a high end 286. I strongly suspect my 286 board with its 20mhz Harris CPU could outperform a similarly clocked 386SX chip.

2867

2) FPU – Like the 386 the 286 could utilize a separate 287 math coprocessor to speed up the calculation of more complex math calculations. I was lucky that my motherboard came with a FPU rated for the same speed as my CPU at 20mhz. Like on the 386 the FPU chip isn’t really all that much help for games and besides programs like CAD very few games were programmed to utilize the co-pro.

2868

I eventually replaced this FPU with an Intel 287XL which is a cut down 387 FPU made to work in a 287 socket. After running some benchmarks I found the 287XL had noticeably better performance.

3) RAM – RAM on many 286 boards can be interesting as there was a bit of a transition going on and it wasn’t uncommon to find several types of RAM being implemented on 286 boards. This is similar to later 486 motherboards where sometimes sockets for both 30 pin and 72 pin RAM could be found. The 286 itself could address up to 16MB or RAM but I’ve never seen a 286 motherboard supporting more than 4MB onboard. Currently, I have 4MB installed via four 1MB SIPP RAM sticks.

2869

My motherboard supports up to 4MB onboard and can accept either DIP or SIPP RAM. DIP RAM are chips just like the ones used on 8088 boards for memory while SIPP RAM was a short lived style of RAM that used legs as seen below.

28611

28610

4) Nic-cad barrel style CMOS battery and AT power connector.

5) Six 16-bit ISA slots and one 8-bit ISA slot – One of the great things about a 286 motherboard is that 16-bit ISA slots were now standard which opens up a huge variety of options for expansion. Since 16-bit ISA slots continued to be used on motherboards all the way up to the early 2000’s cards are very plentiful and relatively cheap compared to 8-bit ISA cards.

I/O – For my I/O controller I used a simple 16-bit ISA Goldstar controller card. I really like Goldstar cards as they always tend to just work for me. This card supports adding a serial and parallel port as well as two high density floppy drives and two IDE devices such as my CD-ROM drive.

28612

Video – For my video card I went with an ATI VGA Wonder XL24 card. The VGA wonder cards were well-regarded VGA cards throughout the ’80s and very early 90’s. While not as fast overall as cards like the Tseng ET4000 they had a few features which I felt lent themselves more to a 286 class machine. The VGA Wonder XL24 card that I’m using is the last and most powerful Wonder card in the series. Released in 1992 this card is a 8/16 bit VGA card that offers 1MB max of RAM and improvements in speed and bug fixes over earlier cards in the series. The card offers one BUS mouse port which was a type of mouse connector similar to but not compatible with the PS/2 standard as well as two monitor ports. The thing I really like about these cards is that they have both a 15-pin monitor port for VGA as well as a 9-pin port for TTL CGA.  The card also could auto detect the type of monitor connected rather than requiring the use of dip switches to tell the card what it’s displaying. I find this feature very handy for a system like a 286 where you may want to be using a VGA or CGA monitor depending on what you’re playing. Although the VGA wonder XL24 claims to offer 100% CGA compatibility this may not be completely true. Despite this the compatibility with CGA is quite high and having the ability to use a true CGA monitor is always a great option with a 286 where you are likely to be playing a lot of CGA games as well as later EGA and even VGA games. The ability to use both types of monitors and a boast of very high compatibility is definitely a plus.

28615

Sound – Lastly we come to sound. I chose to use the 8-bit sound blaster 2.0 card with the CMS sound compatibility chips installed. The sound blaster 2.0 is fully adlib compatible and offers superior quality compared to the earlier sound blasters. The main draw of this card though was the option to add chips for CMS compatibility or “Creative Music System”. This was an earlier standard used by Creative in their first “Game Blaster” cards and some earlier games use this. The CMS compatibility on the SB2.0 with the added chips isn’t quite 100% but it is close. At one time finding the third PAL chip needed for CMS compatibility was very hard but thankfully someone figured out how to reverse engineer the chip and made it available for most revisions of the SB 2.0 card such as the 049151 revision I am using. If you do have a card with the CMS chips installed remember to remove jumper jp9 as circled in the image below to enable them.

Add the line

SET BLASTER=A220 I7 D1 T3

to your Autoexec.bat file to initialize.

28614

Before I wrap this article up I just wanted to post a few images of another motherboard I have. This one is a later 286-16 board.

28616

This slideshow requires JavaScript.

Notice That this board uses standard 30 pin sockets for RAM.

2864

My 286 when I originally acquired it complete with monochrome amber screen monitor.

So what’s my opinion of the 286 and do you need one as a retro PC gamer/enthusiast? The short answer is no. Personally, I enjoy the 286 for its somewhat uniqueness but I can understand why it is usually overlooked. As I stated at the beginning of the article it’s just too fast for the earliest CGA games and as for anything later it can’t really do anything a 386 cant do better. Also compared to a 386 the 286 is harder to find parts for and is generally less capable. If your short on space Id say pass on building a 286 but if you have space, cash and time to spare they can be fun little machines that bridge the small gap between the somewhat archaic 8088 and the somewhat modern feeling 386.

mdd2

In my previous article I talked about the Macintosh G4 and specifically the “Digital Audio” model. This time I’m going to talk about another G4 Mac sometimes referred to as a DRR G4 but more commonly known as the MDD or Mirror Drive Door model. Looking at the images above and below it becomes fairly obvious how these machines got their nicknames.

mdd1

The case overall is basically the same as the Digital Audio versions case and in fact all the G4 tower PC’s are similar with exception of the face and back. The case color scheme is more silver this time around as well as the cases area of the two drive bays has a mirror like plating, hence the name. This is actually quite reflective and I guess is useful to see if your being snuck up on while browsing on OS X or as a impromptu weapon against Medusa attacks. Also on this mirror finish section we have the power button at the top which glows a nice white when powered on as well as a welcomed frontal audio jack for headphones. The speaker is now placed at the very top with four decorative vent looking recesses at the bottom. Missing are the reset button and programmers button found on the Digital Audio and earlier G4 tower cases.

mdd3

The rear of the MDD is the opposite layout of the earlier Digital Audio case. This time the expansion bays are at the top while the various ports and jacks are near the bottom.

mdd4

The available ports are exactly the same but in a different orientation. Two USB 1.1 and two Firewire 400 jacks followed by Ethernet and modem jacks and finally an audio output jack and a jack for those Apple high definition speakers. The only addition is an audio input jack next to the audio out.

mdd5

Opening the case is the same as before and super easy with a side handle that pulls up and away.

mdd6

Inside it’s basically a reverse layout of what we saw in the Digital Audio machine.

mdd9

On the section of the case that does not fold out we have two full 5 1/4 drive bays for optical drives as well as a fan and three spots for hard drive mounting. Two 3 1/2 inch HDD bays under the 5 1/4 inch bays and one vertical oriented 3 1/2 inch HDD bay to the left under the power supply. I have two hard drives currently installed. One 80GB drive that holds Mac OS X 10.5.8 and a second 180GB drive for data.

mdd7

Like other G4 motherboards the MDD motherboard has quite a few chips soldered on underneath making the board look slightly bare from the top.

1) CPU – The MDD model G4s came with many CPU options up to dual 1.42ghz G4 PowerPC 7455 chips. Mine was the lowest powered model and came with dual 867mhz chips with a 133mhz front side bus. Note that many models in the MDD line came with dual CPUs on a sort of CPU module. As I said previously in articles its hard to compare the power PC to the far more common Intel X86 CPU’s in speed but this would roughly be equivalent to a Pentium 4 or maybe a 1.4ghz Tualatin PIII but this is only a rough guess.

mdd8

mdd16

2) RAM – four slots supporting up to 2GB of DDR RAM which is also why this model is also sometimes referred as the DDR G4. Unfortunately the Power PC 7455 can only use at most 50% of the DRR RAM bandwidth meaning there is no improvement over the previous models and their PC133 SDRAM as far as memory speed is concerned.

3) Four 64 bit PCI slots (which work fine with regular PCI cards) as well as one x4 AGP slot for video. Keep in mind that if your using a x8 AGP card whether a MAC card or a PC card that has been flashed with a mac BIOS you need to disable pins 3 & 11 to get video. This applies to all G4 Mac’s with the exception of the AGP 2x Sawtooth models. This issue is due to apple using the at the time unassigned pins 3 & 11 for the “ADC” apple monitors connection. When AGP x8 came out those pins were suddenly used for something else so basically they wouldn’t run on a G4 Macintosh. The way around this is to disable the pins completely either by taping over them or cutting the traces making the card AGP x4.

mdd10

The card I’m using in this machine is a Geforce4 MX. Not a particularly interesting card but it more or less does the job. The MX was a budget card and less advanced then even the preceding Geforce3. For me it’s enough since I really only use this machine for one game and messing with OS X but the MDD G4 can support up to a Geforce 7800 GS with the earlier mentioned Pin modification.

4) Wireless airport adaptor for wireless internet

5) IDE connectors – There are actually three IDE connectors but one is obscured behind the huge CPU heatsink. The one located behind the heatsink is an ATA-100 connection intended for your primary hard drive.

macmddex2

The two connectors located at “5” are an ATA-66 connector for two secondary hard drives and a ATA-33 that is intended for the optical drives.

macmddex1

Regardless I have a separate Sonnet ATA-133 PCI controller card installed in my machine for the optical drive and main hard drive while my secondary hard drive is attached to the ATA-66 labeled connector.

mdd11

6) CMOS battery used for saving settings.

Upgrading the CPU

I decided to upgrade the CPU in my MDD Mac since the CPU it came with was barely what I needed to do what I wanted to do with this machine. Third party CPU upgrade kits seemed to be overpriced so in the end I decided to go with a cheap $25 upgrade to a single 1.25ghz CPU. Now the value of this upgrade is somewhat debatable since I was going from a dual CPU configuration to a single CPU and OS X can take advantage of dual CPUs but my main purpose of this rig was to play a few select games which didn’t really take advantage of dual CPU anyways so I figured the 383mhz bump was worth it.

When considering a CPU upgrade for any G4 Macintosh keep in mind the CPU modules are not compatible across models so make sure the CPU your looking at is specifically for your model, for instance for a MDD model or Sawtooth G4.

I also wanted to (and needed to with this CPU upgrade) bump the front side bus speed up from 133mhz to 167mhz which required a small modification to the motherboard.

First disconnect any cables from the motherboard and then remove the currently installed CPU which can be done by unscrewing the various screws holding the heatsink on and then gently disconnecting the CPU module from the motherboard. It will look like this with the module removed.

mdd12

next unscrew any screws fastening the motherboard to the case and remove. The modification we need to do to enable 167mhz FSB is the desoldering and removal of a resistor on the underside of the motherboard.

mdd13

The piece we need to desolder is labeled as R676 and is located near one of the corners of the large black heatsink.

mdd14

Desolder this component and that’s it. You can now install a faster CPU and have a slightly higher FSB.

mdd15

The final step is to reassemble and install the new CPU. Here is my 1.25ghz G4 CPU module before installation and reapplying the heatsink.

mdd17

And lastly booting the machine and checking the system information to confirm everything.

mdd18

I like the MDD G4 Macintosh. It’s super easy to work on and plays the few early 2000 OS X exclusive games I need it to play just fine. It does have its issues though. It’s a shame there was no real improvement with the DDR RAM being used over the older PC133 SDRAM. Also upgrading the CPU if you have an early model like mine can be a small chore requiring a modification not to mention the modification needed to use a more powerful AGP video card. Another problem is the fan. This machine can be pretty loud and I noticed it is significantly louder then my Digital Audio model G4. For me the fan isn’t to loud and doesn’t come anywhere near the noisiness of my dual Tualatin rig but I can see how it can annoy some people and the noise level did seem to be a common complaint when I was doing research on the model. I would still recommend a MDD model though if you just wanted to casually mess around with those few early 2000’s OS X games and you can pick up a rig cheaply.

g4d14

The G4 Macintosh was produced between 1999 and 2004 in three main distinctive variations known sometimes as the “original G4’s” or “Sawtooth” models, the “Quicksilver” G4’s and the “Mirror Drive Door” or MDD G4’s. Even among these there were motherboard variations. For instance early models of the “original” line lacked an AGP slot. The G4 I’m going to talk about today is a sub model known as the “Digital Audio” G4 and falls somewhere between the original line and the Quicksilver models. Basically It has the motherboard of an early Quicksilver model in the case of the original line.

To be honest I’ve grown kind of fond of the G4 towers over time. They tend to strike a sort of balance between the good things about apple such as design and the Power PC CPU and a IBM compatible such as expandability and more standard ports and drives.

g4d1

The case design for all the G4’s is more or less the same basic design with most of the variations concerning the color and style of the frontal bays. The digital audio G4 uses the same case as the Sawtooth line and is a pleasant white/bluish color. There are also these handle looking things that are on every corner which in all honestly are nice for assisting lifting and moving the relatively heavy tower. On the front we have two 5 1/4 bays.

g4d9

Internal shot of the two bays.

one usually sports a DVD/CD drive as mine does and the other sometimes a 100mb ZIP drive depending on your model. Mine obviously lacks the ZIP drive but one can be added easily enough.

Also on the front we have a grill for the built in speaker as well as a power button that glows a nice white when powered on as well as a programmers button and a reset button beneath that. The programmers button can be used to bring up a console window for debugging and can also be used to update firmware.

g4d2

Under the fan slot we have a standard power jack and to the left we have our built in ports. At the top we have a modem jack and two audio ports. The top jack is a standard headphone jack and below that is an apple speaker mini-jack for high fidelity apple speakers. Further down we have a Ethernet port followed by two Firewire 400 ports and a pair of USB 1.1 ports. Below that we have five slots for internal expansion cards. The top one is taken up by my video card since the G4 machintosh’s do not have built in video. further down I added a Firewire/USB card for more connectivity.

g4d5

Unlike many of the earlier Mac’s I’ve reviewed here the G4 uses a seemingly higher quality plastic and a lot more metal so the case feels much more sturdy and less prone to “brittletosh” issues. Opening the case is getting inside is ridiculously easy and may be the easiest time I’ve ever had getting into any PC or Mac. All you do is lift the handle on the side of the case and….

g4d6

Once open you have almost full and unimpeded access to the board. At first I thought the motherboard seemed very barren and unpopulated but many of the chips and capacitors are actually mounted on the underside of the board. There are also three spots on the bottom of the case for mounting hard drives. Currently I only have one lowly 40GB IDE drive mounted.

g4d8

On to the motherboard.

g4dmb

1) CPU – The Digital Audio G4’s came with a variety of CPU speed options starting at 466mhz. Mine is the highest end model sporting a 733mhz PowerPC 7450 processor sometimes refered to as a G4e (enhanced) as it is a redesigned and improved version of the G4 CPU. Its very hard to find CPU comparisons between PPC and Intel x86 CPU’s on the web but I would wager its perhaps equivalent to a faster Pentium III. This motherboard is running on a 133mhz front side bus.

g4d10

2) CMOS battery – Is the standard 3.6 V lithium battery to save settings. Like all Macs the death of these batteries tend to cause more issues then what I see happen in PC’s. If your having odd instabilities replace these things first.

3) RAM – Three slots for SDRAM supporting up to 1.5gb of PC133 RAM

4) Expansion slots – four 64 bit 33mhz PCI slots and one AGP x4 slot for a video card.

Video – The Digital Audio G4’s came with one of several video cards. Mine came with an AGP ATI Rage 128 Pro with 16 MB VRAM. Keep in mind that if your using a x8 AGP card whether a MAC card or a PC card that has been flashed with a mac BIOS you need to disable pins 3 & 11 to get video. This applies to all G4 Mac’s with the exception of the AGP 2x Sawtooth models. This issue is due to apple using the at the time unassigned pins for “ADC” apple monitors connection. When AGP x8 came out those pins were suddenly used for something else so basically they wouldn’t run on a G4 Macintosh. The way around this is to disable the pins completely either by taping over them or cutting the traces making the card a AGP x4.

g4d11

This card is a Macintosh version so it comes with both a VGA port and an Apple Display Connector port. Its not really the most exciting card but it does well enough for 90’s games and some early 2000’s games. Your going to want to upgrade though for any series turn of the century gaming though. Officially the Digital Audio models were sold with up to Geforce 2 or 3 cards installed (some conflicting information).

5) Wireless airport card connector for well….connecting to wireless devices.

6) IDE connectors – Two ATA-66 connectors for connecting a total of four IDE devices. In my setup I have my DVD drive connected to the onboard ata66 connector but I’m using an ATA100 PCI card to connect to the hard drive.

g4d13

7) ATX power connector.

I haven’t really done much to this machine since I got it. I’m currently running OS X 10.4.11 which is the highest officially supported version of the OS.

This slideshow requires JavaScript.

For comparison I also have a standard Macintosh Quicksiver G4. For all intents and purposes the Quicksiver is basicly identical to the Digital Audio except for the case and improved specs stock such as faster CPU and graphics cards.

quick1

I rather like the look of the front speaker without the grill.

quick2

On the read we have the same connections though my Quicksilver here lacks the modem. Finally a look at the motherboard which looks a little diffrent as far as some smaller compoents but has the same amount and placement of major compoents such as expansion slots.

quick3

I haven’t used this particular Mac much because I have a more powerful MDD G4 that I will eventually cover here that I use for present general early OS X stuff. That said I do like the Digital Audio G4. most of all I like the color scheme and ability to easily add a ZIP drive, even though I currently haven’t and probably will not.


The Turbografx-16, a personal console favorite of mine has seen a recent resurgence of mass popularity as well as a ridicules and dramatic increase in the value of its games. This in turn has also lead to a renewed interest in importing from its Japanese version the PC Engine. Turbografx and PC Engine games came in two basic flavors, Hucard and CD. Hucards acted as standard carts but looked more like credit cards with game data on ROMS while CD games came on…well…CD ROM’s. You also had several options for acquiring a CD attachment but it seems the most popular and one of the more expensive is the “all-in-one” units known as the Turbo Duo in North America. Japan saw three versions of this all-in-one system called the PCE Duo, Duo-R and Duo-RX. I’m not going to go over all the various versions of consoles for the PCE family but I do want to show an import unit I acquired that seems to be at once very common in Japan but in my experience not a method many importers seem to take. this option would be the IFU-30 unit or the “briefcase” setup as its known. Keep in mind the CD units for both Japanese and American consoles are region free so you can play CD games from any region on any machine with the correct RAM card (I won’t go into that in this article) but also keep in mind the Hucards ARE NOT and you will require a region mod, adaptor or Everdrive to play US card games on a Japanese Hucard based console.

20160412_140618

pceb2

The IFU-30 unit is basically an interface that allowed buyers of a PC Engine, Core Grafx or Core Grafx II to add a CD-ROM unit. the IFU-30 interface could be bought as a stand alone or in packages that included the CD-ROM add-on. It was sometimes referred to as “the briefcase unit” because it came with a protective cover as well as a built in carrying handle for easy transport to perhaps a friends house for some gaming. Remember this was before the internet and online gaming when you both had to actually be physically in the room to play a game together.

pceb1

There are two bays in the IFU-30, one for your Hucard system (PC Engine ect..) and the other for the CD add-on. one really nice thing about the IFU-30 is it added composite and stereo A/V options for the PC Engine which alone only could output RF. I have a later Core Grafx attached to my IFU-30 which could output composite but it is a really nice touch for those that had an original PC Engine. Another nice thing is you only need one power supply that attached to the IFU to power both the Hucard system and the CD-ROM unit so you don’t have to worry about multiple power supplies. This also is the case with the all in one turbo duo but I wanted to point it out since systems like the Sega CD which also add a CD to a main cart based console require an extra power supply.

pceb3

The IFU can also be modded to allow the output of S-video, Component and RGB and in turn allow any system attached to it to also output these signals. I had mine modified to output RGB which looks absolutely stunning on a PVM monitor.

pceb4

In my opinion there are a couple benefits to the “briefcase” route over importing an all-in-one system like a duo-R or such.

  1. Initial cost – unlike a duo system you don’t have to pay the full price up front which can be about $300 for such systems give or take. With a “briefcase” setup you can take your time and buy the three individual parts over time and look for deals on each separate piece. PC Engines and Core Grafx can be found for fairly cheap if your patient and frequent classic game forums and sometimes can be had for under $50. Once you have one of these you can wet your teeth on import Hucard games and pick up an IFU-30 and CD-ROM attachment (both of which individually tend to be under $100 at the writing of this article) at your leisure and as your budget allows
  2. Repairs and break downs – with something like the duo if either the CD drive or card slot (or both) stop functioning and you cannot make repairs yourself you need to send the entire unit off to be fixed. Compare this with the IFU-30 based setup where you can simply detach the defective part and either easily and comparatively cheaply replace it or send it off for repair for cheaper. If your CD unit breaks which is more likely then the card slot you can simply detach the CD unit to ship for repair while still enjoying your Hucard based games. A catastrophic failure of a duo motherboard leads to the possible death of an entire expensive console while if the IFU-30 becomes unrepairable it can be replaced sub $100.

.

I’m not entirely sure why the IFU-30 route seems to be less popular among importers despite its potential benefits. There is a “cool” factor with the “all-in-one” duo machines of which I do own two but on the flip side there’s also a something really neat and unique about an IFU-30 based setup. If you think you may be interested in importing don’t count this setup out.

pceb5

In some of my earliest articles I covered a few iterations of the popular Tandy 1000 line. The Tandy 1000A as well as the Tandy 1000HD and the compact Tandy 1000 EX and HX but now I’m going to shift to the end of the true Tandy 1000 line and talk about the Tandy 1000RL-HD the last of the 1000 line to be truly PCjr compatible.

trl1

As you can tell right away the 1000RL is a slim-line design and the machine is surprisingly light. You have a power button to the far right with a 720kb 3 1/2 floppy drive seated next to it. There is another bay for a second floppy drive but I don’t think a dual floppy RL version was ever sold, though I could be wrong. My model is the hard drive version which is slightly upgraded from the regular RL. You can tell easily which version your getting via the faceplate.

Both the RL and RL-HD come with a 8 bit IDE interface on the motherboard for a hard drive. This is the same style interface as found on machines like the Commodore Colt and in all honesty is not terribly useful. The drives are fairly uncommon and less then 40MB in size. My machine came with the original 20MB Seagate ST325X drive. The drive is very loud powering up and can be unreliable.

trl2

The HD version of the RL besides sporting a hard drive stock also has a battery-backed real time clock chip on the motherboard which the regular RL lacks.

The rear of the machine has two levels of ports.

trl3

trl4

On the far left we have a standard power port for a three prong power cord. Starting on the top left we have a serial port followed by two Tandy 1000 joystick ports, a stereo audio jack for speakers or headphones and a mic jack. Lastly on the top level we have a volume knob for the pc speaker which is a very nice addition. I think the knob would of been better placed on the front of the machine somewhere but its inclusion anywhere is always welcomed.

On the bottom row starting from the left we have a standard CGA port which will output CGA and of course Tandy Color Graphics or TGA as well as monochrome. The 25 pin printer port looks standard but unfortunately it supports no input so its basically a printer only port. Finally we have two ps/2 style ports. Now I say style because of the keyboard port. The mouse port is basically a ps/2 port and depending on the driver used you can get many ps/2 mice to work just fine. I was able to get a more modern ps/2 laser mouse working fine with Cutemouse drivers. The keyboard port though is not quite standard even though physically speaking it is ps/2 compatible. This machine requires an XT keyboard with a ps/2 style connector like the Tandy Enhanced Keyboard that came with this machine.

trl14

Otherwise you would need to find a XT keyboard and use an adaptor of some sort.

There is only one 8 bit ISA expansion port available on the rear of the machine making expansion very limited. On the question of adding video or sound cards, you may also of noticed the 1000RL lacks a composite port that was present on earlier Tandy 1000’s. Adding a CGA card with a composite out could be an answer to this issue though. On the sound card front keep in mind that using a Sound Blaster 1.0 or 2.0 may cause freezing under certain circumstances due to conflicts with devices using DMA 1.

The best option in my opinion for the expansion slot would be some kind of 8 bit IDE hard drive controller.

The case is relatively easy to remove and only requires the unscrewing of two screws.

trl8

The motherboard for the 1000RL is very compact. It’s basically a laptop sized board in a desktop case. This machine also has Tandy Deskmate and DOS 3.3 built into ROM so a hard drive is not needed to boot up and then access a floppy disk which is very nice.

Video – The video on the Tandy 1000RL uses an enhanced version of TGA known as ETGA which has all the old modes of the TGA plus a 640×200 with 16 color mode

trl5

1) Pc Speaker


2) riser card – this card contains the rear joystick ports, serial port and audio jacks as well as the volume knob. It is connected to the main board via a connector. The chip directly in front of the riser is I believe the PSSJ chip which controls the audio and ports on the riser.


trl6


3) CPU – the 1000RL CPU is an AMD 8086 running at 9.56mhz though there is an option in BIOS to set the speed to 4.77mhz or by typing “MODE SLOW” in Tandy DOS and “MODE FAST” to return to 9.56mhz. As I’ve mentioned before the 8086 in most circumstances performs faster then the 8088 at equivalent speed so some old game MAY have issues. This speed can be a benefit though for some games such as Digger that may run a little to slow on something like the PCjr. The CPU though is soldered onto the motherboard and not socketed thus it is impossible to replace it with a NEC V30 for more speed.


trl9


There is also no socket on the motherboard for a 8087 math co-pro but since hardly any games take advantage of one this isn’t much of an issue.


4) RAM – The standard RAM on the RL is 512kb but this can be expanded to 768kb (640 DOS, 128kb for video) via two 256k x 4 DRAM chips.
trl10


5) The regular 1000RL has a socket for an added real time clock but the RL-HD has one built into the motherboard using an easy to replace lithium coin battery.


6) One 8-bit ISA slot.
trl7


7) IDE-XT Interface – Both the RL and RL-HD have a IDE-XT 8-bit interface built into the motherboard. This interface only works with a small number of hard drives all being under 40MB.


8) Floppy Interface – The non standard floppy interface is typical of Tandy and supplies the power via the floppy cable to the drive.


9) PSU


This slideshow requires JavaScript.

The Tandy 1000RL-HD has its problems. The built in HD interface was a dead end and there are some minor game incompatibilities but overall it makes a good Tandy machine. It supports TGA graphics as well as 3 channel audio sound and has a slow enough CPU to play most of the games that support those options just fine. Its also extremely light and small taking up little desk space. The fanless design means without a hard drive or when using a CF as a hard drive the machine is dead quiet and invites very little internal dust. The fact that DOS and Deskmate are present in ROM also alleviates some issues such as always needing a DOS boot disk handy to get into the system. They seem to be fairly common and reliable models so if you can find one for a low price its a no brainer to pick it up.

trl15

When I frequent Goodwill’s and other thrift type second hand shops I always make a point of going through the huge stacks of old VCR and DVD players that are usually present. I do this because I’m usually on the lookout for Laserdisc or Beta players as well as the odd video game console that looks like a VCR or DVD player such as certain models of the CD-i or the Laseractive player. In these searches I often come across “combo players” or machines that can play both VHS tapes and DVD discs. These combo machines make sense as when people were transitioning over to DVD they still had large VHS collections they may of wanted to still hold onto for some time, especially since in the early days of DVD many films had not made the jump to the digital disc.

On one of my thrifting outings not to long ago I can across one of these combo machines and I had almost past it up when I had to take a second glance to confirm what I saw.

brc1

Yes, that’s right. A Blu-ray/VHS combo deck. I was immediately intrigued. After all Blu-ray came out long after the general death of VHS. The second label on the player also grabbed my attention and made me finally give in and pay the $20 some dollars on the price tag.

brc3

That’s right, VHS tapes upconverted to 1080p over HDMI, I had no idea. See back in the 1980’s and 90’s the in heydays of VHS the best video output you could hope for for your VHS tapes was s-video and this was usually only available on rather high end players. Even in Europe where RGB was an accepted standard VCR players only outputted composite and s-video over SCART.

There were tape decks with component but these were very rare and reserved only for editing and broadcast commercial uses and I suspect never sold on a commercial market. I only ever saw one of these players and it was a forum sale over at the Neo Geo forums. Later VHS/DVD combo players sported component outputs for video but these only worked when playing a DVD disc so even with these players you were still limited to s-video at best.

That’s a major reason this player really interested me. The player in question is the Panasonic DMP-BD70V which seems to of been released some time in 2009.

brc2

On the back we have both HDMI and component for video output with only the HDMI being capable of displaying 1080p.

There are a few drawbacks. First off is the machines inability to record via either optical disc or VHS cassette. second is the DMP-BD70V does not support S-VHS in its native resolution but WILL still play and upconvert them. You also really want a remote control if you pick one of these machines up as the buttons on the face of the player are pretty sparse and there is no way to rewind, fast forward or move a cursor in a DVD/Blu-ray menu without one. This player also had some initial freezing issues with Blu-rays but a firmware updated solved many of these problems.

So how does it look? Pretty nice in my opinion. it obviously isn’t going to make 20+ year old VHS tapes you bought in a cardboard box for 50 cents a piece look like a brand new HD Blu-ray release but it does produce a very nice image. I would even say if you have a nice TV and a well maintained VHS tape you can achieve almost DVD like quality.

I did take a few direct captures for comparison.  The VHS player I ran the Panasonic up against is the Toshiba model W-804. This is a later model S-VHS player that supports s-video out as well as being a six head player as opposed to the more common four head.

brc4

Toshiba W-804 frontbrc5Toshiba W-804 rear

I took these captures via an Elgato capture device. The captures from the VHS player are all via s-video and the captures from the combo player are via component. Unfortunately I could not capture 1080p via HDMI because of HDCP and I currently have no means of stripping this protection. The first images in the comparisons are from the VHS player and are marked by the white track numbers.

My Great Capture Screenshot 2016-03-18 11-29-12My Great Capture Screenshot 2016-03-18 11-34-14

My Great Capture Screenshot 2016-03-18 11-29-20My Great Capture Screenshot 2016-03-18 11-34-25

My Great Capture Screenshot 2016-03-18 11-29-23My Great Capture Screenshot 2016-03-18 11-31-05

It may be hard to notice via the images or some of you may actually be preferring the VHS images. depending on your TV’s ability to upconvert the quality can be pretty close when the combo player is placed up against a high end VHS deck but the quality gap increases noticeably in the combo players favor when using lower end VHS decks. Overall I am happy I picked this player up. It’s nice to be able to play all of ones VHS, CD audio, DVD and Blu-ray media on one player and on one HDTV. That said it’s still a niche market machine and likely not very common so If you see one at a good price and need a jack of all trades player or your still holding onto a massive VHS collection grab it.

FDISKformat

A place for the pc collector

I ❤ Old Games!

Probabilmente il miglior blog bilingue al mondo*

Waltorious Writes About Games

Game-related ramblings.

NekoJonez's Gaming Blog

My Gaming Timeline

Evelynn Star

Lynn talks about video games, records and books ...

Retro Megabit

Sharing My Retro Video Game Collection.

133MHz's Junk Box

Random electronics and gaming crap

SNES A Day

Chronogaming project featuring reviews, screenshots, and videos of the entire Super Nintendo library in release order.

Retrocosm's Vintage Computing, Tech & Scale RC Blog

Random mutterings on retro computing, music, plus radio controlled scale modelling.

The PewPew Diaries.

Work(s) in Progress!

1001Up

1001 video games and beyond

retro computing and gaming plus a little more

sparcie

retro computers and stuff

jispylicious

Stay Jispy!