Today I’m going to be looking at a pretty rare classic PC in North America and that is the FM Towns II SE20. The FM Towns series of PC’s sold in Japan starting in 1989 and spanning until 1997. Initially the FM Towns series computers used mostly proprietary hardware though later machines like mine eased up on that somewhat and offered more standard hardware. The FM Towns PC’s were one of the earlier PC’s to really focus on the CD format and build a machine around the CD-ROM drive which as we will see in the article is both awsome and horrible for retro PC gamers. Like the Amiga or Atari ST, there are a number of exclusive FM Towns games and unique ports for the PC to take advantage of the proprietary hardware.
The machine we will be looking at in this article is a 90’s FM Towns II SE20. There is virtually no good and specific information on this model in the west so please keep in mind this article will be less specific and more of an overview from my limited experience with this machine. Also, keep in mind I acquired this PC in the USA in a trade and I was unable to get it fully functional thus limiting what I can present here even more. I’ve attempted to take more pictures than usual to help document this PC in the west so expect a more image heavy article then my usual offerings. Also, keep in mind individual images as always, can be clicked on to get a larger image. One final note, The information I could obtain on this machine is kind of sketchy and even having the actual PC in my position has not always provided answers for specifications. That said I will continuously update this article as I get more detailed information and specifics.
The FM Towns most people in the west are familiar with are the consolized FM Towns Marty and the dark grey FM Towns model 2F that features a frontal vertical loading CD drive on the lower front of the tower. The SE20 as we can see above is a desktop form factor PC and mine is quite yellowed. From what I could gleam from the stickers on the back of the case this model was released in 1994.
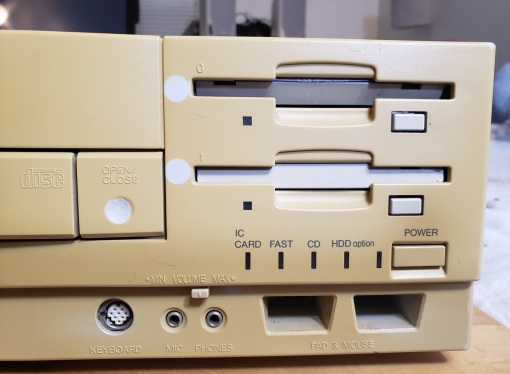
The left side of the front features a reset button as well as a door that opens downward to reveal an IC card slot. A quick google search reveals IC cards are cards used in Japan as mainly prepaid cards for using transportation but on the FM towns I think this slot accepts cards that operate more like either SRAM backed memory cards and operates as a Type I PCMCIA slot. It is possible that printer or modem cards are also compatible with this slot. I found some good information on explaining the slot and its possible use with memory cards HERE.
Above this is the CD-ROM drive. In my model is a single speed Matsushita EBP504 with interfaces via a proprietary connection. The Towns was heavily built around the CD drive and one of the first home computers to widely adopt the CD drive. Many games boot directly from the CD drive since there is a “hidden” C: ROM drive on the motherboard containing a minimal version of DOS with CD drivers.
On the right front side of the case we have several device inputs as well as a number of LEDs. On the bottom left below the CD drive open/close button is the keyboard port. this is NOT PS/2 so if you are acquiring an FM Towns try to get one with a keyboard and mouse included. To the right of the keyboard port are two 1/8 audio jacks. One for a microphone and next to that one intended for headphones with a volume adjust above. To the right of these audio jacks are two mouse/gamepad jacks. These are very convenient since the FM Towns had a reputation as a gaming PC. Above these ports are a series of activity LEDs and a small rectangular power button.
Finally we have two floppy drives labeled as drive 0 and drive 1. The cover door on my upper drive is bent a little inward but otherwise functions normally. These are both standard 3 1/2 inch Teac FD-235HG 1.44MB floppy drives.
Since we recently mentioned the keyboard.
Mine came with the keyboard above. It is not from the same model, which is immediately apparent from the color difference and is also missing a keycap but is fully functional with my Towns. several special function keys are Japanese labeled so google translate on a phone is your friend.
Now for the back of the case. There are three rather rusted on my case, slots for additional expansion cards though as we will see when we look inside they are not standard connectors.
below these and starting on the far left, we first have the video jack.
Video – Wikipedia states “video modes ranging from 320×200 to 720×512 resolutions, with 16 to 32,768 simultaneous colors out of a possible 4096 to 16 million (depending on the video mode) with the ability to overlay different video modes” and is likely sporting 512KB of VRAM with an additional 128KB of sprite RAM. I’m unsure if the video chip and capabilities changed between models over the years but the above specs are what Wikipedia writes in a sort of blanket statement. The video jack on the SE20 is a DB-15 jack labeled as “Analog RGB”. I’ve read a few different things concerning the video output on the FM Towns. Some sources claimed that the Towns outputs 15KHz RGB when booting up and displaying the POST screen while games displayed either at 24KHz or 31KHz depending.
Since I didn’t have the right adaptor available I found someone on eBay that hand made FM Towns DB-15 to standard VGA adaptors.
To my pleasant surprise the adaptor worked perfectly fine with my Sony Trinitron CRT. Keep in mind I never did get a game to run on this Towns but it did display the startup POST and run DOS 6.2 just fine with this adaptor. I did read some sources on various forums that claimed the adaptor did not work with LCD screens or would eventually damage LCD monitors but I could not confirm this.
Next to the video port we have a printer port followed by an RS-232C serial port. To the right of the serial we have a SCSI-1 port for connecting external SCSI devices like CD or hard drives. Lastly we have two pairs of RCA audio stereo jacks. One pair is output and the other input.
Above these is the power supply as well as some stickers giving model number mfg date and other information.
The plug is a standard 2-prong and is hard wired to the proprietary form factor power supply. All this together makes for a bad situation should the power supply die on you.
Removing the top cover of the case on the SE20 is not difficult at all but getting to the motherboard itself is a challenge.
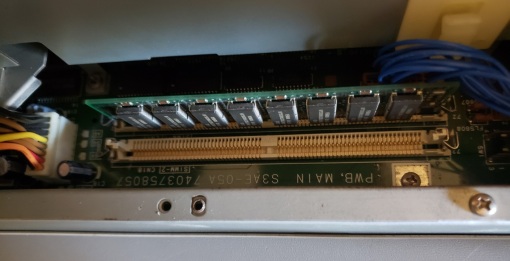
Removing the case cover reveals that almost the entirety of the motherboard is covered by a metal shielding as well as the power supply and the drives. One of the few areas of the motherboard that is accessible is the dual 72 pin RAM slots for expanding the memory. specific details about memory for this model is basically nonexistent so my SE20 either has 1-2MB of RAM soldered directly onto the motherboard expandable to 10MB OR 6MB expandable to 64MB according to online sources. The 1994 manufacturing date on this model would suggest it’s probably a 6MB machine.
Below is the faceplate of the Towns SE20 which also holds the built-in speaker.
The floppy drives are connected to the motherboard via two separate floppy connectors located on the motherboard. Interestingly there are also two power connectors next to the floppy connectors. These power connectors act just like floppy Molex connectors but rather then coming off the PSU they connect via a small cable from the board to the floppy drive.
Behind the floppy drives lies the metal cage that supports any added expansion cards as well as the expansion card daughterboard.
With the Floppy drives removed we can also see a slot for installing a CPU accelerator but we’ll talk about that shortly. First let’s take a look at the daughterboard located behind the floppy drives.
Here is the opposite side of the daughterboard. There are three proprietary looking connectors of types unknown to me. The bottom most looks like an Apple NuBus connector but I can’t confirm anything. Information on the FM Towns computers in the west is fairly scant when it comes to the fine details and the best I could find pertaining to these expansion slots was just a reference to the machine having three “bus slots”.
Now we move onto the what is both one of the FM Towns greatest strengths and definitely its greatest weakness, the CD-ROM drive.
The FM Towns line of computers was way ahead of other computers when it came to adopting the CD drive and had many exclusive CD enhanced versions of games when other PC systems were still using only Floppy drives. The operation of the FM Towns is more or less built around the CD drive, which leads us to the problem.
The drive itself is a Matsushita EBP504 x1 or x2 drive (information is sketchy). The CD drive interface and laser pick up are proprietary. This is understandable seeing as this was a very early attempt to add CD drives as standard to computes. The problem is two-fold. Firstly is that there was no third party alternatives or replacement drives made for the Towns proprietary interface which means if your CD drive dies and you can’t repair it then your pretty much out of luck.
The second big issue is that the majority of games expect to be run from this primary CD drive. You can add a hard drive or even an external SCSI CD drive as seen below via the rear SCSI connector but many games will still fail to load when attempting to boot via these alternative methods.
In short, if your primary CD drive dies in your FM Towns you have a severely compromised system which few options to fix the situation.
The CD drive connects via a daughterboard located in front of the power supply.
The lower connector is for the CD drive and although it looks like IDE it is NOT. As stated before the connection is a proprietary interface that as far as my research has found no one has made an adaptor to allow more common drives to work with nor were any other CD drives manufactured that used this interface. The CD drive is powered through this proprietary interface. The upper connector is a 50 pin SCSI connector intended for a hard drive although hard drives were not standard for the Towns as most programs were still meant to run from the CD drive. The interesting thing is that even though there is a spot to add a SCSI hard drive there is no molex connector coming off the power supply to power one.
The power supply is located behind the HDD/CD interface daughtercard and uses a connector with the motherboard I’ve never seen before. The form factor also seems to be proprietary.
With the various drives, bays and the power supply removed we get to the metal shield directly above the motherboard.
Removing the metal shield is a pretty straight forward process and just requires the removal of a few screws.
1) CPU – The CPU for the FM Towns SE20 is an Intel 486SX at 25MHz. This is a step up from earlier Towns computers that generally had 386 processors installed. The CPU is directly soldered to the motherboard but upgrading is possible via a CPU upgrade slot located next to the processor.
2) RAM – We already talked about memory but to go over it again. The Towns SE20 has two 72 pin slots for expanding the memory. My SE20 either has 1-2MB of RAM soldered directly onto the motherboard expandable to 10MB OR 6MB expandable to 64MB. The 1994 manufacturing date on this models would suggest it’s probably a 6MB machine though I only spot four memory chips suggesting it could be 2MB (512KB each, or 4MB (1MB each). Googling NEC 424800-70l seemed to indicate these are 512kx8 chips.
loading up MS-DOS 6.2 JPN version and running the mem command gives these details.

After this I tried a variety of RAM modules and finally installed this 16MB module which on boot up created a RAM counter in the lower left hand corner of the screen which counted up to 18MB which would seem to confirm (16MB added + 2MB on-board).

I attempted to add a matching 16MB stick and recived an error on boot. counting up to 18MB would suggest online sources were wrong about 2MB motherboards being limited to 10MB maximum RAM.
3) CMOS battery – The battery thankfully is not the barrel type so it is not prone to leaking though it is not a standard CR2032 lithium coin battery and is a little bigger.
4) Power connector – The power supply connects to the motherboard by what I believe is another proprietary connection. You can see it in the image above for the RAM and the connection is obviously not AT or ATX. This can be an issue if you’re trying to replace the PSU.
5) Floppy connectors – As we saw earlier both of the floppy drives are connected via two separate floppy connectors on the motherboard itself along with two separate power jacks that will require two power cables.
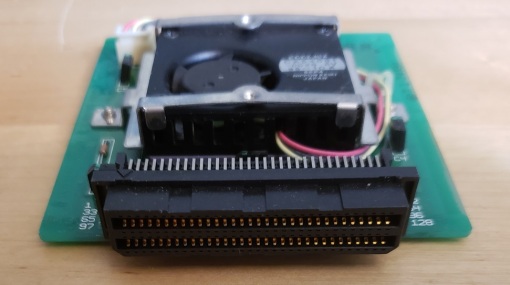
6) CPU upgrade interface – This slot is for adding a “CPU upgrade card” which in effect disables the soldered on 25MHz 486SX and takes over control. The most popular card I’ve seen on sites like eBay replaces the on-board CPU with a 66MHz 486DX though other cards may exist.
Below is an image of my 66MHz 486DX2 upgrade card.
The CPU is unfortunately soldered directly to the upgrade card though in theory you could simply desolder the current CPU and solder in a new one. One would have to be mindful of the voltage difference if you wanted to attempt a DX4 upgrade though since the DX2 operates at 5v while the DX4 is 3.3v so perhaps a 486 Overdrive chip with a voltage regulator would make a good upgrade candidate.
7) expansion card daughterboard interface – This is where the daughterboard that any expansion cards fit into interfaces with the motherboard.
8) CD and HDD interface – This is where the daughterboard for the CD drive and Hard drive interface with the motherboard.
A few final notes.
Games for the FMTowns are in general very expensive and almost all of them come exclusively on CDs. The primary CD drive should be able to read CD-R’s but as mine does not work at all I cannot confirm. Many games released for other PC’s but ported to the Towns line of computers are considered to be definitive versions usually since they were specifically enhanced for the Towns and the CD format. This along with a number of Towns exclusives make the Towns a desirable retro gaming PC. As I said most FM Towns games easily go for over $100 US dollar on sites like eBay though every once in awhile you may find a less desirable or incomplete game for cheaper. The sole FM Towns game I own is the port of Sim City seen below. Also keep in mind most Towns games require at least 2MBs of memory to be installed.
The Towns use its own OS called Towns OS and the upgraded Towns OS 2.1. Since a hard drive is not necessary for the FM Towns PC’s the OS is loaded via the CD drive. Windows 3,3.1 and 95 as well as DOS can be run on the FM Towns and Towns II. In order to boot from the CD drive there is a hidden C: drive contained in ROM with CD drivers. I was able to boot from the A: drive via a floppy before the machine eventually failed on me and I could not get the floppy drives to seek again.
The image above is a screen of a special version of DOS with SCSI drivers loaded in order to attempt to boot from the external SCSI drive though my efforts proved useless.
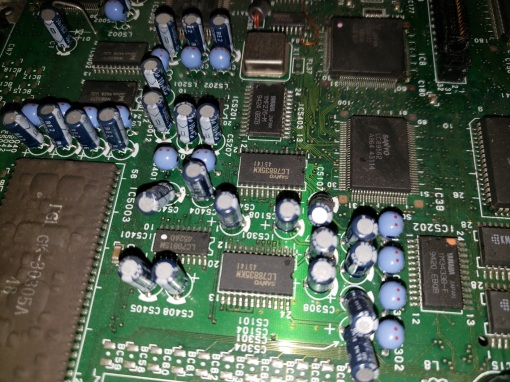
Audio – Besides being able to read and play Redbook CD audio @ 44.1KHz the towns is also capable of 6-channel stereo FM synthesis via a Yamaha chip as well as PCM sound via a sound chip from Ricoh. below is an image I took of the Yamaha chips as well as a chip from Ricoh that I believe is the PCM chip. The Ricoh chip is labeled RF5C190A while the Yamaha chips are labeled YMF276-M and YM3433B-F
Below are a number of photos I took of the motherboard. I can’t claim to understand what all these chips do but I assume these photos may prove helpful to those better versed on the technical side of things.
The FM Towns II SE20, as well as the rest of the FM Towns line of computers and including the consolized “Marty” to a lesser extent, are exotic and awesome retro computers. Unfortunately owning and collecting for one is a very frustrating and expensive pursuit. The computers themselves use so many proprietary components that if any one part fails it becomes extremely difficult to repair and/or replace. This is especially true for the CD drive which the entire computer is basically based around. Add in the further difficulties of having almost all the available information on the PC line is in Japanese and hardware and games are very expensive and you’re looking at a significant investment of money and time to maintain an FM Towns setup.


