
Well we’ve finally reached the end of the road going into the past for our x86 “anatomy of series“. So far we started this series with the end of the DOS era and our Anatomy of a Pentium based DOS PC article and thus far we have covered every x86 era in between with our last article covering the ultimate 286 based build. Today we are going to take a look back at the earliest x86 and look at the best parts that balance power, compatibility and esthetics to create the best build for the 8088 era of PC retro gaming. Keep in mind this build is based around the 8088 but you can just as easily make the same build around the faster 8086 CPU (though you may encounter issues with speed sensitive games). Also for the sake of this article we also aren’t considering the Tandy 1000 line of PC’s such as the Tandy 1000SX, 1000 HD or 1000RL HD which due to their superior Tandy graphics, sound and high compatibility would possibly make them the superior choice to building your own early 80’s IBM compatible 8088 PC.
The 8088 is an 8-bit variant of the 16-bit 8086 developed in 1979. The 8088 would go on to be the dominant CPU in the early days of personnel home computing and was the CPU IBM chose to base their legendary IBM 5150 on. For anyone that’s a computer enthusiast that’s building a PC to relive the earliest days of home computing this can be a very fun project. Before we get into the details of what I feel comes close to a “ultimate 8088” build lets look at some of the reasons you may or may not want to build a PC focusing on this early era.
This machine will primarily be geared to playing early CGA PC classics from the early 1980’s up until the mid 80’s though it is capable of playing games from later on. We will try to use as close to period correct cards as we can when we can but will use later parts where it makes sense. With this said before we go over the build it’s very important to note that early on in the realm of IBM x86 compatibles there wasn’t a such thing as a “gaming PC” and early IBM compatible machines were largely intended for office and business use with gaming being a novelty and an afterthought. Most computer gaming was taking place on home micro computers such as the Commodore 64 and most of the earliest games for the IBM arena were rather simple “arcade like” or text based affairs. There were exceptions of course like complex early RPG games such as Wizardry and Ultima but by and large early games were rather simple compared to later offerings. Because of this hardware for the PC compatibles weren’t very game oriented until the later half of the 1980’s.

Why you may want to build a 8088 era PC?
besides building such an old PC simply for the pleasure of restoring a piece of computing history there are more practical gamer oriented reasons. Many early PC games demand an 8088 CPU running at 4.77mhz and a true CGA card to display properly. Games such as Striker, Demon Attack and early Ultima titles among many others really need a 8088 CPU running at a stock 4.77mhz to run at a correct speed. With some titles even a small speed bump of a few megahertz can drastically throw off game play or create glitches in sound effects. It may of been rather difficult to comprehend the speed at which computer CPU’s would advance at the time and thus poor programing and a lack of thinking ahead crippled many games when run on later, faster CPU’s. Another issue is that many of the earliest PC games were meant for a CGA card running at an appropriate speed. Later EGA and VGA cards are NOT 100% compatible with CGA and errors can occur to various degrees depending on the VGA card used. Games from Windmill software are one example of games that have issues running on a non CGA card. You can place a CGA card in a later PC such as a 286 and up but then you still have to deal with the various speed problems associated with a faster CPU. Unlike later games from the early 90’s that may of been speed sensitive these early games never received patches or work arounds to the degree later games did due to a seeming lack of interest in the earliest games of the PC era.
Before moving on it’s probably also wise to make a quick distinction between PC and XT class computers. The computer we are looking at in this article is an XT class computer. XT stands for eXtended Technology and is basically a slightly refined PC class computer. The biggest distinction is that XT class motherboards had more ISA slots (eight vs five) then a PC class machine but otherwise had most things in common such as the keyboard scan codes that we will discuss later.
Now that we’ve had a basic overview of the machine we are striving for and a few reasons you may want to build one lets take a look at the machine in question and talk about what you want to look for when putting together such an early build and what you can probably leave out.

If you want to go era correct the overwhelming majority of PC cases in the early 80’s were desktop style with only a few bays for 5 1/4 drives. The case I’m using here as you can tell from the image is heavily yellowed but this can usually be fixed by using the retrobright technique.
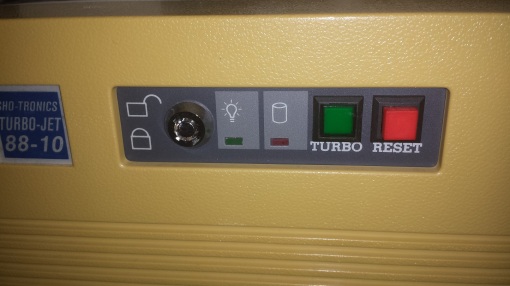
On the front panel we have some fairly typical buttons and LED lights. At this time in PC history Turbo buttons actually did what they stated and engaged a “turbo” mode. Mine kicks the CPU from 4.77mhz to a blazing fast 10mhz. This is a pretty substantial boost and can help with some games that maybe need a little more power to get running smoothing such as flight simulators or more intensive CGA titles. I really like the feel of the buttons on this case and when depressed the entire turbo button on my case lights green.
There is no power button on front of this case. Like many PC cases and designs from the early 80’s the power button is a rather large, in this case red, switch located on the right side near the rear of the case.
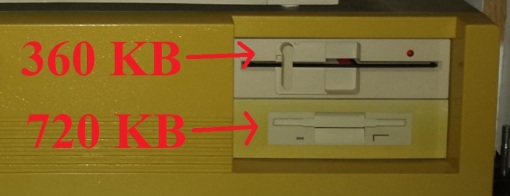
Before flipping the case around we need to take note of the floppy drives. Floppy drives of the era were low density 360 KB and later on 720 KB drives as opposed to the later high density 1.2 MB and 1.44 MB drives.
Thankfully 1.2 MB 5 1/4 and 1.44 MB 3 1/2 high density drives will work on a low density controller as 360 KB and 720 KB drives. Do take into consideration though that floppies formatted and written to on a 1.2 MB drive acting as 360 KB floppy may not read properly on an actual 360 KB drive. There are high density 8-bit floppy controller cards but they tend to be pretty rare and expensive. There are also programs such as “2M” which when used with an 8-bit compatible 16-bit floppy controller and a small TSR program loaded into memory should allow the use of high density drives and disks. Ive never used this method personally as I’ve felt its unnecessary but I’ve read others have used it with good results. perhaps the best option though would be a parallel port high density drive. These arn’t as rare as an actual 8-bit high density controller card but they can be quite slow.
Though I admit the convenience of a high density drive in such a PC would be nice I’m generally okay with running low density drives on such machines as the vast majority of software meant for this class of PC will easily fit on a 720 KB floppy disk. I don’t recommend adding a CD-ROM drive for this era either. CD drives did not become common until the 1990’s on PC’s and games meant for a 8088 will easily fit on a floppy disk. unlike later games most of the games from this era did not get CD re-releases.
Mounting a CD-Drive in an XT can also be quite difficult as they were not a consideration at the time and screw holes may not match up. If you do want to add a CD drive I would recommend an external drive controlled by either a 8-bit SCSI card or a parallel port drive.
I would also urge anyone building an era correct XT class machine to set their 360 KB floppy drive as drive A. This is because a number of games were released as “auto booters” which means they do not require an operating system such as DOS and will load up and play on booting the PC if the disk is inserted. All of these games that I am aware of came on 360 KB disks and a number of these “auto booter” games default to looking for the A: drive. Therefor if your 360 KB drive is set as drive B: there is simply no way of telling the PC to boot from there instead.

Nothing to exciting about the back of the case. It is worth noting that the majority of these early 80’s cases are not designed to accept a standard AT power supply. Though the connector is generally the same as later AT PSU’s the form factor is different and they are generally larger and have a large switch on the side that is used to power on/off. They generally also come in lower wattage’s of 65-200 watts.
While we are looking at the back of this machine We do need to also point out the keyboard type. As mentioned earlier the earliest IBM PC and XT compatible computers used a keyboard interface that looked like the later AT interfaced used up until the PS/2 standard but is not compatible. Many keyboards from the mid 80’s have a DIP switch on the underside to switch the keyboard into PC/XT or AT mode.
If you have such a keyboard make sure it is in PC/XT mode in order to function properly with your PC or XT class PC. There were also some auto sensing keyboards as well as XT to AT adapters allowing the use of later keyboards but these can be harder to find then an actual XT kyboard or have questionable functionality.
Before we take a look at the expansion cards lets take a look at the motherboard itself and the various components.

The motherboard I’m using is a DTK PIM-TBIO-Z Rev-9. This board is a “10mhz turbo board” meaning that it can turbo the CPU from a stock 4.77mhz to 10mhz either via the turbo button on the front of the case of via a keyboard command of < ctl > <alt > <-> provided your board has a 10mhz capable 8088 installed. This is a little different as many 8088 PC’s only offered a speed boost up to 7.16mhz although machines like the Commodore Colt offered all three options. There isn’t anything to necessarily look for when choosing an XT class motherboard as they all were fairly similar. I would make sure though that your board runs stock at 4.77mhz or can down clock to 4.77mhz since the point of this build is running software at this original speed. There are some 8088 boards that run default at higher speeds such as 7.16mhz. The manual to my particular board can be found here.
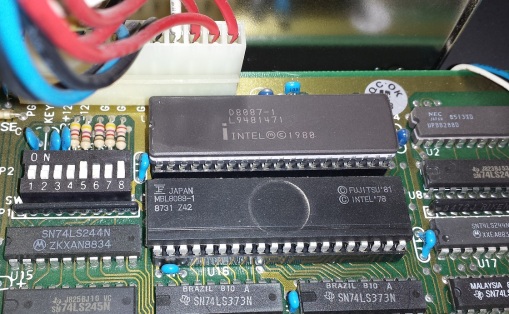
A) CPU – The 8088 running at 4.77mhz was IBMs choice for their first personnel computer and a CPU that stayed relevant for many years. As we’ve already established a great deal of early games demand a CPU running at this lower speed. If you acquired your motherboard with the CPU already installed it is likely already capable of running at the boards turbo speed but be sure to double check if you can. A -1 after the 8088 designation marks the CPU as 10mhz capable. My CPU is a Fujitsu but your just as likely to come across Intel, AMD, Siemens or other variants. These are all functionally identical to one another and who your particular CPU is from is largely irrelevant.
There are various CPU accelerators available for the 8088 socket and usually add a 286 class CPU for significantly increased speed. These cards tend to be rather rare and expensive and I wouldn’t recommend one unless you find one for a great deal or are just trying to push the XT PC to its limit. Generally it would be more worth it to simply build a true 286 or even 386 PC then to use an accelerator. If you do want to add an accelerator to your PC/XT computer try to acquire one that can fallback to the original 8088 and its 4.77mhz speed as a 286 at any speed will break many games meant to run on an 8088.
The blog Nerdly Pleasures has a good article listing a few games that have issues with faster CPU’s in his article “4.77mhz 8088 You’re needed!” but for convenience I will list some of them here along with my own findings on games that require an 8088 to run properly. For more details on the games in question and how speed effects them check out his site.
- Striker
- Defender
- Ultima I-IV
- Dunzhin: Warrior of RAS
- Lode Runner & Championship Lode Runner
- Touchdown Football
- Demon Attack
- Super Boulder Dash
To NEC V20 or not to NEC V20?

The NEC V20 was a pin compatible clone of the 8088 designed to run faster and more efficiently at the same clock speed. The NEC V20 is sort of a “magic bullet” drop in replacement for the 8088 increasing speeds by as much as 10 to 15 percent. Compatibility is also extremely high and is estimated to be around 99% with the only program I could find that refused to work with a V20 being Lode Runner Championship edition. The V20 also incorporates some new code that allows programs to work which otherwise won’t on a 8088. One example is the Iomega ZIP drivers which will not function on an 8088 but will if a V20 is installed.
The V20 was a fairly common upgrade for 8088 systems and is generally recommended as it has high compatibility and offers a decent performance increase. Whether to install one or not is up to you. I have chosen not to as the performance boost is enough to throw off timing in a small number of games but if absolute compatibility is not your goal I feel the V20 is a great upgrade which adds some performance (but usually not to much) as well as some added functionality.
B) FPU – As with later PC’s adding a math co-processor is completely optional and very few games (Sim City) actually support it. It’s more useful for things like CAD programs rather then games. If you do choose to add one like I did make sure it’s rated speed matches that of your CPU
C) Most motherboards of the early 80’s will have one or two DIP switch blocks with switches in ON/OFF positions. Unlike later boards that can auto detect or work on simple jumpers for things like video output many older 8088 based boards require the setting of DIP switchs for various functions. It is very important to learn what these switches control and how to properly set them as they can control things like your floppy drives, what type of video card is enabled and the amount of RAM recognized. This information is commonly found in your motherboards manual or online.
D) RAM

The 8088 is only capable of addressing up to 1 MB of RAM with the upper 360 KB being restricted and reserved meaning at most your left with 640 KB of memory to work with. This is known as conventional memory and it’s something we have had to consider in all of our DOS builds.
Here is a simple chart displaying how the 1 MB of RAM is split up into segments. This is true for later X86 DOS builds as well except in those cases we have the benefit of CPU’s able to address over 1 MB of memory as well as programs such as EMM386 which allowed TSRs to be placed in upper memory.
 (Page from Hicard AMS manual)
Look for a board that supports a full 640 KB of RAM. thankfully most boards except for the earliest such as early IBM 5150 PC class computers do. My board here came with a full 640 KB and in my own experience coming across these era PC’s most do. If yours doesn’t but is capable of adding RAM do so. Generally this RAM will come in DIP form and installs into sockets on the motherboard as seen above.
Sticking to early 80’s games the small amount of memory available should not be a problem as these restrictions were taken into consideration at the time. memory limitations may become a problem though if you decide to add peripherals outside of the era of this PC such as a CD-ROM drive and the memory eating drivers that go with it. 640 KB should be enough for a simple build though. I will go into more detail on expanding memory when we get to the expansion cards though.
Expansion cards, what you need and what you can ignore.

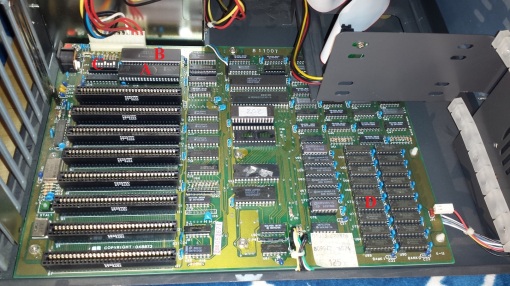
Here is an overview shot of my 8088 PC with all expansion cards installed. Right off the bat your going to see something amiss….allow me to explain.
What you need.
1) Hard drive & Hard drive controller – Even though you don’t necessarily need a hard drive for a PC from this era one does make life a heck of a lot easier and also makes a much better all around experience, especially if your playing multi disk RPG games. Many early 8088 based PC’s did not come with a hard drive option and some like the IBM 5150 only came with single or dual floppy options. With programs being so small it wasn’t out of the question to play the entirety of your game from a floppy disk as well as load your version of DOS from a floppy on every boot.
That said I definitely recommend adding a hard drive and its relevant controller card if only to cut down the wear and tear on the floppy drives. For an operating system I went with DOS 3.3. DOS 3.3 was released in 1987 at the tail end of the 8088’s useful life and allows us to use hard drive partitions of a whopping 32 MB in size. the 286 had been out for some time at this point and the 386 was two years old but 8088 machines were still in use in office settings and budget builds. IBM had just discontinued its 8088 based XT PC in 87 but companies like Commodore were just launching the 8088 based PC10-III the same year so I feel this is the best OS as it still falls into the twilight years of the 8088 and gives the most functionality and options. You could use later versions of DOS and I doubt the 8088 would really care as increased overhead between DOS versions seems minimal to nil but many of the advanced features would be unusable or wasted such as EMM386.
Now onto the topic of the hard drive itself. If you wanted to be completely period correct then you would have to choose between a MFM/RLL drive such as the one below or and early IDE or SCSI mechanical drive.
 (Image courtesy of Wikipedia)
I don’t recommend a MFM or RLL drive as they are all going on over thirty years old now and tend to be very small in capacity, hard to find, possibly overpriced on eBay and have questionable reliability. If your just going for a fun project build and want to be period correct then by all means but if you plan on running your 8088 PC a lot I wouldn’t trust 20+ hours of Wizardry saves to it.
SCSI is a good choice but 8-bit SCSI controllers are hard to find and 50 pin SCSI drives as well. IDE was released in 1986 and would make a good compromise choice between period correctness and reliability. You could use a more modern IDE drive but with 32 MB partition limits there’s going to be a lot of wasted space. Even though my case had a bay for a full height MFM drive internally I opted to go a bit of a different route and went with a modern compact flash drive with a CF to IDE converter. They are silent, fast, power efficient and come in a 32 MB size so I don’t feel like I’m wasting a ton of space.
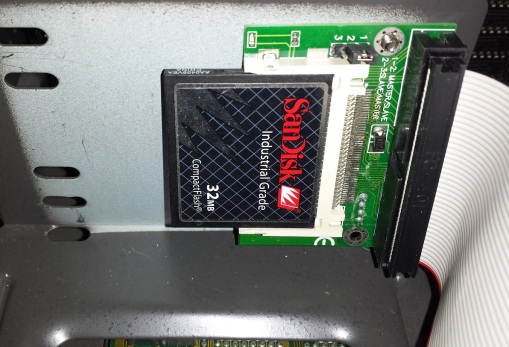
If you do go the compact flash route I recommend buying a brand name drive. I also recommend using an industrial grade card which were built to be more reliable and durable then consumer grade cards.

For a controller card I am using my Silicon Valley ADP-50L 8-bit IDE card from 1991. This card has always worked great for me though oddly enough I have read it can cause palette switching issues with the game Jungle Hunt for unknown reasons. Another more modern option would be a XT-IDE card which are usually available as a kit or pre-made on sites such as eBay and usually sell for $60 to $100 depending.
2) I/O controller – seeing as the vast majority of 8088 motherboards had no built in controllers for things like Floppy drives and various serial and parallel ports an I/O card is an absolute must.

Thankfully most of the super common 16-bit ISA I/O cards will work just fine in an 8-bit ISA slot minus use of things such as IDE. I’m using a fairly generic Winbond card to add a serial, and parallel port as well as to control both of my floppy drives. The addition of a serial port does allow the use of a serial mouse though Ive found very few times any need to use it or any early games that even take advantage of a mouse.
3) CGA video card – Since we are building this machine expressly for the purpose of playing the earliest games that require both an 8088 and a CGA card it makes sense that we want to use a CGA card for our video.

I am using my ATI small wonder card which formally resided in my Epson Equity PC. I really like this card as it’s small and supports a wide variety of standards such as CGA, Plantronics Colorplus CGA & Hercules Graphics.
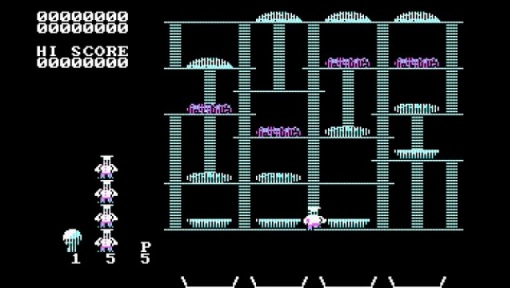
CGA was introduced in 1981 and was the first color display standard for IBM PC’s. It was most commonly used in a 320×200 resolution with 4 colors from a 16 color hardware palette. It also had several other less used modes but this article isn’t about CGA itself. If you want to learn more about CGA I suggest watching The 8-bit Guy’s YouTube video on how CGA graphics worked or for a more simple explanation check out my short article on an overview of PC video standards. The color palettes CGA uses can be pretty ugly but it’s the only color graphics mode many of the earliest DOS games support.
Example of the CGA game Alley Cat using the standard cyan/magenta/white/black palette

Here are three examples of the same game, Burger Time, two are in different modes the ATI Small Wonder provides. These images are for demonstration, the three preceding images I found online.

CGA mode on a CGA RGB monitor
 CGA mode on a VGA card
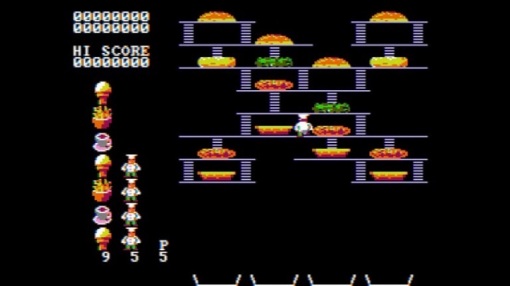 Composite mode
Notice how CGA looks completely different when run via a CGA card on a CGA monitor as opposed to being run on a VGA card. The VGA card defaults to cyan/magenta/black/white though in this case I find it more appealing then the blue background and color scheme on a true CGA monitor. Composite mode looks by far the best but not all games supported a composite mode and although colors are much better sharpness and especially text suffer. It’s not so much an issue with a game like Burger Time but on something like a flight simulator with dials and text menus it can be an issue.
What makes a true CGA card essential to our 8088 build though is compatibility. EGA as well as VGA cards are backwards compatible with CGA and many 16-bit VGA cards will work in a 8-bit ISA slot either by auto sensing or with a quick jumper selection from 16 to 8 bit. The problem though is VGA isn’t 100% compatible with CGA due to the way CGA is handled and even the higher speed of VGA cards may cause issues. The levels of compatibility can even be different depending on the VGA card you choose. It has also been said CGA on a true CGA card also looks more vibrant then CGA emulation on a VGA card and colors seem more correct, I would agree with this statement. Another issue with using a VGA card for CGA is that many CGA games will play but be stuck in the default cyan/magenta/white/black palette while a true CGA card may display a more appropriate choice. Wizardy is an example that comes to mind and when played on a CGA card the palette choice is much more appealing. Other games like StarQuake switch up the CGA color palette as you progress through the various screens but many VGA cards will stick with the same default palette for the entire game. Composite out compatibility for games that support it is another feature lacking on most VGA cards. For this reason only a true CGA card connected to a CGA monitor will give you 100% compatibility with the earliest of PC games. If we’re going through the trouble of building a PC based around an 8088 processor for compatibility it only makes since we also run a true CGA card for compatibilities sake since pretty much all of those 8088 speed sensitive games also were designed to display in CGA.
The ATI Small Wonder is a great card since it supports all CGA modes fully as well as a few additional modes such as Plantronics Colorplus CGA & Hercules Graphics. Plantronics mode is similar to Tandy video but at a slightly higher resolution. A few Utility programs of the time supported this mode but no games did. The only known game to support Plantronics mode is the relatively modern retro game Plant X3 from “8-bit guy”. Hercules Graphics mode allows for graphics on a monochrome monitor as well as CGA emulation in monochrome on a monochrome monitor. The card is also fully IBM MDA compatible if you just want to do text on a monochrome monitor.
The ATI Small Wonder also has a composite out (usually) which is a must have feature when looking for a CGA adapter. On my card I am using a break out cable connected to pins at the top of the card but most cards have a composite jack directly on the card. Composite allowed connection to a standard TV set or high quality monitor with a composite in jack and use of a standard composite cable (the usually yellow color coded RCA jack cable). Over one hundred early games have special color composite modes that use the dithering effect of composite video to actually display more then the four colors of CGA on screen and the effect can create an image that looks very close to 16 color EGA at times. Basically CGA mode is sharper and much, much better for text but is limited to four colors that usually look pretty hideous where composite mode is a bit more blurry and text can look pretty poor but depending on the game you can get a image with many more colors looking substantially better then CGA mode.
Also keep in mind CGA mode is a digital format unlike VGA which is analog as well as using a different connector. CGA uses a DE-9 connector (also the typical connector for EGA and Monochrome standards) outputting a digital signal while VGA uses a DE-HD15 connector and an analog signal. Here is an image of my ATI VGA Wonder XL 24 card which has connectors on the bracket for connection with both a VGA and a EGA/CGA/Monochrome monitors.

most VGA monitors will not be compatible with a CGA signal coming from a CGA card even with a pin adapter though very early VGA models may be, check your monitor model and specs before trying. For the best results with a CGA card use a CGA monitor like the Tandy CM line. I am using a Tandy CM-4 but there are others from Tandy like the CM-4 and CM-10. The CM-11 is a very highly regarded CGA monitor as well as a multitude of monitors from other makers such as IBM themselves.
Here are a list of some games that may encounter issues when running on a VGA or EGA card emulating CGA mode.
- Digger (high score screen)
- Possibly all Windmill Software games (like Digger mentioned above)
- Microsoft Flight Simulator II (“double screen effect”)
- Starquake (has positioning and palette switching problems when used with some VGA cards, ex ATI Mach32)
- Freddy’s Rescue Roundup
- Pac Man (incorrect title screen colors)
With all this said I understand that not all of us are 100% hardware purists and even I take some liberties at times incorporating newer tech outside of a given era into a build for the sake of convenience. So considering the increasing scarcity of 8-bit CGA cards and especially CGA monitors if you must go with a VGA card here are some tips. Stay away from cards using the ET3000 and ET4000 core as even though these are great VGA cards they have shown to especially lack compatibility in CGA. For a cheaper card with decent CGA compatibility go for the Trident 8900 series as they can operate in an 8-bit slot and offer decent compatibility. For the best compatibility look for cards that are “CGA Register compatible” and I recommend the ATI VGA Wonder XL 24 or the Cirrus Logic Eagle II chipset both of which have CGA DE-9 connectors for connecting to real CGA monitors and standard VGA DE-HD15 connectors on the card. Also check your cards software as some cards can be switched into a “CGA mode” via software for better compatibility. My ATI VGA wonder cards have this feature. Unfortunately both of these cards can be hard to acquire these days, especially cards using the Eagle II chipset which I’ve read has the highest CGA compatibility of any VGA card but is pretty slow for VGA.
If your curious about the compatibility of your own card there is a program called the CGA compatibility tester available for download here.
Some of the issues are relatively minor but others can be quite distracting and take away from the experience.
What you can probably do without.
The last three cards in this setup are cards that may add a little functionality to your setup but you could probably do without them.
4) EMS memory card – Remember earlier when we talked about how the 8088 could only address up to 1 MB of memory? Well using an EMS memory expansion card is a way around such a limitation.
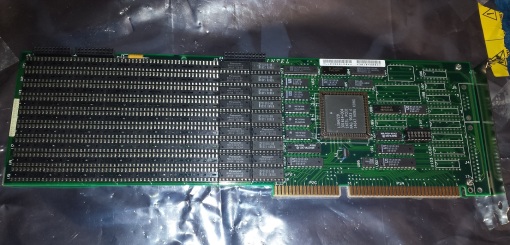
The card I’m using is from Intel and it is an 8 Above board capable of providing 8 MB of additional EMS (Expanded Memory Specification) memory to a PC or XT (or AT) class computer. EMS should also not be confused with the later introduced XMS (eXtended Memory). The 8 Above card uses a 16-bit ISA connector but will happily work in an 8-bit slot as will many EMS cards. My card only has 2 MB installed but filling the DIP sockets up with the appropriate RAM will allow for a total of 8 MB. There were several makers and variations of this card type and some such as the Orchard RamQuest card will allow adding up to 16 MB via 30 pin SIMMS.
This card as well as many other EMS RAM cards will allow you to use its RAM as a temporary RAM disk hard drive or for back filling conventional memory if your board does not have a full 640 KB installed. Using the card as conventional memory is mostly a waste as filling your 640 KB via the motherboard is generally a better idea and grants faster performance.
The main attraction of this card however is the ability to add LIM 4.0 compliant EMS memory. LIM is a standard put together by Lotus, Intel and Microsoft (hence LIM) to grant a way for users of PC and XT class computers to access more then 1 MB of memory. Lotus 123 was a very popular program for business spreadsheets at the time and 1 MB just wasn’t doing it. They managed find a way to add memory by using a section of the upper reserved memory that wasn’t being used as a sort of “window” to the EMS memory on the card as illustrated below.
 (Page from Intel 8 Above card manual)
So when accessing the EMS memory the computer would have to “look” at the designated memory segment in the upper memory and then through that access the EMS memory on the card. This was obviously pretty inefficient and slow compared to using regular conventional memory on the motherboard but it did allow the 1 MB barrier to be circumvented. Setting one of these cards up isn’t plug and play either as you must use special drivers and have a basic understanding of your computers setup so you can configure the card to an unused memory segment. The Intel 8 Above card I’m using also needs a dummy plug inserted into a socket near the bracket in order to function in 8-bit mode.

So why wouldn’t I recommend adding one of these cards to your 8088 setup when having up to an additional MB of RAM seems like a great idea? Well basically it’s because you will never use it in a standard 8088 gaming setup. Unless your creating giant spreadsheets or word documents in Lotus 123 or pushing your machine to play software well out of its era you’ll likely never encounter a situation where you actually need EMS memory. Sure some games require EMS memory but those games are generally later VGA games that would run poorly on an 8088 anyways and would be better off played on something like a 386 PC. Add in that these cards can be hard to find and typically cost over $100 and it’s just not worth the price. Sure it’s fun to see that extra RAM counting up on POST but it’s sad to know your rarely if ever going to need it.
5) HIcard AMS – This card is very similar to the Intel 8 Above board but rather then add EMS memory it manipulates the RAM you already have installed.
The HIcard can do several things. Like the EMS card the HImem can be configured to use its RAM as a temporary RAM disk. The more interesting features of the card are the ability to extend your conventional memory as well as create up to 192 KB of HIpage memory. HIpage memory allows you to load programs such as RAM resident programs and utilities, ect, into memory which basically acts just as as loading programs into upper memory with EMM386 would.
The first feature this card performs is expanding your conventional memory from 640 KB to a total of 704 KB. Since the first 64 KB of memory over 640 KB is reserved for use of an EGA video card if no EGA card is installed this memory is not used and the HImem card can be configured to take advantage of this and expand conventional memory into this segment creating a total of 704 KB of usable conventional memory. If you do have an EGA card installed obviously this feature will not work. Since my goal here was to build an 8088 with a CGA card this memory segment was available and I was able to successfully expand my conventional memory to a full 704 KB.
the second function of this card is to map unused areas of the upper memory to the cards HIpage memory. Since I have various things installed in my 8088 such as a hard drive and an EMS card I was only able to find one unused segment of 64 KB to configure as HIpage memory.
Like the EMS card the HImem AMS card requires a basic knowledge of your PC’s configuration and memory setup and requires special drivers and the correct configuring of DIP switches on the card. Thankfully like the EMS card the manual and software is fairly detailed and the process isn’t to difficult.
The truth is I didn’t even know cards like this existed and if I didn’t randomly come across one in a forum for sale at a great price I never would of searched one out. Admittedly the features of this card are super cool. Expanding your conventional memory and being able to free up the conventional memory you already have sounds extremely useful but like the with the EMS card if your just playing CGA games your never going to use this cards features. This again is another card meant for computers running memory hungry productivity software and things like Lotus 123. For a system geared to games of the early 80’s conventional requirements were never super high and since my system lacks things like a CD-ROM drive, ZIP drive, network card or even a sound card driver I have no resident memory programs to even load into the available HIpage memory. Now if you do decide to add things like a CD drive or network card to your 8088 setup I could see this card being much more useful but as it stands its a neat card but not to useful for our PC’s purposes.
Here is an image of my computers screen after the memory count and the loading of DOS. here you can see the EMS and HImem AMS cards initializing for DOS.

6) Sound card – For a sound card the earlier are the most period correct such as an adlib or a Game blaster card but I went with a card from a little later and chose the Sound Blaster 1.5 w/CMS chips from 1990 since it mostly supports both standards plus has digital sound effects.

The sound Blaster 1.5 supports Adlib sound as well as most games that support Game Blaster/CMS (Creative Music System) sound and has an improved DSP over the earlier Sound Blaster 1.0. If you come across a Sound Blaster 1.5 with two empty sockets that card is missing CMS support but restoring support is easy with installing two readily and cheaply available Phillips SAA1099P chips off eBay. most games that use CMS will work once the chips are installed but a few games do require a true Game Blaster card.
Adding the line
SET BLASTER=A220 I7 D1 T1
To the Autoexec.bat file is all you need to do to allow the card to function and requires no conventional memory although a small number of games do require you install the driver to receive sound.
Even though adding a sound card may seem like a no brainier, remember that even the earliest sound card, the Adlib wasn’t released until 1987. Up until this point in time all games used the built in PC speaker for sound. By the time games started supporting sound cards and music they also largely supported EGA and were starting to support the new VGA standard and most don’t run all that well on a 8088 even in turbo mode. Sure many games still had a option for CGA mode and some do play well on an 8088 and support sound blaster sound like Prince of Persia but the question remains why wouldn’t you just play any of these games on a faster machine in their EGA or VGA mode.
Is it worth building an 8088 PC?
As always the answer is highly dependent on your individual needs and wants. For the casual retro PC gamer whom views the golden age as consisting of classics like, Doom, Duke Nukem, Decent or even Wolfenstein 3d and Secret of Monkey island an 8088 build probably isn’t for you and I would suggest thinking hard about if your passionate about playing the early games an 8088 does excel at which with exceptions are generally much simpler and more arcade like experiences. On the other hand if your interested in an earlier era of PC games and are looking for full compatibility of all eras on real hardware then building a 8088 is pretty essential to your collection. where as you could probably skip a 286 since a 386 will do just about anything a 286 will do but better an 8088 build by nature of its slow speed can play a number of games that just won’t feel or sound right on any faster system. Sure you can throw a CGA card in a faster 286 or 386 and fix most of the issues associated with not using a true CGA card but your not going to be able to downclock that CPU to a 8088 4.77mhz speed equivalent. Even a 286 or 8086 running at 4.77mhz is faster then a true 8088 at the same speed.

If you want to completely abandon period correctness I found a great example of pushing an early XT class machine and based several of my hardware choices off his article. If you want to push your own machine to its limits I suggest checking out Anonymous Cowards “V’ger XT” -10MHz V30.

7 Comments
Nice article. I’d like to add that it’s also worth building one because emulation of CGA is sketchy even in dosbox. I’m working on a post for Freddy’s rescue roundup and dosbox does the 4 colour CGA fine, but won’t show the game with composite output. It’s supposed to, but for some reason doesn’t work in this case.
I remember using XT class machines at school and my brother has the Canon XT clone, but none of them had/have colour displays. I’d like to get an old machine like this working at some point, but the parts/machines are extortion prices on ebay, and they’re hard to find despite how common they were.
Thankfully I was able to get lucky and grab the bulk of this stuff locally for a great price. For me the hardest part to find at a reasonable price was the EMS card and even then I paid a premium.
The one CGA game I did test was Starquake and it does in fact display off center when on my TNT2 VGA card. It’s also a game that switches the CGA palette as you transition to other screens to mix things up. on a VGA card it’s always the default Cyan/Magenta/Black/White which is pretty brutal on the eyes. First time players probably wouldn’t even know the game palette swaps if they only played it on a VGA card.
Some early VGA cards had a mode utility on driver/utility floppy, though. It allowed switching into CGA emulation mode.
Hi – thank you for the write up! This has been an amazing guide for me as I build an XT clone myself.
Wondering if you could post a link to the AMS Hicard drivers? I’ve been struggling to find them for weeks and your article is one of the few that even mention these cards!!
Thank you!!
Do you have an email address? I can email you the ZIP file with all the drivers. its only 150kb
Yes! Thank you for replying Justin!!! You have no idea how hard I’ve been looking for the files! My email is sevincent01 @ msn. com.
If you happen to have the manual in pdf too, I would love a copy 🙂
Looking forward to finally being able to use this card 🙂 Thanks Again!!
Many thanks for the article. I Found an XT computer with V20 and a silicon valley IDE controller! Also a have an Ati small wonder card and some trident 8900.
One Trackback/Pingback
[…] ancientelectronics.wordpress.com […]