

How To Enter BIOS and Change Boot Order?

Summary
Learn how to enter bios and change boot order for tasks like replacing a hard disk or migrating the system. Discover BIOS shortcut keys and brand-specific instructions.


1. Use the left and right arrow keys to select the Boot menu, and change the boot sequence on the Boot interface.
2. Please press F10 on the keyboard to save and exit the BIOS.

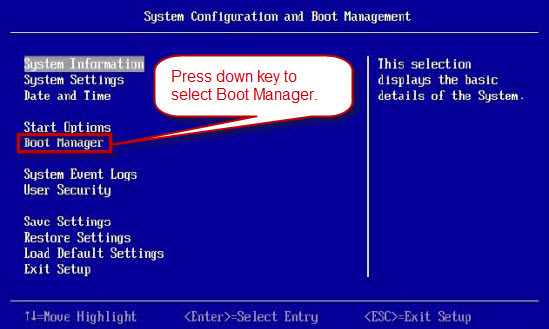
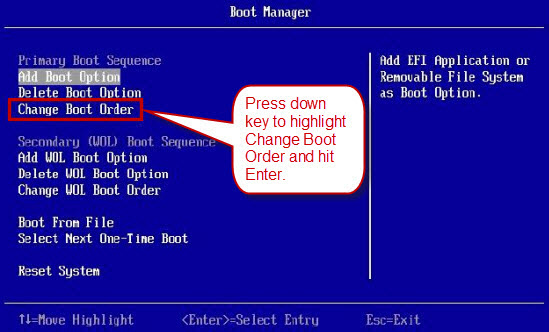
1. Use the left and right arrows to select the (Startup) menu, use the up and down arrows to select (Primary Boot Sequence) and press the (Enter) key.


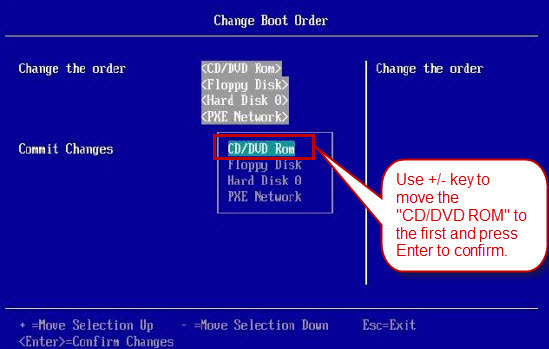
Boot from USB: Select the corresponding USB disk in Boot Order.
3. Press F10 to save and exit BIOS.

1. Change the status of (External Device Boot) under Boot Configuration to (Enabled).
2. In Boot Priority, use the ↑↓ arrow to select (External Device), and then press the F5 button to move it to the primary boot position.

1. Use the left and right arrow keys to select the Boot menu.
2. Set 1st Boot Device as CDROM or USB disk in Boot Device Priority

1. Use the left and right arrow keys to select the Boot menu.

1. Use the left and right arrow keys to select the Boot menu
3. Save and exit BIOS.

1. Use the left and right arrow keys to select the (Boot Options) menu.


- If the BIOS boot device list does not include a USB option, it is possible that your device does not support booting from USB. To resolve this issue, you can transfer the files from the USB to a CD/DVD and then change the first boot item in the BIOS from USB to CD/DVD.
- Be sure to save the changes before exiting the BIOS. It is important to carefully follow the on-screen instructions for saving and exiting, as this process may differ depending on your operating system and computer motherboard.
HP | hot key |
HP Compaq Desktop PC (2006 or later (Windows Vista or Windows 7)) | Press the “F10″ key once every second until the BIOS Setup Utility screen opens. |
| HP Compaq desktop computer (installed before 2006 (Windows XP or earlier)). | Press the “F1″ key once every second until the BIOS Setup Utility screen opens. |
| HP laptop: | Press “F10″ repeatedly until the BIOS Setup Utility screen opens, or press “F1″ for help. |
Dell | hot key |
| dell computer | At the first text on the screen or when the Dell logo appears, tap “F2″ until the message appears Entering Setup .Notice: Some older Dell computers use an alternate key sequence instead of “F2″ to enter system setup. These key sequences include:· Ctr + Alt + Enter· Delete· Fn + F1 (laptops only) · Fn + Esc (laptops only) |
| Dell 400 | F1, F3 |
| Dell 4400 | F12 |
| Dell XPS, Dell Inspiron, Dell Vostro, Dell Dimension, Dell Precision, Dell Optiplex | F2 |
| Dell Latitude | Fn + F1 |
Lenovo | hot key |
| Lenovo | F2 |
ThinkPad | hot key |
| T60/p, T61/p, X60/s, X61, X61 Tablet, Z60m/t, Z61e/m/p/t, Reserve, T400, T400s, T410, T410i, T410s, T410si, T500, T510i, X200 , X200s, X200si, X200 Tablet, X201, X201i, X201s, X201 Tablet, X300, X301, W500, W510, W700, W700ds, W701, W701ds, R51e, R60/e/i, R61/e/i and higher models . | When the message “To interrupt normal startup, press the ThinkVantage button” is displayed, press the “ThinkVantage” button, enter the ThinkVantage Productivity Center, and select “Start setup utility” to open the BIOS. |
| R40, R40e, R50/e/p, R51, R52, G40, G41, T40/p, T41/p, T42/p, T43/p, X40, X41, X41 tablet | When the message “To interrupt normal startup, press the Access IBM button” is displayed, press the “Access IBM” button to enter ThinkVantage Productivity Center, and then select “Start setup utility” to open the BIOS setup utility. |
| i-series 1200, i-series 1300, i-series 1400, i-series 1500, i-series 172x, 240 series, 390 series, 570 series, A20, A21, A22, A30, A31, R30, R31, R32, S30, S31, X20 , X21, X22, X23, X24, X30, X31, T20, T21, T22, T23, T30, TransNote | F1 |
| 310, 315, 310E/ED, 315ED | After powering on, when the ThinkPad logo is displayed, press and hold F2 Enter BIOS Utility. |
| 365X/XD, 360, 355 series, 380, 385 series, 560 series, 600 series, 701C/CS, 75x series, 76x series, 770 series | Power off the device, press and hold F1 key, and then power on the device. Press and hold F1 until “Easy Setup” appears. Notice : On the TP 701, you can also press the Fn + F1 key to access the Configuration area on the BIOS. |
| 365C/CS, 365CD/CSD, 65E/ED | From the DOS prompt by pressing CTRL + Alt + F11 Go into settings (you must be in DOS mode, not a DOS session under Windows). |
| 500, 510 | From the DOS prompt by pressing CTRL + Alt + F3 Go into settings (you must be in DOS mode, not a DOS session under Windows). |
| 700/C, 720/C | When the cursor moves to the upper right corner of the screen after the memory count, press CTRL + ALT + INS . |
| 710T, 730T | While turning on the computer, press and hold the Suspend/Resume switch. |
Acer | hot key |
| Aspire, Veriton, Power, Extensa, Ferrari, TravelMate, Altos | “Del” or “F2″ |
| Acer Altos 600 | Ctrl + Alt + Esc |
| Older Acer | “F1″ or “Ctrl+Alt+Esc” |
Gateway | hot key |
| DX, FX, One, GM, GT, GX, Profile, Astro | F1 |
| Older Computer | F2 |
Toshiba | hot key |
| Portégé, Satellite, Tecra, Equium | “F1″ or “Esc” |
| Toshiba Equium | F12 |
Fujitsu | hot key |
| LifeBook, Esprimo, Amilo, Tablet, DeskPower | F2 |
NEC | hot key |
| PowerMate, Versa, W-Series | F2 |
sharp | hot key |
| Notebook Laptops, Actius UltraLite | F2 |
Shuttle | hot key |
| Glamor G-Series, Prima P2-Series, Workstation, D’vo, X Mini XPC, Surveillance | “F2″ or “Del” |
BIOS | hot key |
| ALR Advanced Logic Research, Inc. ® PC / PCI | F2 |
| AMD BIOS | F1 |
Award BIOS | DEL, CTRL+ALT+ESC |
AMI BIOS | DEL or ESC |
Phoenix BIOS | F2 or CTRL+ALT+ESC, CTRL+ALT+S, CTRL+ALT+INS |
Data source: https://www.asunsoft.com/bios/how-to-enter-your-bios-setup-via-bios-key.html, if you need more information, please visit the official website of your computer supplier. | |

Remove Windows Login Password 3 steps for whole password remove process.
Enable/Create Administrator One click for creating new administrator and enable the disabled account.
Easy to use No need of any professional knowledge or password reset disk.
Multifuctional Data transfer, data recovery, bootable problem recovery can be run without system.
Highly compatible Windows 10/8.1/8/7/XP/Vista. Also supports UEFI boot mode.
Remove Login Password 3 steps for whole password remove process.
Enable/Create Administrator One click for creating new administrator and enable the disabled account.
Easy to use No need of any professional knowledge or password reset disk.
Free TrialFree TrialNow 2000 people have downloaded!Relate Links :
Easy Solutions for Fixing the error BOOTMGR is Compressed

01-03-2024
Jennifer Thatcher : Discover effective methods to resolve the "BOOTMGR is compressed" error on Windows PCs and retrieve inaccessible data without...
Causes and Solutions for Blue Screen of Death

30-04-2024
Amanda J. Brook : Master Windows blue screen of death solutions and prevent data loss with our definitive troubleshooting guide.
How to Factory Reset A Computer of Various Brands?
22-04-2024
Amanda J. Brook : Discover the definitive guide on how to factory reset a computer while safeguarding your important data for a...
How to solve the problem that boot device not found please install an operating system?

01-08-2023
John Weaver : Learn the causes and solutions for the problem "Boot device not found please install an operating system". Before...

