Adapt the appearance of the GRUB boot menu, boot screen, and KDE splash screen
Variations on a Theme
Power users can adjust the look of their desktops in openSUSE with just a few clicks. We'll show you how to customize the GRUB boot menu, the boot splash screen, and the KDE start screen.
The splash screen and other startup images are a familiar sight for any Linux distribution. Although the desktop background and color scheme can be quickly customized to suit your tastes, the GRUB boot menu (Figure 1) and the boot splash screen (Figure 2) are far more difficult to customize. This article describes how to modify and unify your system by changing the GRUB boot menu and the boot and KDE splash screens to fit your personal preferences. The following examples are based on openSUSE, but the procedures are similar for other Linux systems – especially KDE-based systems.
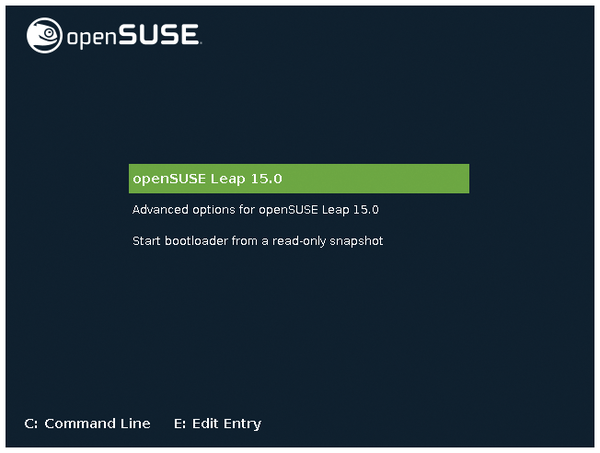 Figure 1: Even the first sign of life from openSUSE, the GRUB menu, is green.
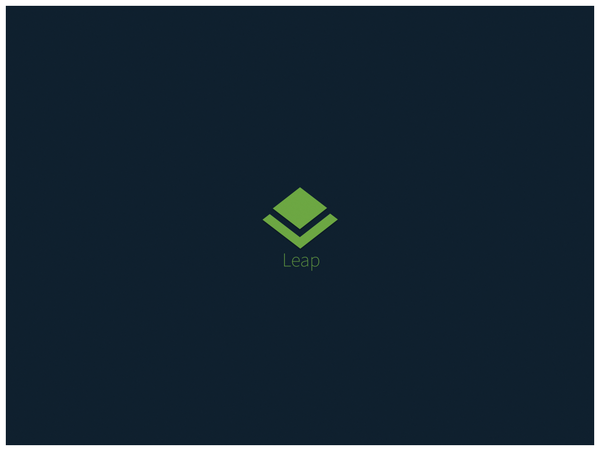 Figure 2: OpenSUSE only offers a uniform green for the boot splash screen.
Start with YaST
If you're working in openSUSE or another SUSE variant, you can use YaST to select a different theme for the GRUB boot menu. Use the graphical tool in System/YaST Bootloader (Figure 3). Select the theme.txt file for your choice of theme. YaST will do the rest of the work.
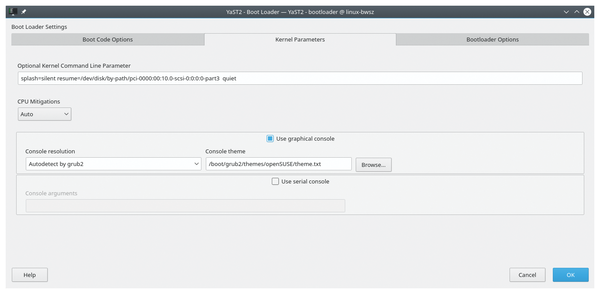 Figure 3: In the center tab of the YaST Bootloader module, select the theme.txt configuration file of a GRUB theme installed on your system.
Unfortunately only the default theme is preinstalled on openSUSE. However, there is a grub2-theme-breeze package for a retrofit that matches the plain, monochrome, original KDE start screen. Pling.com [1], the former OpenDesktop.org, has a choice of around 350 themes. Unpack the zip archive you download from the site and – working with root privileges – move the subfolder with the theme.txt file into the /boot/grub2/themes/ directory.
Then start the YaST Bootloader module and open the Kernel Parameters tab. Click on Browse to the right of the input box for the Console theme, and navigate to the theme folder you copied to /boot/grub2/themes/ in the file browser. When you get there, select the theme.txt file and press OK in YaST. After rebooting the system, you can stand back and admire the new look of the boot menu (Figure 4).
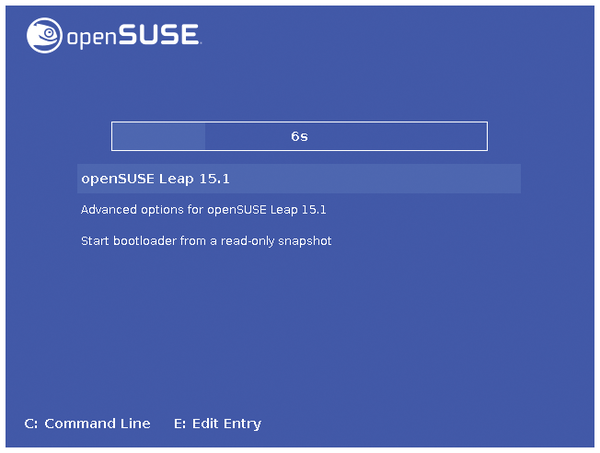 Figure 4: A cosmetic color change for the boot menu does not require any in-depth knowledge of the GRUB configuration syntax.
Editing a Theme
Creating your own GRUB theme is somewhat complicated. It is easier to adapt an existing theme to suit your requirements. To create a background image and colors that you like, you need to be familiar with a few elements of the GRUB theme description language [2].
First copy the /boot/grub2/themes/openSUSE/ folder to your home directory for editing. Then open the theme.txt file in a text editor. The file consists of five parts : a definition of global properties at the beginning and the sections + **image {}, + boot_menu {}, progress_bar {} and + hbox {}. You define the openSUSE logo, the countdown time before auto-booting, the boot menu itself, and the bottom line with the keyboard shortcuts.
To adjust the colors of the GRUB menu, you need to change some statements in theme.txt and the PNG files in the themes folder. The hexadecimal value to the right of desktop-color: defines the background color. The KDE KColorChooser program returns the appropriate values with the help of the default KDE color picker. Figure 4 shows a GRUB menu, where the values for desktop-color in the global header, as well as fg_color, bg_color and border_color in the + progress_bar {} section, have been adjusted.
The colors of the bars that highlight a selected menu item are not based on a setting in theme.txt, but on bitmaps. This means that 3D effects can be realized, although the openSUSE theme does not use any. To adjust the color of the highlight bar, open the highlight_c.png file in Gimp (Figure 5). The slider_* files are responsible for displaying a scrollbar, which only appears if there is not enough space for all the items in the start menu.
In Gimp, click on the upper color box just below the tool palette (highlighted in Figure 5). In the HTML notation field of the Gimp color selector, enter hexadecimal values as in theme.txt. Use the Fill tool (also highlighted) to color the formerly green areas to reflect your wishes. The highlight_c.png file consists of only one pixel. Open in Gimp and zoom in until the scale is large enough.
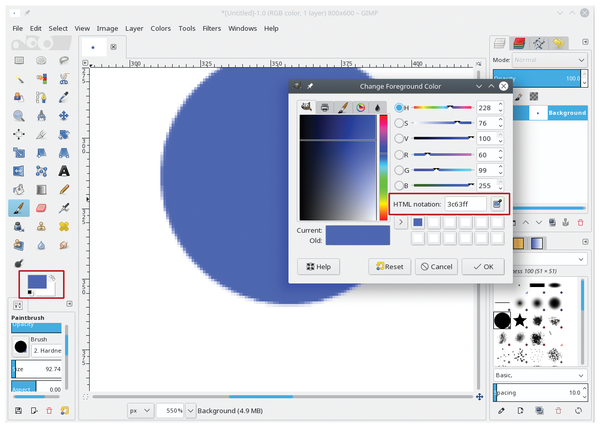 Figure 5: In graphical mode, openSUSE's GRUB configuration uses bitmaps for the highlight bar. Gimp gives you an easy option for changing the color.
The important thing to know about 3D designs is that the highlight and slider settings result from the values for selected_item_pixmap_style (=highlight_*.png) and scrollbar_thumb (=slider_*.png).
The file names for the highlight_* and slider_* files include final characters defining the position on a map: _c, _w, _n, _s, _e, _ne, _nw, _se, and _sw. For instance, highlight_c.png refers to the center of the screen, and _w, _n, _s, and _e refer to the four cardinal directions.
A background image is far more appealing than a monochrome background. The image must be a PNG or JPEG image with a color depth of 8 bits that you copy into the theme folder. In theme.txt, add desktop-image: "file.png" at the start of the global block.
Working with administrative privileges, copy the theme folder to /boot/grub2/themes/ and select the customized theme.txt file in the YaST Bootloader module. Even if you create new versions where the path to theme.txt does not change, you still need to open the YaST module each time and update the GRUB configuration by pressing OK. All other aspects of GRUB themes are explained in the GRUB manual [2].
Boot Animation
After booting the system with the bootloader, the boot splash screen (Figure 2) appears; it remains visible for a few seconds during system startup. This splash screen is produced by Plymouth, a tool that starts early in the boot process and displays a graphical image. Numerous Plymouth themes are available on Pling.com [3]. You can change the splash screen with a simple command.
Unpack the downloaded archive in /usr/share/plymouth/themes/. If several subfolders exist there, you will recognize the actual theme folder by the fact that it contains a configuration file with the .plymouth extension. Then run the plymouth-set-default-theme -l command and look for the new theme. The plymouth-set-default-theme -R command then installs the theme.
You do not need to reboot the system to view the new theme. Install the plymouth-x11-renderer package, launch plymouthd as root, and then call plymouth --show-splash. The Plymouth screen is displayed in a window. Press the right arrow key to continue the animation. However, the window cannot be closed so easily; it is programmed to remain in the foreground. To get rid of it, press Ctrl+Alt+Esc on KDE and click on it. Before performing another test, run plymouth --quit.
Plymouth comes with a set of plugins that load PNG files. Unfortunately, these files are not documented. The naming conventions from the demo themes (packages plymouth-theme-<XXX>) can be used if necessary. However, almost all the themes available online use the Script plugin preinstalled by openSUSE, which comes with good documentation [4].
Scripting Language
The Script plugin evaluates the instructions in a theme-name.script in the theme folder. The specially developed scripting language is extensive. So let's have a look at the minimalistic Simple-Image [5] theme, which displays a centered image at boot time and does not use any animation.
In as-delivered condition, the graphic shows an Arch Linux logo. To replace it, edit the img.png file in the theme folder or replace it with a PNG with a resolution of 1920 x 1080 pixels. You must reinstall the theme after each change to the image. With an absolute minimum of script code, Simple Image is a good basis for experiments.
The content of the simple-image.plymouth theme configuration file is shown in Listing 1. The configuration provides a name and description and selects the Script plugin. The [script] configuration block for the plugin specifies the directory for the image to be displayed and the name of the script file. To create a new theme, simply adjust these paths and the file name of the .plymouth file itself to match the theme name you have chosen.
Listing 1
simple-image.plymouth
[Plymouth Theme]
Name=Arch Linux Simple Image
Description=This is a plymouth theme which simply displays an image
ModuleName=script
[script]
ImageDir=/usr/share/plymouth/themes/simple-image
ScriptFile=/usr/share/plymouth/themes/simple-image/simple-image.script
You can see the simple-image.script file in Listing 2. It creates an image object and calculates the screen center (lines 1 to 4). In computer graphics and also in Plymouth scripts, a sprite is a moving image object (line 6). Lines 7 and 8 place its coordinates at the computed center of the display. The last line defines RefreshFunction as the refresh_callback, which is called at each step of the boot process. Here it simply sets the opacity of the image to 1 and the stacking order to 15.
Listing 2
simple-image.script
01 image = Image("img.png");
02
03 pos_x = Window.GetWidth()/2 - image.GetWidth()/2;
04 pos_y = Window.GetHeight()/2 - image.GetHeight()/2;
05
06 sprite = Sprite(image);
07 sprite.SetX(pos_x);
08 sprite.SetY(pos_y);
09
10 fun refresh_callback () {
11   sprite.SetOpacity(1);
12   spr.SetZ(15);
13 }
14
15 Plymouth.SetRefreshFunction (refresh_callback);
You can extend this rudimentary framework by elaborating on the refresh_callback() function. You could successively increase the Opacity from to 1, fade in more images, or move sprites over the screen with algorithms of arbitrary complexity using SetX() and SetY(). The script plugin documentation lists all the available commands.
Yet Another Splash Screen
The display manager starts after the boot splash. For KDE, openSUSE installs SDDM (Figure 6). When starting KDE, you will then see a second splash screen (Figure 7). The background image of the KDE login manager can be easily changed in the desktop environment's settings tool. This is all it takes to adjust the login screen to match the rest of the graphical design, as the login screen controls use a neutral look by default.
 Figure 6: The green background of the KDE login screen can be changed with just a few clicks in the system settings.
 Figure 7: Writing a theme for the KDE start screen requires QML programming skills if you want to do more than simply replace the graphics that are displayed.
The KDE start screen, on the other hand, does not easily fit into a customized look. Newer KDE versions include a download function for themes in the system settings, as in many other places. This is still missing from openSUSE Leap 15.1, but it's not difficult to download and install themes manually from Pling.com [6]. Just unpack the zip archives in the ~~/.local/share/plasma/look-and-feel/ directory; you might need to create look-and-feel/ first.
The start screens are written in QML, an interface description language provided by the Qt GUI framework used by KDE. To even touch on the Qt feature set would go beyond the scope of this article. However, QML startup screens can be "hacked" in a similar way to Plymouth boot screens by changing the graphics in the Theme-Name/contents/splash/images/ folder.
As soon as you hover the mouse pointer over the preview of a Start Screen Design, a play symbol appears that starts the boot animation for testing purposes. This makes it quite easy to see which graphics from the images/ subfolder appear at which position in the start screen.
Conclusions
Adapting the KDE desktop to your own taste is a breeze. The GRUB boot menu, the boot splash animation, and the KDE start screen are a bit trickier. To install themes found on the Internet, all you have to do is choose the right folder to store the themes, and, in the worst case, you may need to know the right YaST module or command.
It is not quite as easy to create your own themes for these three system design elements. The best way to get started is to modify existing themes using the templates available on the Internet. Even with minor adjustments, you can achieve a customized, seamless look for the system.
Infos
- GRUB themes: https://www.pling.com/browse/cat/109/order/latest/
- GRUB theme file documentation: https://www.gnu.org/software/grub/manual/grub/html_node/Theme-file-format.html
- Plymouth themes: https://www.pling.com/browse/cat/108/order/latest/
- Plymouth script plugin: https://www.freedesktop.org/wiki/Software/Plymouth/Scripts/
- Simple-Image theme: https://github.com/barskern/plymouth-theme-simple-image/
- Start screen designs: https://www.pling.com/browse/cat/488/order/latest