DIY broadband absorbers
There are things you are proud of if you can call them your own. A luxurious car, a chic wristwatch, high-quality loudspeakers - what is your top priority? What would you be happy about and would like to post a photo about it?
Absorbers are probably not yet part of it, are they? Am I the only one who gets a broad grin on my face from a broadband absorber? Well then it's time for us to tackle this issue!
And I can already promise you: once you've heard the difference, you don't want to give up your absorbers anymore! 😁 And maybe you will proudly post a photo of your small but effective helpers! I'm looking forward to it!

Admittedly, such a simple absorber cannot win an award for innovative design. And with a material price of around EUR 25, it may not be anything that will make your neighbor pale with envy. Therefore, the real reason for joy lies solely in its use: when used correctly, it can take the sound of your speakers to a whole new level!
Over the next few weeks, I will be intensively concerned with the subject of room acoustics in my own living room. In particular, I will systematically and objectively clarify the question of effectiveness at low frequencies using measurement technology so that you get a good basis for your own decisions.
Before we get started, a short word on how to classify my "instructions": I am primarily concerned with the acoustic properties. Good sound and music enjoyment are my greatest passions! In addition, of course, it should still be reasonably comfortable in my living room. What I cannot serve are perfect tips for woodworking. For myself, I am very happy with the elaboration, just as the absorbers are now in my living room. But I'm sure there are many ways to improve. So don't take my suggestion strictly as a guide, but rather as a suggestion for your own implementation. In particular with the wood thickness and the type of gluing / screwing, you make your own judgment as to whether this achieves sufficient stability for your specific situation. Your health and that of your family and guests comes first!
WHICH SIZE AND THICKNESS SHOULD I TAKE?
I made life as easy as possible - at least in this case! 😀 There are mostly rockwool mats cut into a size of 120x60cm. That was perfect for me, because with two pieces one above the other I almost reach the ceiling.
The processing of rock wool is unfortunately associated with a little dirt. I can therefore highly recommend using finished plates. Before you start planning your wooden frame, it is best to first visit your hardware store for a first inspiration and have the available sizes shown.
Of course, the thickness of the absorber depends on your goal and your application. If you only want to line a speaker booth, a shallower depth is certainly sufficient than if you (like me) also want to absorb low-frequency sound from the subwoofer.
I chose a depth of 20cm. If this does not reach far enough into the bass area, the absorber can be removed a few cm from the wall later to improve the absorption effect. I will provide details on the relationship between absorber depth and lower cut-off frequency in the next blog article as soon as I have measured the whole.
THE MATERIAL LIST
My supplier only had the rockwool with a thickness of 5cm in the program, so I use four pieces on top of each other to get my absorber depth of 20cm. I used the following materials for each absorber:
Rockwool Airrock ND rockwool (50kg / m³): sheets of 120x60x5cm (4x)
Wooden frame and back panel with 10mm plywood panel: 120x20cm (2x), 62x20cm (3x)
Squares 17x17mm: 19cm long (4x)
Fabric (irrelevant acoustic properties): 180x120cm
Leftovers of fabric for the back: at least 130X70cm
If the question arises: the sum of all materials in my case only cost a good 20 euros (per absorber).
WHAT TOOLS DO I NEED?
You either have the few tools you need at home anyway, or you can get them for a few euros at the hardware store:
wood glue
nails or screws (I used nails 1.3x20mm)
hammer or screwdriver
staple gun and matching staples
scissors
Your hardware store will most likely saw the wood for you free of charge according to your specifications. So you don't need a saw - less work and less dirt at home!
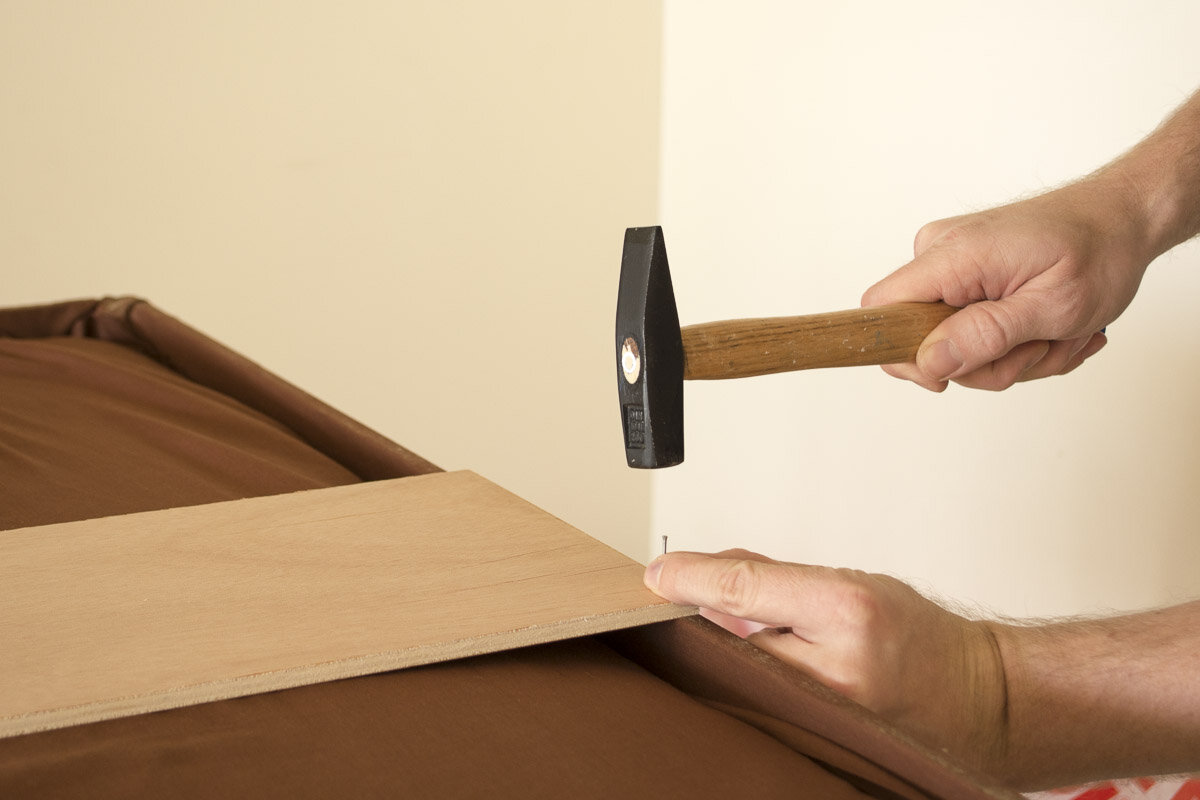
STEP 1: THE WOODEN FRAME
First I glued the squared timbers to the side walls. If you use thicker wood, you can possibly do without squared timber. In my case it seemed sensible to use them for reasons of stability. As a precaution, I also fixed the squared timbers with 2 nails. It is important to ensure that they are flush with the side parts in order to obtain a large, flat surface.


The next step is to connect two side parts and two floor / ceiling panels to a frame. If you can ask a second person for help, this will make your job easier. Here, too, I glued first and then fixed it with two nails.


I then let the finished frame dry overnight.
STEP 2: STRETCH FABRIC AROUND THE FRAME
If you have an available table that is larger than your wooden frame, you can place the fabric on the table like a tablecloth and place the wooden frame in the middle of it. Otherwise you will unfortunately have to make do with the floor. 😀


Check whether the fabric protrudes approximately the same length on the inside of the wooden frame on all sides. My recommendation for the staple sequence (I learned a lot after 12 absorbers!):
first staple in the middle on a small side
pull tight on the opposite small side and staple
staple in the middle on one long side
staple in the middle on the opposite long side. Here you need a little tact: if you stretch the fabric too little, you will see small wrinkles later. However, if you stretch too much, the wood will bend inwards (at least with a wood thickness of 10mm) and you will have unsightly gaps later when juxtaposing the absorbers. So just pull lightly so that the fabric is just tight.
Carefully pull and staple on ¼ and ¾ of the long side
pull tight on the short sides in the corners and staple
Finally fold and staple the corners. I just folded the fabric at the corners and didn't cut it.
STEP 3: INSERT MINERAL WOOL

This step is actually self-explanatory. I have a little honest note:
after a few hours of contact with the rock wool, I noticed some itching on my forearms and also a slight skin reaction. I would therefore recommend to you to use old clothes and possibly gloves and to carry out the work in a tidy environment. Then you can easily remove all the remains with the vacuum cleaner, put your clothes in the washing machine and jump in the shower!
To protect your airways, you should also decide for yourself whether you want to use a respirator.
STEP 4: COVER THE BACK
Even if you keep the absorbers firmly on the wall, I would recommend you to cover the back with fabric residues for hygienic reasons. I simply clamped them between stone wool and wooden frame.
You can also staple the fabric all around on the frame as long as it doesn't survive.

STEP 5: ATTACH BACK PLATE
If the absorber depth is low and you are not planning to stack the absorbers on top of each other, you may not need to do this step. I decided to attach another plate in the middle of the back in the same dimensions as the floor / ceiling plates. This gives me a better sense of stability when I want to stack multiple absorbers.
FINISHED!
In the meantime I have “built” 12 of these absorbers and I am thrilled as could be about the great progress!
Incidentally, an absorber with the materials listed here weighs just under 12kg. It's not a little, but it's still light enough to hang on the wall if necessary.
And it is also light and small enough that it can be transported quickly when moving to another apartment.

I hope I was able to convince you with my remarks that you can get into the topic of room acoustics for just a few euros and with little effort! I will keep you up to date in the next blog articles regarding the exact effectiveness!
Finally, a photo of how it looks in my home now. The absorbers have settled in well, phase 1 is complete!! And hopefully the speakers will finally move in in a few days! 😀
