

How To Add A Printer On Windows 8.1

Adding a printer on Windows 8.1 may seem like a daunting task, but with the right guidance, it can be a straightforward process. Did you know that Windows 8.1 offers a variety of options for adding a printer, allowing you to connect both wired and wireless devices? Whether you're setting up a new printer or connecting an existing one, this guide will walk you through the steps to ensure a smooth installation process.
When it comes to adding a printer on Windows 8.1, it's important to understand the features and compatibility requirements. Windows 8.1 supports a wide range of printers, including both local and network printers. With the built-in printer driver database, you can easily find and install the appropriate driver for your printer. Additionally, the Windows 8.1 operating system provides a user-friendly interface for managing and configuring printers, making it easier than ever to print documents and photos. By following the steps outlined in this guide, you'll be able to seamlessly add a printer to your Windows 8.1 device and start printing in no time.
Adding a printer on Windows 8.1 is a simple process that can be done in a few easy steps. First, connect your printer to your computer using a USB cable or make sure it is connected to the same network. Then, open the Control Panel and click on "Devices and Printers". Select "Add a printer" and choose the option to add a network, wireless or Bluetooth printer. Finally, follow the on-screen instructions to complete the setup. With these steps, you'll be able to add a printer to your Windows 8.1 device hassle-free.
Understanding Printer Connectivity on Windows 8.1
Adding a printer to your Windows 8.1 operating system can enhance your productivity and streamline your printing tasks. However, if you are new to the Windows 8.1 environment or face technical issues, the process might be a bit daunting. In this guide, we will walk you through the different methods for adding a printer on Windows 8.1, ensuring a seamless printing experience. Whether you prefer a wired connection or a wireless one, this article will cover all the necessary steps to help you add a printer successfully.
Wired Printer Connection
If you have a printer with a USB port, connecting it to your Windows 8.1 computer using a USB cable is one of the simplest ways to add a printer. Here's how:
Step 1: Connect the Printer
Start by connecting your printer to your computer using a USB cable. Ensure that the printer is turned on and ready to use. Make sure to use a USB cable that is compatible with both your printer and computer.
Step 2: Open Devices and Printers Settings
To access the printer settings on your Windows 8.1 computer, navigate to the Control Panel by pressing the Windows key + X and selecting "Control Panel" from the menu. Then, click on the "Devices and Printers" option.
Step 3: Add a Printer
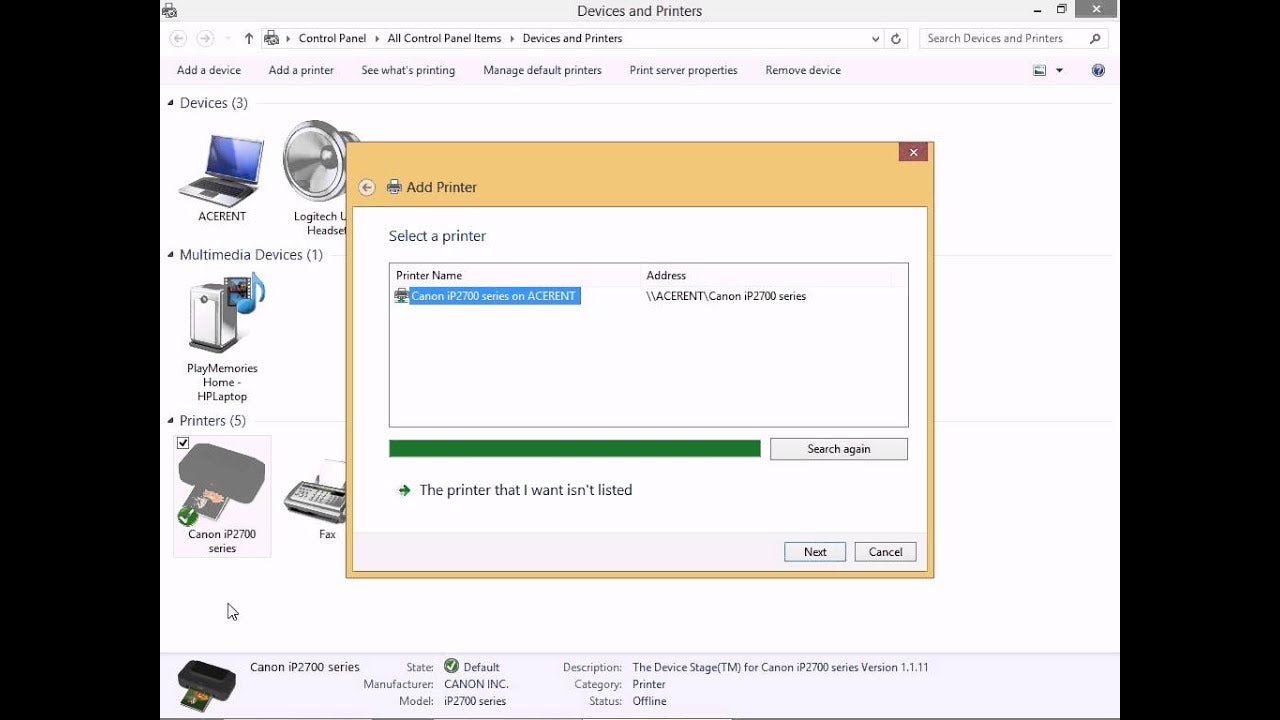
In the Devices and Printers window, click on the "Add a printer" button located at the top of the window. It will open the "Add Printer" wizard that will guide you through the process of adding a printer.
Step 4: Select the Printer
The "Add Printer" wizard will search for available printers and display a list. Select the printer you connected in Step 1 from the list and click "Next." If the printer is not listed, ensure that it is properly connected and turned on, then click "Refresh."
Step 5: Install the Printer Driver
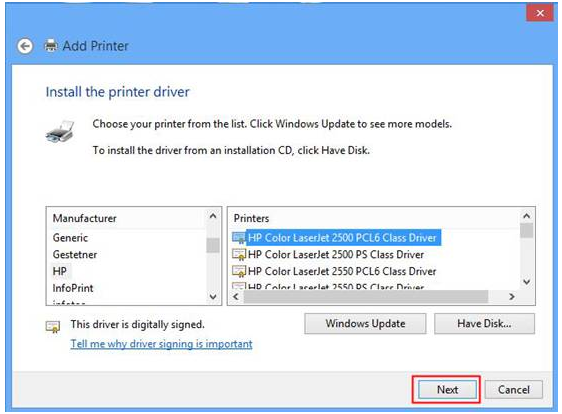
After selecting the printer, Windows will install the necessary driver software automatically. If prompted, choose the appropriate driver for your printer, or let Windows select it automatically. Click "Next" to proceed.
Step 6: Set as Default (Optional)
If you want to set the newly added printer as your default printer, select the option to set it as the default printer. Otherwise, leave it unchecked. Click "Next" to continue.
Step 7: Finish the Setup
Review the summary of your printer settings in the "Completing the Add Printer Wizard" window. If everything looks correct, click "Finish" to complete the setup. You can now start printing with your newly added printer.
Wireless Printer Connection
If you prefer a wireless printer connection, Windows 8.1 lets you easily connect and add a wireless printer to your computer network. Follow these steps:
Step 1: Enable Wi-Fi and Printer
Ensure that the wireless printer is turned on and connected to the same Wi-Fi network as your Windows 8.1 computer. Refer to your printer's user manual or manufacturer's website for specific instructions on how to connect to a wireless network.
Step 2: Open Devices and Printers Settings
Access the printer settings by navigating to the Control Panel using the Windows key + X combination and selecting "Control Panel." Click on "Devices and Printers" to open the settings window.
Step 3: Add a Printer
In the "Devices and Printers" window, click on the "Add a printer" button at the top. The "Add Printer" wizard will open, guiding you through the process of adding a printer to your computer.
Step 4: Select the Printer
Windows will search for available printers on the network. Select the wireless printer you wish to add from the list and click "Next." If the printer is not listed, ensure that it is properly connected to the Wi-Fi network and turned on, then click "Refresh."
Step 5: Install the Printer Driver
Once you have selected the printer, Windows will automatically install the necessary driver software. If prompted, choose the correct driver for your printer, or let Windows select it automatically. Click "Next" to proceed.
Step 6: Set as Default (Optional)
If you want to set the wireless printer as your default printer, select the option to set it as the default. If not, leave it unchecked. Click "Next" to continue.
Step 7: Finish the Setup
Review the summary of your printer settings in the "Completing the Add Printer Wizard" window. If everything looks correct, click "Finish" to complete the setup. You can now enjoy wireless printing with your newly added printer.
Troubleshooting Printer Issues on Windows 8.1
While adding a printer on Windows 8.1 is generally a straightforward process, you might encounter issues along the way. Here are some common troubleshooting steps to resolve printer connection issues:
Check Printer Connectivity
Ensure that your printer is properly connected to your computer or network. For a wired connection, check the USB cable and make sure it is securely connected to both the printer and computer. For a wireless connection, ensure that the printer is connected to the Wi-Fi network and in range.
Update Printer Drivers
An outdated or incompatible printer driver can cause connectivity issues. Visit the manufacturer's website to download and install the latest driver for your printer model. Alternatively, you can use the Device Manager in Windows to update the printer driver.
Restart Print Spooler Service
The print spooler service manages print jobs and can sometimes encounter issues. Restarting the print spooler service can resolve problems related to print queue and pending print jobs. To restart the print spooler service, follow these steps:
- Press the Windows key + R to open the Run dialog box.
- Type "services.msc" (without quotes) and press Enter.
- In the Services window, scroll down and locate "Print Spooler" in the list.
- Right-click on "Print Spooler" and select "Restart" from the context menu.
Run Printer Troubleshooter
Windows 8.1 includes a built-in printer troubleshooter that can automatically detect and fix common printer issues. To run the printer troubleshooter, follow these steps:
- Press the Windows key + I to open the Settings app.
- Click on "Update & Security" and select "Troubleshoot" from the left pane.
- Scroll down and click on "Printer" under "Find and fix other problems."
- Click on the "Run the troubleshooter" button and follow the on-screen instructions.
Conclusion
Adding a printer on Windows 8.1 is a simple process with wired and wireless connectivity options. By following the step-by-step instructions provided in this guide, you can easily connect and set up a printer for your Windows 8.1 computer. In case of any issues, the troubleshooting steps will help you overcome common problems and ensure a smooth printing experience. Enjoy the convenience of printing from your Windows 8.1 system with ease and efficiency.
Adding a Printer on Windows 8.1
Adding a printer to your Windows 8.1 computer is a straightforward process. Follow these steps to set up your printer:
1. Connect the printer to your computer using a USB cable or make sure both devices are connected to the same network if you are using a wireless printer.
2. Open the Control Panel by pressing the Windows key + X and selecting "Control Panel" from the menu.
3. In the Control Panel, click on "Hardware and Sound" and then select "Devices and Printers."
4. Click on the "Add a printer" option and Windows will search for available printers.
5. Select your printer from the list or click on "The printer that I want isn't listed" if your printer is not shown.
6. Follow the on-screen instructions to install the necessary drivers and complete the setup process.
7. Once the setup is complete, your printer will be ready to use.
Adding a printer on Windows 8.1 is a simple task and ensures that you can easily print documents and files from your computer.
Key Takeaways: How to Add a Printer on Windows 8.1
- Step 1: Open the Settings menu by swiping in from the right edge of the screen or pressing the Windows key + C.
- Step 2: Click on the "Change PC settings" option at the bottom of the menu.
- Step 3: In the PC settings menu, select the "PC and devices" category.
- Step 4: Click on the "Devices" tab and then select the "Printers and scanners" option from the left-hand menu.
- Step 5: Click on the "Add a printer or scanner" button and wait for Windows to detect the printers and scanners connected to your computer.
Frequently Asked Questions
Adding a printer on Windows 8.1 can be a simple process once you know the right steps. Here, we have outlined some commonly asked questions about how to add a printer on Windows 8.1, along with detailed answers to help you get started.
1. How do I find the "Devices and Printers" menu in Windows 8.1?
In order to find the "Devices and Printers" menu on Windows 8.1, follow these steps:
1. Press the Windows key + X on your keyboard to open the Quick Access Menu.
2. Select "Control Panel" from the menu.
3. In the Control Panel window, select the "Hardware and Sound" category.
4. Under "Devices and Printers," click on "Add a Printer."
5. Follow the on-screen instructions to add the printer to your Windows 8.1 device.
2. Can I add a wireless printer to Windows 8.1?
Yes, you can add a wireless printer to Windows 8.1 by following these steps:
1. Make sure your printer is turned on and connected to the same Wi-Fi network as your Windows 8.1 device.
2. Open the "Devices and Printers" menu as mentioned in the previous question.
3. Click on "Add a Printer."
4. Select "Add a network, wireless or Bluetooth printer." Wait for Windows to detect your wireless printer.
5. Follow the on-screen instructions to complete the installation of your wireless printer.
3. What should I do if my printer is not listed during the installation process?
If your printer is not listed during the installation process on Windows 8.1, try the following:
1. Make sure your printer is turned on and properly connected to your Windows 8.1 device.
2. Click on "The printer that I want isn't listed" option during the installation process.
3. Select "Add a local printer or network printer with manual settings."
4. Follow the on-screen instructions to manually add your printer by providing the necessary details.
4. Can I connect multiple printers to Windows 8.1?
Yes, you can connect multiple printers to Windows 8.1 by following these steps:
1. Open the "Devices and Printers" menu as mentioned in the first question.
2. Click on "Add a Printer."
3. Select the printer(s) you want to add from the list of available printers.
4. Follow the on-screen instructions to complete the installation of the additional printer(s).
5. How do I set a default printer on Windows 8.1?
To set a default printer on Windows 8.1, follow these steps:
1. Open the "Devices and Printers" menu as mentioned in the first question.
2. Right-click on the printer you want to set as the default.
3. Select "Set as default printer" from the context menu.
4. The selected printer will now be set as the default printer for your Windows 8.1 device.
How to install Printer with Windows 8
Adding a printer on Windows 8.1 is a straightforward process that can be done in just a few steps. First, make sure that your printer is connected to your computer and turned on. Then, open the Control Panel by swiping in from the right edge of the screen, tapping "Search," typing "Control Panel," and selecting it from the results. In the Control Panel, click on "View devices and printers" under the "Hardware and Sound" section. Here, you will see a list of the devices connected to your computer.
To add your printer, click on "Add a printer" at the top of the page. Windows will search for available printers on your network. If your printer is detected, select it from the list and click "Next." If your printer is not listed, you can manually add it by clicking on "The printer that I want isn't listed." Follow the on-screen instructions to complete the installation process. Once your printer is successfully installed, you can set it as your default printer or adjust its settings as needed. With these simple steps, you can easily add and set up a printer on Windows 8.1.


