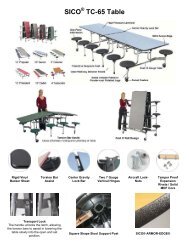
installing the venue steps - Sico Inc.
installing the venue steps - Sico Inc.
installing the venue steps - Sico Inc.

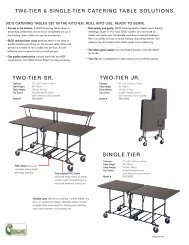
Create successful ePaper yourself
Turn your PDF publications into a flip-book with our unique Google optimized e-Paper software.
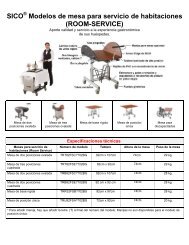
Impreso en los Estados Unidos (01-03) SICO es marca registrada de SICO <strong>Inc</strong>orporated Pieza Nº 117687 Rev. A<br />
Si tiene algún problema durante la<br />
instalación, comuníquese con el<br />
Servicio al cliente<br />
SICO al 1-800-424-0796.<br />
NO ES NECESARIO EMPLEAR<br />
HERRAMIENTAS<br />
MANUAL DE<br />
INSTRUCCIONES<br />
ESCALERA<br />
UNIVERSAL<br />
Cuide su espalda al levantar, empujar, tirar,<br />
doblar o desdoblar estas unidades. Nunca<br />
levante más de lo que es capaz de manejar<br />
con seguridad.<br />
ANTES DE COMENZAR...<br />
Lea y entienda estas instrucciones antes de<br />
realizar el montaje.<br />
BEFORE YOU BEGIN...<br />
Read and understand <strong>the</strong>se instructions<br />
before operating.<br />
Use caution and care for your back when<br />
lifting, pushing, pulling, or folding and<br />
unfolding <strong>the</strong>se units. Never lift more than<br />
you are able to safely handle.<br />
NO TOOLS REQUIRED<br />
UNIVERSAL<br />
STEPS<br />
OWNER’S<br />
MANUAL<br />
If you have any problems during setup,<br />
contact SICO Customer Service at<br />
1-800-424-0796<br />
Printed in <strong>the</strong> USA (01-03) SICO is a registered trademark of SICO <strong>Inc</strong>orporated Part No. 117687 Rev. A
INTRODUCTION<br />
SICO Universal Steps are designed to work with<br />
all SICO stage products.<br />
Dual Height, Articulating and Venue Steps are<br />
available in a variety of sizes to match your<br />
stage height.<br />
Dual Height Steps:<br />
- Dual Height Steps are available to<br />
accommodate various stage heights. Steps<br />
range from 12” (305 mm) to 32” (813 mm) in<br />
fixed heights.<br />
STEP RISER<br />
STEP MODEL HEIGHT<br />
2 step model 6”<br />
(152 mm)<br />
2 step model 8”<br />
(203 mm)<br />
3 step model 6”<br />
(152 mm)<br />
3 step model 8”<br />
(203 mm)<br />
ATTACHES TO<br />
STAGE HEIGHT:<br />
12” or 18”<br />
(305 mm-457 mm)<br />
16” or 24”<br />
(406 mm-610 mm)<br />
18” or 24”<br />
(457 mm-610 mm)<br />
24” or 32”<br />
(610 mm-813 mm)<br />
- Parts of <strong>the</strong> step include, guardrails, clamp<br />
and casters.<br />
See page 4 for detailed installation instructions.<br />
Articulating Steps:<br />
- Articulating Steps are available to<br />
accommodate various stage heights from<br />
12” (305 mm) to 56” (1,422 mm).<br />
STEP RISER ATTACHES TO<br />
STEP MODEL HEIGHT: STAGE HEIGHT:<br />
3 step model 4” to 8”<br />
12” to 24”<br />
(102 mm-203 mm) (305 mm-610 mm)<br />
4 step model 4” to 8”<br />
16” to 32”<br />
(102 mm-203 mm) (406 mm-813 mm)<br />
5 step model 4” to 8”<br />
20” to 40”<br />
(102 mm-203 mm) (508 mm-1,016 mm)<br />
6 step model 4” to 8”<br />
24” to 48”<br />
(102 mm-203 mm) (610 mm-1,219 mm)<br />
7 step model 4” to 8”<br />
28” to 56”<br />
(102 mm-203 mm) (711 mm-1,422 mm)<br />
For example:<br />
If a customer has a 16”(406 mm)-24” (610mm)<br />
1800 stage and a 18”(457 mm)-24”(610 mm)-<br />
30”(762 mm)Tri-Height stage, <strong>the</strong>y will use <strong>the</strong><br />
4 step model, because it will work with each<br />
stage height from <strong>the</strong> 16”(406 mm) 1800 stage<br />
to <strong>the</strong> 30” (762 mm) Tri-Height stage.<br />
- Parts of this step include adjustable guardrails,<br />
attachment clamp, and casters.<br />
See page 6 for detailed installation instructions.<br />
2<br />
DUAL HEIGHT<br />
STEP<br />
ARTICULATING STEPS<br />
DOBLE ALTURA<br />
ESCALERA DE<br />
2<br />
Vea las instrucciones detalladas de instalación<br />
en la página 4.<br />
- Entre las piezas de la escalera se incluyen<br />
barandas, abrazadera y ruedas retráctiles.<br />
610 mm a 813 mm<br />
457 mm a 610 mm<br />
406 mm a 610 mm<br />
305 mm a 457 mm<br />
SE FIJA A LA ALTURA<br />
DEL ESCENARIO:<br />
203 mm<br />
152 mm<br />
203 mm<br />
152 mm<br />
ALTURA DEL<br />
CONTRAPELDAÑO<br />
2 escalones<br />
Modelo de<br />
2 escalones<br />
Modelo de<br />
3 escalones<br />
Modelo de<br />
3 escalones<br />
Modelo de<br />
MODELO DE<br />
ESCALERA<br />
- La escalera de doble altura está disponible<br />
para ajustarse a las diferentes alturas de los<br />
escenarios. Las alturas de las escaleras<br />
oscilan entre 305 cm y 813 cm en alturas<br />
fijas.<br />
Escalera de doble altura:<br />
Las escaleras de doble altura, articuladas y<br />
Venue están disponibles en diferentes medidas<br />
para lograr un óptimo ajuste a la altura de su<br />
escenario.<br />
Las Escaleras Universales SICO están<br />
diseñadas para funcionar con todos los<br />
productos para escenarios SICO.<br />
INTRODUCCIÓN
ESCALERA VENUE<br />
ESCALERA ARTICULADA<br />
3<br />
Vea las instrucciones detalladas de instalación<br />
en la página 9.<br />
- Las piezas de esta escalera incluyen barandas<br />
ajustables, abrazadera de fijación, ruedas<br />
retráctiles y muelles asistidos por gas.<br />
1219 mm a<br />
1,829 mm<br />
1,016 mm a<br />
1,625 mm<br />
SE FIJA A LA ALTURA<br />
DEL ESCENARIO:<br />
Escalera Venue:<br />
- Las escaleras Venue están disponibles en<br />
diferentes alturas a partir de 1,016 cm y<br />
hasta 1,829 cm.<br />
Vea las instrucciones detalladas de instalación<br />
en la página 6.<br />
- Las piezas de la escalera incluyen barandas<br />
ajustables, abrazadera de fijación y ruedas<br />
retráctiles.<br />
Por ejemplo:<br />
Si un cliente posee un escenario 1800 de<br />
406 mm-610 mm y un escenario de tres alturas<br />
(Tri-Height) de 457 mm-610 mm-762 mm,<br />
utilizará el modelo de 4 escalones, ya que será<br />
apto para cada altura de escenario desde los<br />
406 mm del escenario 1800 a los 762 mm del<br />
escenario de tres alturas.<br />
711 mm a 1,422 mm<br />
610 mm a 1,219 mm<br />
508 mm a 1,016 mm<br />
406 mm a 813 mm<br />
305 mm a 610 mm<br />
SE FIJA A LA ALTURA<br />
DEL ESCENARIO:<br />
136 mm a<br />
203 mm<br />
127 mm a<br />
203 mm<br />
ALTURA DEL<br />
CONTRAPELDAÑO<br />
102 mm a 203 mm<br />
102 mm a 203 mm<br />
102 mm a 203 mm<br />
102 mm a 203 mm<br />
102 mm a 203 mm<br />
ALTURA DEL<br />
CONTRAPELDAÑO<br />
8 escalones<br />
Modelo de<br />
9 escalones<br />
Modelo de<br />
MODELO DE<br />
ESCALERA<br />
3 escalones<br />
Modelo de<br />
4 escalones<br />
Modelo de<br />
5 escalones<br />
Modelo de<br />
6 escalones<br />
Modelo de<br />
7 escalones<br />
Modelo de<br />
MODELO DE<br />
ESCALERA<br />
Escalera articulada:<br />
- Las escaleras articuladas están disponibles<br />
para ajustarse a las diferentes alturas de los<br />
escenarios entre 305 mm y 1,422 mm.<br />
INTRODUCCIÓN - continuación<br />
INTRODUCTION continued<br />
Venue Steps:<br />
- Venue Steps are available in varying heights<br />
ranging from 40” (1,016 mm) to 72”<br />
(1829 mm).<br />
STEP RISER ATTACHES TO<br />
STEP MODEL HEIGHT: STAGE HEIGHT:<br />
8 step model 5” to 8”<br />
40” to 64”<br />
(127 mm-203 mm) (1,016 mm-1,625 mm)<br />
9 step model 5.34” to 8” 48” to 72”<br />
(136 mm-203 mm) (1219 mm-1,829 mm)<br />
- Parts of this step include adjustable guardrails,<br />
attachment clamp, casters and gas assist<br />
springs.<br />
See page 9 for detailed installation instructions.<br />
3<br />
VENUE STEP
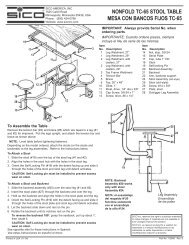
INSTALLING DUAL HEIGHT STEPS<br />
NOTE: Always move <strong>the</strong> <strong>steps</strong> by using <strong>the</strong><br />
wheels located on <strong>the</strong> side of <strong>the</strong> step unit.<br />
1. Roll <strong>the</strong> <strong>steps</strong> into position near <strong>the</strong> stage.<br />
2. Push <strong>the</strong> step against <strong>the</strong> stage.<br />
CAUTION<br />
DO NOT leave a gap between<br />
<strong>the</strong> stage unit and <strong>steps</strong>.<br />
Injury can occur. 117757-01<br />
3. Slide <strong>the</strong> hook lock up so that <strong>the</strong> hook<br />
fastens under <strong>the</strong> stage frame.<br />
4<br />
4<br />
3. Deslice la traba del gancho hacia arriba para<br />
que éste quede fijo bajo la estructura del<br />
escenario.<br />
117757-01<br />
PRECAUCIÓN<br />
NO deje ningún espacio entre el<br />
escenario y la escalera. Esto<br />
puede provocar lesiones.<br />
2. Empújela contra el escenario.<br />
1. Transporte la escalera hasta la posición<br />
prevista cerca del escenario.<br />
NOTA: Mueva siempre la escalera utilizando las<br />
ruedas ubicadas al costado de la unidad.<br />
INSTALACIÓN DE LA ESCALERA DE DOBLE ALTURA
5<br />
Importante: Ambos lados de la escalera deben<br />
estar bien asegurados al escenario con el<br />
gancho de la escalera para evitar que ésta se<br />
aparte del escenario.<br />
4. Gire el gancho amarillo de la escalera para<br />
asegurarlo bajo el escenario.<br />
INSTALACIÓN DE LA ESCALERA DE DOBLE ALTURA - continuación<br />
INSTALLING DUAL HEIGHT STEPS continued<br />
4. Turn <strong>the</strong> yellow step hook to secure <strong>the</strong> hook<br />
under <strong>the</strong> stage.<br />
Important: Both sides of <strong>the</strong> step must be<br />
properly secured to <strong>the</strong> stage with <strong>the</strong> step<br />
hook to prevent <strong>the</strong> <strong>steps</strong> from moving away<br />
from <strong>the</strong> stage.<br />
5
INSTALLING THE ARTICULATED STEPS<br />
NOTE: Two people are required to safely set<br />
up <strong>the</strong> articulating <strong>steps</strong>.<br />
1. Move <strong>the</strong> <strong>steps</strong> close to <strong>the</strong> stage you will be<br />
using.<br />
2. With a person on ei<strong>the</strong>r side of <strong>the</strong> <strong>steps</strong>, lift<br />
<strong>the</strong> top end of <strong>the</strong> <strong>steps</strong> and carefully roll <strong>the</strong><br />
<strong>steps</strong> to <strong>the</strong> stage.<br />
6<br />
6<br />
2. Coloque una persona a cada lado de la<br />
rampa, levante el extremo superior de la<br />
escalera y transpórtela con cuidado hasta el<br />
escenario.<br />
1. Mueva la escalera cerca del escenario que<br />
utilizará.<br />
NOTA: Se necesitan dos personas para instalar<br />
la escalera articulada sin inconvenientes.<br />
INSTALACIÓN DE LA ESCALERA ARTICULADA
Para ajustar<br />
Soporte del<br />
escalón superior<br />
7<br />
Cuando estén ajustados correctamente, los<br />
soportes de la escalera se apoyarán<br />
completamente sobre la plataforma.<br />
4. Tome la baranda y empuje la anilla de la<br />
misma hacia delante o hacia atrás (según sea<br />
necesario) para que la escalera quede nivelada<br />
y los postes queden en posición vertical.<br />
3. Afloje las tuercas de mano de la baranda<br />
ubicadas a ambos lados de la escalera.<br />
Nivelación de la escalera con el escenario:<br />
El soporte del escalón superior debe apoyarse<br />
plano sobre la superficie de la plataforma.<br />
IMPORTANTE:<br />
Si la escalera no está nivelada con el escenario<br />
como se muestra en la figura de la derecha,<br />
deberá nivelarse.<br />
INSTALACIÓN DE LA ESCALERA ARTICULADA - continuación<br />
INSTALLING THE ARTICULATED STEPS continued<br />
IMPORTANT:<br />
If <strong>the</strong> <strong>steps</strong> are not level with <strong>the</strong> stage as shown<br />
at <strong>the</strong> right, <strong>the</strong> <strong>steps</strong> will need to be made level.<br />
The upper step support should rest flat on <strong>the</strong><br />
deck surface.<br />
Levelling <strong>the</strong> <strong>steps</strong> with <strong>the</strong> stage:<br />
3. Loosen <strong>the</strong> guardrail hand knobs located on<br />
both sides of <strong>the</strong> <strong>steps</strong>.<br />
4. Grasp <strong>the</strong> guardrail and push <strong>the</strong> guardrail<br />
hoop forward or back as required to make <strong>the</strong><br />
step level and <strong>the</strong> posts vertical.<br />
When properly adjusted, <strong>the</strong> step supports<br />
will fully rest on <strong>the</strong> deck.<br />
7<br />
Upper Step<br />
Support<br />
To adjust
INSTALLING THE ARTICULATED STEPS continued<br />
5. Roll <strong>the</strong> <strong>steps</strong> to <strong>the</strong> stage.<br />
WARNING<br />
Steps must be properly clamped to <strong>the</strong> stage.<br />
DO NOT leave a gap between <strong>the</strong> stage unit<br />
and <strong>steps</strong>.<br />
Serious injury can occur. 117692-01<br />
6. Hand tighten ( )<strong>the</strong> yellow clamping knob to<br />
secure <strong>the</strong> <strong>steps</strong> to <strong>the</strong> stage. (Tools are not<br />
required to tighten <strong>the</strong> knob).<br />
Important: Both sides of <strong>the</strong> step must be<br />
properly secured to <strong>the</strong> stage to prevent <strong>the</strong><br />
<strong>steps</strong> from moving away from <strong>the</strong> stage.<br />
7. Tighten <strong>the</strong> guardrail hand knobs located at<br />
both sides of <strong>the</strong> stage.<br />
Important: Both hand knobs must be tightened<br />
to achieve full load capacity.<br />
8<br />
8<br />
Importante: Las dos tuercas de mano deben<br />
estar ajustadas, para lograr una capacidad de<br />
carga completa.<br />
7. Apriete las tuercas de la mano de la barandilla<br />
ubicadas a ambos lados del escenario<br />
Importante: Ambos lados de escalera deben<br />
estar bien asegurados al escenario para evitar<br />
que ésta se aparte del escenario.<br />
6. Ajuste a mano ( ) la tuerca amarilla de la<br />
abrazadera para asegurar la escalera al<br />
escenario. (No se necesitan herramientas para<br />
ajustar la tuerca.)<br />
La escalera debe estar correctamente fijada<br />
al escenario con las abrazaderas. NO deje<br />
ningún espacio entre el escenario y la<br />
escalera.<br />
Esto puede provocar lesiones graves.<br />
117692-01<br />
ADVERTENCIA<br />
5. Transporte la escalera hasta el escenario.<br />
INSTALACIÓN DE LA ESCALERA ARTICULADA - continuación
Trabas de<br />
las patas<br />
9<br />
3. Mueva con cuidado la escalera hasta su<br />
posición adecuada cerca del escenario que<br />
utilizará.<br />
2. Destrabe las patas girando hacia arriba la<br />
palanca de trabado.<br />
Levante la escalera con ayuda de los muelles<br />
a gas.<br />
1. Ubique las dos (2) trabas de las patas a los<br />
costados de la escalera.<br />
NOTA: Se necesitan dos personas para instalar<br />
la escalera Venue sin inconvenientes.<br />
INSTALACIÓN DE LA ESCALERA VENUE<br />
INSTALLING THE VENUE STEPS<br />
NOTE: Two people are required to safely set<br />
up <strong>the</strong> Venue Steps.<br />
1. Locate <strong>the</strong> two (2) leg locks at <strong>the</strong> sides of <strong>the</strong><br />
<strong>steps</strong>.<br />
2.Unlock <strong>the</strong> legs by rotating <strong>the</strong> lock handle<br />
upward.<br />
Lift <strong>the</strong> staircase using <strong>the</strong> assistance of <strong>the</strong><br />
gas springs.<br />
3.Carefully move <strong>the</strong> <strong>steps</strong> into position near <strong>the</strong><br />
stage you will be using.<br />
9<br />
Leg Locks
INSTALLING THE VENUE STEPS continued<br />
4. With a person on ei<strong>the</strong>r side, lift <strong>the</strong> top of <strong>the</strong><br />
step unit and carefully roll <strong>the</strong> <strong>steps</strong> to <strong>the</strong><br />
stage until it makes contact with <strong>the</strong> top of <strong>the</strong><br />
stage deck.<br />
IMPORTANT:<br />
If <strong>the</strong> <strong>steps</strong> are not level with <strong>the</strong> stage as shown<br />
at <strong>the</strong> right, <strong>the</strong> <strong>steps</strong> will need to be made level.<br />
The Upper Step Support should rest flat on <strong>the</strong><br />
deck.<br />
Levelling <strong>the</strong> <strong>steps</strong> with <strong>the</strong> stage:<br />
5. Loosen <strong>the</strong> guardrail hand knobs located on<br />
both sides of <strong>the</strong> <strong>steps</strong>.<br />
Note: On <strong>the</strong> Venue <strong>steps</strong> <strong>the</strong>re are four (4)<br />
hand knobs.<br />
10<br />
Upper Step<br />
Support<br />
Soporte del<br />
escalón superior<br />
10<br />
Nota: En la escalera Venue hay cuatro (4)<br />
tuercas de mano<br />
5. Afloje las tuercas de mano de la baranda<br />
ubicadas a ambos lados de la escalera.<br />
Nivelación de la escalera con el escenario:<br />
El soporte del escalón superior debe apoyarse<br />
plano sobre la plataforma.<br />
IMPORTANTE:<br />
Si la escalera no está nivelada con el escenario<br />
como se muestra en la figura de la derecha,<br />
deberá ser nivelada.<br />
4. Coloque una persona a cada lado, levante el<br />
extremo superior de la escalera y transporte<br />
con cuidado la escalera hacia el escenario<br />
hasta que toque la parte superior de la<br />
plataforma del mismo.<br />
INSTALACIÓN DE LA ESCALERA VENUE - continuación
Para Ajustar<br />
11<br />
7. Una vez que la escalera está nivelada con el<br />
escenario, ajuste las tuercas de mano de la<br />
baranda.<br />
Importante: Las cuatro (4) tuercas de mano<br />
deben estar ajustadas para lograr una<br />
capacidad de carga completa.<br />
Nota: En escaleras de mayor altura, puede ser<br />
de utilidad el empleo de una herramienta de<br />
nivelación para lograr la posición óptima de la<br />
escalera.<br />
Cuando esté ajustado correctamente, los<br />
soportes de la escalera apoyarán<br />
completamente sobre la plataforma.<br />
6. Tome la baranda y empuje la anilla de la<br />
baranda hacia delante o hacia atrás (según<br />
sea necesario) para que la escalera quede<br />
nivelada y los postes queden en posición<br />
vertical.<br />
INSTALACIÓN DE LA ESCALERA VENUE - continuación<br />
INSTALLING THE VENUE STEPS continued<br />
6.Grasp <strong>the</strong> guardrail and push <strong>the</strong> guardrail<br />
hoop forward or back as required to make <strong>the</strong><br />
step level and <strong>the</strong> posts vertical.<br />
When properly adjusted, <strong>the</strong> step supports<br />
will fully rest on <strong>the</strong> deck.<br />
Note: On higher step units it may be helpful to<br />
use a levelling tool in order to achieve <strong>the</strong><br />
best position of <strong>the</strong> step.<br />
7. Once <strong>the</strong> <strong>steps</strong> are level with <strong>the</strong> stage,<br />
tighten <strong>the</strong> guardrail hand knobs.<br />
Important: All four (4) hand knobs must be<br />
tightened to achieve full load capacity.<br />
11<br />
To Adjust
INSTALLING THE VENUE STEPS continued<br />
8. Roll <strong>the</strong> <strong>steps</strong> against <strong>the</strong> stage.<br />
WARNING<br />
Steps must be properly clamped to <strong>the</strong> stage.<br />
DO NOT leave a gap between <strong>the</strong> stage unit<br />
and <strong>steps</strong>.<br />
Serious injury can occur. 117692-01<br />
9. Hand tighten <strong>the</strong> two (2) yellow clamping<br />
knobs by turning clockwise, to secure <strong>the</strong><br />
<strong>steps</strong> to <strong>the</strong> stage.<br />
(Tools are not required to tighten <strong>the</strong> knob).<br />
Important: Both sides of <strong>the</strong> step must be<br />
properly secured to <strong>the</strong> stage to prevent <strong>the</strong><br />
<strong>steps</strong> from moving away from <strong>the</strong> stage.<br />
NOTE: When storing <strong>the</strong> step, rotate <strong>the</strong> leg<br />
lock down and <strong>the</strong>n push down on <strong>the</strong> step.<br />
When <strong>the</strong> lowest height is achieved <strong>the</strong> two (2)<br />
leg locks will activate.<br />
12<br />
12<br />
NOTA: Cuando guarde la escalera, gire hacia<br />
abajo la traba de las patas y luego empuje la<br />
escalera hacia abajo. Cuando se alcance la<br />
altura menor altura se activarán las dos (2)<br />
trabas de las patas.<br />
Importante: Ambos lados de la escalera deben<br />
estar bien asegurados al escenario para<br />
evitar que aquélla se aparte del escenario.<br />
9. Ajuste a mano las dos (2) tuercas amarillas<br />
de la abrazadera, girándolas en dirección<br />
horaria, para asegurar la escalera al<br />
escenario.<br />
(No se necesitan herramientas para ajustar la<br />
tuerca.)<br />
ADVERTENCIA<br />
La escalera debe estar correctamente fijada<br />
al escenario con las abrazaderas.<br />
NO deje ningún espacio entre el escenario y<br />
la escalera.<br />
Esto puede provocar lesiones graves.<br />
117692-01<br />
8. Transporte la escalera contra el escenario.<br />
INSTALACIÓN DE LA ESCALERA VENUE - continuación
SICO AMERICA INC.<br />
7525 Cahill Road<br />
Minneapolis, MN 55439 USA<br />
TELÉFONO: 1-800-424-0796<br />
FAX: (952) 829-5141<br />
SITIO WEB: WWW.SICOINC.COM<br />
Cuando llame al servicio al cliente,<br />
tenga a mano el número de serie del<br />
producto.<br />
Si desea recibir ayuda para:<br />
- Seleccionar piezas de repuesto /<br />
calcomanías<br />
- Reparar el producto<br />
- Ajustar y manejar el producto<br />
- Obtener asistencia en línea<br />
Notas:<br />
Notes:<br />
Please have <strong>the</strong> serial number of <strong>the</strong><br />
product when contacting customer<br />
service.<br />
To receive assistance for:<br />
- Selecting replacement parts / decals<br />
- Repairing <strong>the</strong> product<br />
- Adjusting and operating <strong>the</strong> product<br />
- Obtaining On-line assistance<br />
TELEPHONE: 1-800-424-0796<br />
FAX: (952) 829-5141<br />
WEB SITE: WWW.SICOINC.COM<br />
SICO AMERICA INC.<br />
7525 Cahill Road<br />
Minneapolis, MN 55439 USA