installing the venue steps - Sico Inc.
installing the venue steps - Sico Inc.
installing the venue steps - Sico Inc.

You also want an ePaper? Increase the reach of your titles
YUMPU automatically turns print PDFs into web optimized ePapers that Google loves.
Impreso en los Estados Unidos (01-03) SICO es marca registrada de SICO <strong>Inc</strong>orporated Pieza Nº 117687 Rev. A<br />
Si tiene algún problema durante la<br />
instalación, comuníquese con el<br />
Servicio al cliente<br />
SICO al 1-800-424-0796.<br />
NO ES NECESARIO EMPLEAR<br />
HERRAMIENTAS<br />
MANUAL DE<br />
INSTRUCCIONES<br />
ESCALERA<br />
UNIVERSAL<br />
Cuide su espalda al levantar, empujar, tirar,<br />
doblar o desdoblar estas unidades. Nunca<br />
levante más de lo que es capaz de manejar<br />
con seguridad.<br />
ANTES DE COMENZAR...<br />
Lea y entienda estas instrucciones antes de<br />
realizar el montaje.<br />
BEFORE YOU BEGIN...<br />
Read and understand <strong>the</strong>se instructions<br />
before operating.<br />
Use caution and care for your back when<br />
lifting, pushing, pulling, or folding and<br />
unfolding <strong>the</strong>se units. Never lift more than<br />
you are able to safely handle.<br />
NO TOOLS REQUIRED<br />
UNIVERSAL<br />
STEPS<br />
OWNER’S<br />
MANUAL<br />
If you have any problems during setup,<br />
contact SICO Customer Service at<br />
1-800-424-0796<br />
Printed in <strong>the</strong> USA (01-03) SICO is a registered trademark of SICO <strong>Inc</strong>orporated Part No. 117687 Rev. A
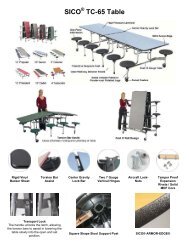
INTRODUCTION<br />
SICO Universal Steps are designed to work with<br />
all SICO stage products.<br />
Dual Height, Articulating and Venue Steps are<br />
available in a variety of sizes to match your<br />
stage height.<br />
Dual Height Steps:<br />
- Dual Height Steps are available to<br />
accommodate various stage heights. Steps<br />
range from 12” (305 mm) to 32” (813 mm) in<br />
fixed heights.<br />
STEP RISER<br />
STEP MODEL HEIGHT<br />
2 step model 6”<br />
(152 mm)<br />
2 step model 8”<br />
(203 mm)<br />
3 step model 6”<br />
(152 mm)<br />
3 step model 8”<br />
(203 mm)<br />
ATTACHES TO<br />
STAGE HEIGHT:<br />
12” or 18”<br />
(305 mm-457 mm)<br />
16” or 24”<br />
(406 mm-610 mm)<br />
18” or 24”<br />
(457 mm-610 mm)<br />
24” or 32”<br />
(610 mm-813 mm)<br />
- Parts of <strong>the</strong> step include, guardrails, clamp<br />
and casters.<br />
See page 4 for detailed installation instructions.<br />
Articulating Steps:<br />
- Articulating Steps are available to<br />
accommodate various stage heights from<br />
12” (305 mm) to 56” (1,422 mm).<br />
STEP RISER ATTACHES TO<br />
STEP MODEL HEIGHT: STAGE HEIGHT:<br />
3 step model 4” to 8”<br />
12” to 24”<br />
(102 mm-203 mm) (305 mm-610 mm)<br />
4 step model 4” to 8”<br />
16” to 32”<br />
(102 mm-203 mm) (406 mm-813 mm)<br />
5 step model 4” to 8”<br />
20” to 40”<br />
(102 mm-203 mm) (508 mm-1,016 mm)<br />
6 step model 4” to 8”<br />
24” to 48”<br />
(102 mm-203 mm) (610 mm-1,219 mm)<br />
7 step model 4” to 8”<br />
28” to 56”<br />
(102 mm-203 mm) (711 mm-1,422 mm)<br />
For example:<br />
If a customer has a 16”(406 mm)-24” (610mm)<br />
1800 stage and a 18”(457 mm)-24”(610 mm)-<br />
30”(762 mm)Tri-Height stage, <strong>the</strong>y will use <strong>the</strong><br />
4 step model, because it will work with each<br />
stage height from <strong>the</strong> 16”(406 mm) 1800 stage<br />
to <strong>the</strong> 30” (762 mm) Tri-Height stage.<br />
- Parts of this step include adjustable guardrails,<br />
attachment clamp, and casters.<br />
See page 6 for detailed installation instructions.<br />
2<br />
DUAL HEIGHT<br />
STEP<br />
ARTICULATING STEPS<br />
DOBLE ALTURA<br />
ESCALERA DE<br />
2<br />
Vea las instrucciones detalladas de instalación<br />
en la página 4.<br />
- Entre las piezas de la escalera se incluyen<br />
barandas, abrazadera y ruedas retráctiles.<br />
610 mm a 813 mm<br />
457 mm a 610 mm<br />
406 mm a 610 mm<br />
305 mm a 457 mm<br />
SE FIJA A LA ALTURA<br />
DEL ESCENARIO:<br />
203 mm<br />
152 mm<br />
203 mm<br />
152 mm<br />
ALTURA DEL<br />
CONTRAPELDAÑO<br />
2 escalones<br />
Modelo de<br />
2 escalones<br />
Modelo de<br />
3 escalones<br />
Modelo de<br />
3 escalones<br />
Modelo de<br />
MODELO DE<br />
ESCALERA<br />
- La escalera de doble altura está disponible<br />
para ajustarse a las diferentes alturas de los<br />
escenarios. Las alturas de las escaleras<br />
oscilan entre 305 cm y 813 cm en alturas<br />
fijas.<br />
Escalera de doble altura:<br />
Las escaleras de doble altura, articuladas y<br />
Venue están disponibles en diferentes medidas<br />
para lograr un óptimo ajuste a la altura de su<br />
escenario.<br />
Las Escaleras Universales SICO están<br />
diseñadas para funcionar con todos los<br />
productos para escenarios SICO.<br />
INTRODUCCIÓN
ESCALERA VENUE<br />
ESCALERA ARTICULADA<br />
3<br />
Vea las instrucciones detalladas de instalación<br />
en la página 9.<br />
- Las piezas de esta escalera incluyen barandas<br />
ajustables, abrazadera de fijación, ruedas<br />
retráctiles y muelles asistidos por gas.<br />
1219 mm a<br />
1,829 mm<br />
1,016 mm a<br />
1,625 mm<br />
SE FIJA A LA ALTURA<br />
DEL ESCENARIO:<br />
Escalera Venue:<br />
- Las escaleras Venue están disponibles en<br />
diferentes alturas a partir de 1,016 cm y<br />
hasta 1,829 cm.<br />
Vea las instrucciones detalladas de instalación<br />
en la página 6.<br />
- Las piezas de la escalera incluyen barandas<br />
ajustables, abrazadera de fijación y ruedas<br />
retráctiles.<br />
Por ejemplo:<br />
Si un cliente posee un escenario 1800 de<br />
406 mm-610 mm y un escenario de tres alturas<br />
(Tri-Height) de 457 mm-610 mm-762 mm,<br />
utilizará el modelo de 4 escalones, ya que será<br />
apto para cada altura de escenario desde los<br />
406 mm del escenario 1800 a los 762 mm del<br />
escenario de tres alturas.<br />
711 mm a 1,422 mm<br />
610 mm a 1,219 mm<br />
508 mm a 1,016 mm<br />
406 mm a 813 mm<br />
305 mm a 610 mm<br />
SE FIJA A LA ALTURA<br />
DEL ESCENARIO:<br />
136 mm a<br />
203 mm<br />
127 mm a<br />
203 mm<br />
ALTURA DEL<br />
CONTRAPELDAÑO<br />
102 mm a 203 mm<br />
102 mm a 203 mm<br />
102 mm a 203 mm<br />
102 mm a 203 mm<br />
102 mm a 203 mm<br />
ALTURA DEL<br />
CONTRAPELDAÑO<br />
8 escalones<br />
Modelo de<br />
9 escalones<br />
Modelo de<br />
MODELO DE<br />
ESCALERA<br />
3 escalones<br />
Modelo de<br />
4 escalones<br />
Modelo de<br />
5 escalones<br />
Modelo de<br />
6 escalones<br />
Modelo de<br />
7 escalones<br />
Modelo de<br />
MODELO DE<br />
ESCALERA<br />
Escalera articulada:<br />
- Las escaleras articuladas están disponibles<br />
para ajustarse a las diferentes alturas de los<br />
escenarios entre 305 mm y 1,422 mm.<br />
INTRODUCCIÓN - continuación<br />
INTRODUCTION continued<br />
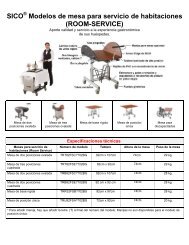
Venue Steps:<br />
- Venue Steps are available in varying heights<br />
ranging from 40” (1,016 mm) to 72”<br />
(1829 mm).<br />
STEP RISER ATTACHES TO<br />
STEP MODEL HEIGHT: STAGE HEIGHT:<br />
8 step model 5” to 8”<br />
40” to 64”<br />
(127 mm-203 mm) (1,016 mm-1,625 mm)<br />
9 step model 5.34” to 8” 48” to 72”<br />
(136 mm-203 mm) (1219 mm-1,829 mm)<br />
- Parts of this step include adjustable guardrails,<br />
attachment clamp, casters and gas assist<br />
springs.<br />
See page 9 for detailed installation instructions.<br />
3<br />
VENUE STEP
INSTALLING DUAL HEIGHT STEPS<br />
NOTE: Always move <strong>the</strong> <strong>steps</strong> by using <strong>the</strong><br />
wheels located on <strong>the</strong> side of <strong>the</strong> step unit.<br />
1. Roll <strong>the</strong> <strong>steps</strong> into position near <strong>the</strong> stage.<br />
2. Push <strong>the</strong> step against <strong>the</strong> stage.<br />
CAUTION<br />
DO NOT leave a gap between<br />
<strong>the</strong> stage unit and <strong>steps</strong>.<br />
Injury can occur. 117757-01<br />
3. Slide <strong>the</strong> hook lock up so that <strong>the</strong> hook<br />
fastens under <strong>the</strong> stage frame.<br />
4<br />
4<br />
3. Deslice la traba del gancho hacia arriba para<br />
que éste quede fijo bajo la estructura del<br />
escenario.<br />
117757-01<br />
PRECAUCIÓN<br />
NO deje ningún espacio entre el<br />
escenario y la escalera. Esto<br />
puede provocar lesiones.<br />
2. Empújela contra el escenario.<br />
1. Transporte la escalera hasta la posición<br />
prevista cerca del escenario.<br />
NOTA: Mueva siempre la escalera utilizando las<br />
ruedas ubicadas al costado de la unidad.<br />
INSTALACIÓN DE LA ESCALERA DE DOBLE ALTURA
5<br />
Importante: Ambos lados de la escalera deben<br />
estar bien asegurados al escenario con el<br />
gancho de la escalera para evitar que ésta se<br />
aparte del escenario.<br />
4. Gire el gancho amarillo de la escalera para<br />
asegurarlo bajo el escenario.<br />
INSTALACIÓN DE LA ESCALERA DE DOBLE ALTURA - continuación<br />
INSTALLING DUAL HEIGHT STEPS continued<br />
4. Turn <strong>the</strong> yellow step hook to secure <strong>the</strong> hook<br />
under <strong>the</strong> stage.<br />
Important: Both sides of <strong>the</strong> step must be<br />
properly secured to <strong>the</strong> stage with <strong>the</strong> step<br />
hook to prevent <strong>the</strong> <strong>steps</strong> from moving away<br />
from <strong>the</strong> stage.<br />
5
INSTALLING THE ARTICULATED STEPS<br />
NOTE: Two people are required to safely set<br />
up <strong>the</strong> articulating <strong>steps</strong>.<br />
1. Move <strong>the</strong> <strong>steps</strong> close to <strong>the</strong> stage you will be<br />
using.<br />
2. With a person on ei<strong>the</strong>r side of <strong>the</strong> <strong>steps</strong>, lift<br />
<strong>the</strong> top end of <strong>the</strong> <strong>steps</strong> and carefully roll <strong>the</strong><br />
<strong>steps</strong> to <strong>the</strong> stage.<br />
6<br />
6<br />
2. Coloque una persona a cada lado de la<br />
rampa, levante el extremo superior de la<br />
escalera y transpórtela con cuidado hasta el<br />
escenario.<br />
1. Mueva la escalera cerca del escenario que<br />
utilizará.<br />
NOTA: Se necesitan dos personas para instalar<br />
la escalera articulada sin inconvenientes.<br />
INSTALACIÓN DE LA ESCALERA ARTICULADA
Para ajustar<br />
Soporte del<br />
escalón superior<br />
7<br />
Cuando estén ajustados correctamente, los<br />
soportes de la escalera se apoyarán<br />
completamente sobre la plataforma.<br />
4. Tome la baranda y empuje la anilla de la<br />
misma hacia delante o hacia atrás (según sea<br />
necesario) para que la escalera quede nivelada<br />
y los postes queden en posición vertical.<br />
3. Afloje las tuercas de mano de la baranda<br />
ubicadas a ambos lados de la escalera.<br />
Nivelación de la escalera con el escenario:<br />
El soporte del escalón superior debe apoyarse<br />
plano sobre la superficie de la plataforma.<br />
IMPORTANTE:<br />
Si la escalera no está nivelada con el escenario<br />
como se muestra en la figura de la derecha,<br />
deberá nivelarse.<br />
INSTALACIÓN DE LA ESCALERA ARTICULADA - continuación<br />
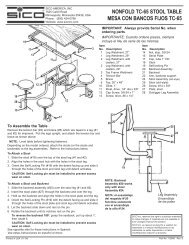
INSTALLING THE ARTICULATED STEPS continued<br />
IMPORTANT:<br />
If <strong>the</strong> <strong>steps</strong> are not level with <strong>the</strong> stage as shown<br />
at <strong>the</strong> right, <strong>the</strong> <strong>steps</strong> will need to be made level.<br />
The upper step support should rest flat on <strong>the</strong><br />
deck surface.<br />
Levelling <strong>the</strong> <strong>steps</strong> with <strong>the</strong> stage:<br />
3. Loosen <strong>the</strong> guardrail hand knobs located on<br />
both sides of <strong>the</strong> <strong>steps</strong>.<br />
4. Grasp <strong>the</strong> guardrail and push <strong>the</strong> guardrail<br />
hoop forward or back as required to make <strong>the</strong><br />
step level and <strong>the</strong> posts vertical.<br />
When properly adjusted, <strong>the</strong> step supports<br />
will fully rest on <strong>the</strong> deck.<br />
7<br />
Upper Step<br />
Support<br />
To adjust
INSTALLING THE ARTICULATED STEPS continued<br />
5. Roll <strong>the</strong> <strong>steps</strong> to <strong>the</strong> stage.<br />
WARNING<br />
Steps must be properly clamped to <strong>the</strong> stage.<br />
DO NOT leave a gap between <strong>the</strong> stage unit<br />
and <strong>steps</strong>.<br />
Serious injury can occur. 117692-01<br />
6. Hand tighten ( )<strong>the</strong> yellow clamping knob to<br />
secure <strong>the</strong> <strong>steps</strong> to <strong>the</strong> stage. (Tools are not<br />
required to tighten <strong>the</strong> knob).<br />
Important: Both sides of <strong>the</strong> step must be<br />
properly secured to <strong>the</strong> stage to prevent <strong>the</strong><br />
<strong>steps</strong> from moving away from <strong>the</strong> stage.<br />
7. Tighten <strong>the</strong> guardrail hand knobs located at<br />
both sides of <strong>the</strong> stage.<br />
Important: Both hand knobs must be tightened<br />
to achieve full load capacity.<br />
8<br />
8<br />
Importante: Las dos tuercas de mano deben<br />
estar ajustadas, para lograr una capacidad de<br />
carga completa.<br />
7. Apriete las tuercas de la mano de la barandilla<br />
ubicadas a ambos lados del escenario<br />
Importante: Ambos lados de escalera deben<br />
estar bien asegurados al escenario para evitar<br />
que ésta se aparte del escenario.<br />
6. Ajuste a mano ( ) la tuerca amarilla de la<br />
abrazadera para asegurar la escalera al<br />
escenario. (No se necesitan herramientas para<br />
ajustar la tuerca.)<br />
La escalera debe estar correctamente fijada<br />
al escenario con las abrazaderas. NO deje<br />
ningún espacio entre el escenario y la<br />
escalera.<br />
Esto puede provocar lesiones graves.<br />
117692-01<br />
ADVERTENCIA<br />
5. Transporte la escalera hasta el escenario.<br />
INSTALACIÓN DE LA ESCALERA ARTICULADA - continuación
Trabas de<br />
las patas<br />
9<br />
3. Mueva con cuidado la escalera hasta su<br />
posición adecuada cerca del escenario que<br />
utilizará.<br />
2. Destrabe las patas girando hacia arriba la<br />
palanca de trabado.<br />
Levante la escalera con ayuda de los muelles<br />
a gas.<br />
1. Ubique las dos (2) trabas de las patas a los<br />
costados de la escalera.<br />
NOTA: Se necesitan dos personas para instalar<br />
la escalera Venue sin inconvenientes.<br />
INSTALACIÓN DE LA ESCALERA VENUE<br />
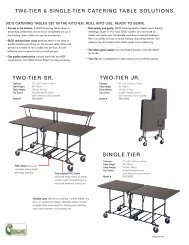
INSTALLING THE VENUE STEPS<br />
NOTE: Two people are required to safely set<br />
up <strong>the</strong> Venue Steps.<br />
1. Locate <strong>the</strong> two (2) leg locks at <strong>the</strong> sides of <strong>the</strong><br />
<strong>steps</strong>.<br />
2.Unlock <strong>the</strong> legs by rotating <strong>the</strong> lock handle<br />
upward.<br />
Lift <strong>the</strong> staircase using <strong>the</strong> assistance of <strong>the</strong><br />
gas springs.<br />
3.Carefully move <strong>the</strong> <strong>steps</strong> into position near <strong>the</strong><br />
stage you will be using.<br />
9<br />
Leg Locks
INSTALLING THE VENUE STEPS continued<br />
4. With a person on ei<strong>the</strong>r side, lift <strong>the</strong> top of <strong>the</strong><br />
step unit and carefully roll <strong>the</strong> <strong>steps</strong> to <strong>the</strong><br />
stage until it makes contact with <strong>the</strong> top of <strong>the</strong><br />
stage deck.<br />
IMPORTANT:<br />
If <strong>the</strong> <strong>steps</strong> are not level with <strong>the</strong> stage as shown<br />
at <strong>the</strong> right, <strong>the</strong> <strong>steps</strong> will need to be made level.<br />
The Upper Step Support should rest flat on <strong>the</strong><br />
deck.<br />
Levelling <strong>the</strong> <strong>steps</strong> with <strong>the</strong> stage:<br />
5. Loosen <strong>the</strong> guardrail hand knobs located on<br />
both sides of <strong>the</strong> <strong>steps</strong>.<br />
Note: On <strong>the</strong> Venue <strong>steps</strong> <strong>the</strong>re are four (4)<br />
hand knobs.<br />
10<br />
Upper Step<br />
Support<br />
Soporte del<br />
escalón superior<br />
10<br />
Nota: En la escalera Venue hay cuatro (4)<br />
tuercas de mano<br />
5. Afloje las tuercas de mano de la baranda<br />
ubicadas a ambos lados de la escalera.<br />
Nivelación de la escalera con el escenario:<br />
El soporte del escalón superior debe apoyarse<br />
plano sobre la plataforma.<br />
IMPORTANTE:<br />
Si la escalera no está nivelada con el escenario<br />
como se muestra en la figura de la derecha,<br />
deberá ser nivelada.<br />
4. Coloque una persona a cada lado, levante el<br />
extremo superior de la escalera y transporte<br />
con cuidado la escalera hacia el escenario<br />
hasta que toque la parte superior de la<br />
plataforma del mismo.<br />
INSTALACIÓN DE LA ESCALERA VENUE - continuación
Para Ajustar<br />
11<br />
7. Una vez que la escalera está nivelada con el<br />
escenario, ajuste las tuercas de mano de la<br />
baranda.<br />
Importante: Las cuatro (4) tuercas de mano<br />
deben estar ajustadas para lograr una<br />
capacidad de carga completa.<br />
Nota: En escaleras de mayor altura, puede ser<br />
de utilidad el empleo de una herramienta de<br />
nivelación para lograr la posición óptima de la<br />
escalera.<br />
Cuando esté ajustado correctamente, los<br />
soportes de la escalera apoyarán<br />
completamente sobre la plataforma.<br />
6. Tome la baranda y empuje la anilla de la<br />
baranda hacia delante o hacia atrás (según<br />
sea necesario) para que la escalera quede<br />
nivelada y los postes queden en posición<br />
vertical.<br />
INSTALACIÓN DE LA ESCALERA VENUE - continuación<br />
INSTALLING THE VENUE STEPS continued<br />
6.Grasp <strong>the</strong> guardrail and push <strong>the</strong> guardrail<br />
hoop forward or back as required to make <strong>the</strong><br />
step level and <strong>the</strong> posts vertical.<br />
When properly adjusted, <strong>the</strong> step supports<br />
will fully rest on <strong>the</strong> deck.<br />
Note: On higher step units it may be helpful to<br />
use a levelling tool in order to achieve <strong>the</strong><br />
best position of <strong>the</strong> step.<br />
7. Once <strong>the</strong> <strong>steps</strong> are level with <strong>the</strong> stage,<br />
tighten <strong>the</strong> guardrail hand knobs.<br />
Important: All four (4) hand knobs must be<br />
tightened to achieve full load capacity.<br />
11<br />
To Adjust
INSTALLING THE VENUE STEPS continued<br />
8. Roll <strong>the</strong> <strong>steps</strong> against <strong>the</strong> stage.<br />
WARNING<br />
Steps must be properly clamped to <strong>the</strong> stage.<br />
DO NOT leave a gap between <strong>the</strong> stage unit<br />
and <strong>steps</strong>.<br />
Serious injury can occur. 117692-01<br />
9. Hand tighten <strong>the</strong> two (2) yellow clamping<br />
knobs by turning clockwise, to secure <strong>the</strong><br />
<strong>steps</strong> to <strong>the</strong> stage.<br />
(Tools are not required to tighten <strong>the</strong> knob).<br />
Important: Both sides of <strong>the</strong> step must be<br />
properly secured to <strong>the</strong> stage to prevent <strong>the</strong><br />
<strong>steps</strong> from moving away from <strong>the</strong> stage.<br />
NOTE: When storing <strong>the</strong> step, rotate <strong>the</strong> leg<br />
lock down and <strong>the</strong>n push down on <strong>the</strong> step.<br />
When <strong>the</strong> lowest height is achieved <strong>the</strong> two (2)<br />
leg locks will activate.<br />
12<br />
12<br />
NOTA: Cuando guarde la escalera, gire hacia<br />
abajo la traba de las patas y luego empuje la<br />
escalera hacia abajo. Cuando se alcance la<br />
altura menor altura se activarán las dos (2)<br />
trabas de las patas.<br />
Importante: Ambos lados de la escalera deben<br />
estar bien asegurados al escenario para<br />
evitar que aquélla se aparte del escenario.<br />
9. Ajuste a mano las dos (2) tuercas amarillas<br />
de la abrazadera, girándolas en dirección<br />
horaria, para asegurar la escalera al<br />
escenario.<br />
(No se necesitan herramientas para ajustar la<br />
tuerca.)<br />
ADVERTENCIA<br />
La escalera debe estar correctamente fijada<br />
al escenario con las abrazaderas.<br />
NO deje ningún espacio entre el escenario y<br />
la escalera.<br />
Esto puede provocar lesiones graves.<br />
117692-01<br />
8. Transporte la escalera contra el escenario.<br />
INSTALACIÓN DE LA ESCALERA VENUE - continuación
SICO AMERICA INC.<br />
7525 Cahill Road<br />
Minneapolis, MN 55439 USA<br />
TELÉFONO: 1-800-424-0796<br />
FAX: (952) 829-5141<br />
SITIO WEB: WWW.SICOINC.COM<br />
Cuando llame al servicio al cliente,<br />
tenga a mano el número de serie del<br />
producto.<br />
Si desea recibir ayuda para:<br />
- Seleccionar piezas de repuesto /<br />
calcomanías<br />
- Reparar el producto<br />
- Ajustar y manejar el producto<br />
- Obtener asistencia en línea<br />
Notas:<br />
Notes:<br />
Please have <strong>the</strong> serial number of <strong>the</strong><br />
product when contacting customer<br />
service.<br />
To receive assistance for:<br />
- Selecting replacement parts / decals<br />
- Repairing <strong>the</strong> product<br />
- Adjusting and operating <strong>the</strong> product<br />
- Obtaining On-line assistance<br />
TELEPHONE: 1-800-424-0796<br />
FAX: (952) 829-5141<br />
WEB SITE: WWW.SICOINC.COM<br />
SICO AMERICA INC.<br />
7525 Cahill Road<br />
Minneapolis, MN 55439 USA