Alaris® PCA Module Guide
Alaris® PCA Module Guide
Alaris® PCA Module Guide

You also want an ePaper? Increase the reach of your titles
YUMPU automatically turns print PDFs into web optimized ePapers that Google loves.
Alaris® <strong>PCA</strong> <strong>Module</strong> <strong>Guide</strong><br />
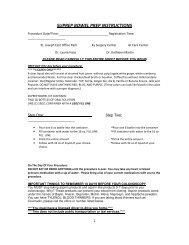
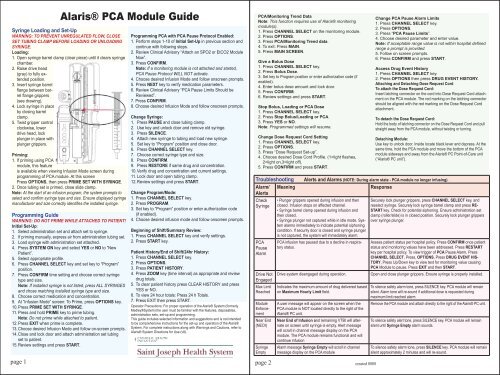
Syringe Loading and Set-Up<br />
WARNING: TO PREVENT UNREGULATED FLOW, CLOSE<br />
SET TUBING CLAMP BEFORE LOADING OR UNLOADING<br />
SYRINGE.<br />
Loading:<br />
1. Open syringe barrel clamp (clear piece) until it clears syringe<br />
chamber.<br />
2. Raise drive head<br />
(gray) to fully extended<br />
position.<br />
3. Insert syringe barrel<br />
flange between barrel<br />
flange grippers<br />
(see drawing).<br />
4. Lock syringe in place<br />
by closing barrel<br />
clamp.<br />
5. Twist gripper control<br />
clockwise, lower<br />
drive head, lock<br />
plunger in place with<br />
plunger grippers.<br />
Priming:<br />
1. If priming using <strong>PCA</strong><br />
module, this feature<br />
is available when viewing Infusion Mode screen during<br />
programming of <strong>PCA</strong> module. At this screen<br />
Press OPTIONS, then press PRIME SET WITH SYRINGE.<br />
2. Once tubing set is primed, close slide clamp.<br />
Note: At the start of an infusion program, the system prompts to<br />
select and confirm syringe type and size. Ensure displayed syringe<br />
manufacturer and size correctly identifies the installed syringe.<br />
Programming <strong>PCA</strong> with <strong>PCA</strong> Pause Protocol Enabled:<br />
1. Perform steps 1-10 of Initial Set-Up in previous section and<br />
continue with following steps.<br />
2. Review Clinical Advisory “Attach an SPO2 or EtCO2 <strong>Module</strong><br />
Now”.<br />
3. Press CONFIRM.<br />
Note: If a monitoring module is not attached and started,<br />
<strong>PCA</strong> Pause Protocol WILL NOT activate.<br />
4. Choose desired Infusion Mode and follow onscreen prompts.<br />
5. Press NEXT key to verify medication parameters.<br />
6. Review Clinical Advisory “<strong>PCA</strong> Pause Limits Should be<br />
Reviewed”.<br />
7. Press CONFIRM.<br />
8. Choose desired Infusion Mode and follow onscreen prompts.<br />
Change Syringe:<br />
1. Press PAUSE and close tubing clamp.<br />
2. Use key and unlock door and remove old syringe.<br />
3. Press SILENCE.<br />
4. Attach new syringe to tubing and load new syringe.<br />
5. Set key to “Program” position and close door.<br />
6. Press CHANNEL SELECT key.<br />
7. Choose correct syringe type and size.<br />
8. Press CONFIRM.<br />
9. Press RESTORE if same drug and concentration.<br />
10. Verify drug and concentration and current settings.<br />
11. Lock door and open tubing clamp.<br />
12. Review settings and press START.<br />
Change Program/Mode:<br />
1. Press CHANNEL SELECT key.<br />
2. Press PROGRAM.<br />
3. Set key to “Program” position or enter authorization code<br />
Programming <strong>Guide</strong><br />
(if enabled).<br />
WARNING: Do not prime while attached to patient! 4. Choose desired infusion mode and follow onscreen prompts.<br />
Initial Set-Up:<br />
1. Select administration set and attach set to syringe.<br />
Beginning of Shift/Summary Review:<br />
2. If priming manually, express air from administration tubing set. 1. Press CHANNEL SELECT key and verify settings.<br />
3. Load syringe with administration set attached.<br />
2. Press START key.<br />
4. Press SYSTEM ON key and select YES or NO to “New<br />
Patient”.<br />
Patient History/End of Shift/24hr History:<br />
5. Select appropriate profile.<br />
1. Press CHANNEL SELECT key.<br />
6. Press CHANNEL SELECT key and set key to “Program” 2. Press OPTIONS.<br />
position.<br />
3. Press PATIENT HISTORY.<br />
7. Press CONFIRM time setting and choose correct syringe 4. Press ZOOM key (time interval) as appropriate and review<br />
type and size.<br />
drug totals.<br />
Note: If installed syringe is not listed, press ALL SYRINGES 5. To clear patient history press CLEAR HISTORY and press<br />
and chose matching installed syringe type and size.<br />
YES or NO.<br />
8. Choose correct medication and concentration.<br />
6. To view 24 hour totals: Press 24 h Totals.<br />
9. At “Infusion Mode” screen: To Prime, press OPTIONS key. 7. Press EXIT then press START.<br />
10. Press PRIME SET WITH SYRINGE.<br />
Operator Precautions: For proper operation of the Alaris® System (formerly<br />
Medley®System) the user must be familiar with the features, disposables,<br />
11. Press and hold PRIME key to prime tubing.<br />
administration sets, set-up and programming.<br />
Note: Do not prime while attached to patient.<br />
This guide includes selected information and suggestions and is not intended<br />
12. Press EXIT when prime is complete.<br />
to be comprehensive instructions for the set-up and operation of the Alaris®<br />
13. Choose desired Infusion Mode and follow on-screen prompts. System. For complete instructions along with Warnings and Cautions, refer to<br />
Alaris® System Directions for Use (v8).<br />
14. Close and lock door and attach administration set tubing<br />
set to patient.<br />
15. Review settings and press START.<br />
page 1 page 2<br />
<strong>PCA</strong>/Monitoring Trend Data<br />
Note: This function requires use of Alaris® monitoring<br />
module(s).<br />
1. Press CHANNEL SELECT on the monitoring module.<br />
2. Press OPTIONS.<br />
3. Press <strong>PCA</strong>/Monitoring Trend data.<br />
4. To exit: Press MAIN.<br />
5. Press MAIN SCREEN.<br />
Give a Bolus Dose<br />
1. Press CHANNEL SELECT key.<br />
2. Press Bolus Dose.<br />
3. Set key to Program position or enter authorization code (if<br />
enabled).<br />
4. Enter bolus dose amount and lock door.<br />
5. Press CONFIRM.<br />
6. Review settings and press START.<br />
Stop Bolus, Loading or <strong>PCA</strong> Dose<br />
1. Press CHANNEL SELECT key.<br />
2. Press Stop Bolus/Loading or <strong>PCA</strong>.<br />
3. Press YES or NO.<br />
Note: Programmed settings will resume.<br />
Change Dose Request Cord Setting<br />
1. Press CHANNEL SELECT key.<br />
2. Press OPTIONS.<br />
3. Press “Dose Request Set-up”.<br />
4. Choose desired Dose Cord Profile. (1=light flashes,<br />
2=light on,3=light off).<br />
5. Press CONFIRM and press START.<br />
Troubleshooting<br />
Alarm/ Meaning<br />
Alerts<br />
Check<br />
Syringe<br />
<strong>PCA</strong><br />
Pause<br />
Alarm<br />
Drive Not<br />
Engaged<br />
Max Limit<br />
Reached<br />
<strong>Module</strong><br />
Enforcement<br />
Near End<br />
(NEOI)<br />
Syringe<br />
Empty<br />
Alerts and Alarms (NOTE: During alarm state - <strong>PCA</strong> module no longer infusing).<br />
Response<br />
• Plunger grippers opened during infusion and then<br />
closed. Infusion stops on affected channel.<br />
• Syringe barrel clamp opened during infusion and<br />
then closed.<br />
• Syringe plunger not captured while in idle mode. System<br />
alarms immediately to indicate potential siphoning<br />
condition. If security door is closed and syringe plunger<br />
is not captured, the system will immediately alarm.<br />
<strong>PCA</strong> infusion has paused due to a decline in respiratory<br />
status.<br />
Drive system disengaged during operation.<br />
Indicates the maximum amount of drug delivered based<br />
on Maximum Hourly Limit field.<br />
A user message will appear on the screen when the<br />
<strong>PCA</strong> module is NOT located directly to the right of the<br />
Alaris® PC unit.<br />
Near End of Infusion and remaining VTBI will alternate<br />
on screen until syringe is empty. Alert message<br />
will scroll in channel message display on the <strong>PCA</strong><br />
module. The <strong>PCA</strong> module remains functional and will<br />
continue infusion<br />
Alarm message Syringe Empty will scroll in channel<br />
message display on the <strong>PCA</strong> module<br />
created 0808<br />
Change <strong>PCA</strong> Pause Alarm Limits<br />
1. Press CHANNEL SELECT key.<br />
2. Press OPTIONS.<br />
3. Press “<strong>PCA</strong> Pause Limits”.<br />
4. Choose desired parameter and enter value.<br />
Note: If acceptable range value is not within hospital defined<br />
range a prompt is provided.<br />
5. Follow on screen prompts.<br />
6. Press CONFIRM and press START.<br />
Access Drug Event History<br />
1. Press CHANNEL SELECT key.<br />
2. Press OPTIONS then press DRUG EVENT HISTORY.<br />
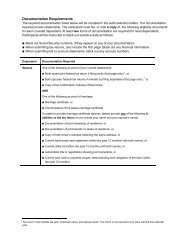
Attaching and Detaching Dose Request Cord<br />
To attach the Dose Request Cord:<br />
Insert latching connector on the cord into Dose Request Cord attachment<br />
on the <strong>PCA</strong> module. The red marking on the latching connector<br />
should be aligned with the red marking on the Dose Request Cord<br />
attachment.<br />
To detach the Dose Request Cord:<br />
Hold the body of latching connector on the Dose Request Cord and pull<br />
straight away from the <strong>PCA</strong> module, without twisting or turning.<br />
Detaching <strong>Module</strong>:<br />
Use key to unlock door. Inside locate black lever and depress. At the<br />
same time, hold the <strong>PCA</strong> module and move the bottom of the <strong>PCA</strong><br />
module sideways and away from the Alaris® PC Point-of-Care unit<br />
(“Alaris® PC unit”).<br />
Securely lock plunger grippers, press CHANNEL SELECT key, and<br />
reselect syringe. Securely lock syringe barrel clamp and press RE-<br />
START key. Check for potential siphoning. Ensure administration set<br />
clamp (roller/slide) is in closed position. Securely lock plunger grippers<br />
over syringe plunger.<br />
Assess patient status per hospital policy. Press CONFIRM once patient<br />
status and monitoring values have been addressed. Press RESTART<br />
key per hospital policy. To view trigger of <strong>PCA</strong> Pause Alarm, Press<br />
CHANNEL SELECT, Press, OPTIONS, Press DRUG EVENT HIS-<br />
TORY, Press Up/Down key to view text for monitoring value causing<br />
<strong>PCA</strong> <strong>Module</strong> to pause. Press EXIT and then START.<br />
Open and close plunger grippers. Ensure syringe is properly installed.<br />
To silence safety alarm tone, press SILENCE key. <strong>PCA</strong> module will remain<br />
silent. Alarm tone will re-sound if additional dose is requested during<br />
maximum limit reached alarm<br />
Remove the <strong>PCA</strong> module and attach directly to the right of the Alaris® PC unit.<br />
To silence safety alert tone, press SILENCE key. <strong>PCA</strong> module will remain<br />
silent until Syringe Empty alarm sounds.<br />
To silence safety alarm tone, press SILENCE key. <strong>PCA</strong> module will remain<br />
silent approximately 2 minutes and will re-sound.
<strong>PCA</strong>/EtCO2 Trend Data:<br />
Note: This function requires use of Alaris® <strong>PCA</strong> module.<br />
1. Press CHANNEL SELECT key.<br />
2. Press OPTIONS.<br />
3. Select <strong>PCA</strong>/EtCO2 Trend Data. Navigate as described<br />
above in section titled Trend Data.<br />
Troubleshooting :<br />
High Priority Meaning/ Causes<br />
Alarm<br />
No Breath<br />
Detected<br />
High EtCO2<br />
Low EtCO2<br />
High RR<br />
Low RR<br />
High FiCO2<br />
Disconnect<br />
Occluded<br />
Disposable<br />
Autozero<br />
(in progress)<br />
Clearing<br />
Disposable<br />
Alaris® EtCO2 <strong>Module</strong> <strong>Guide</strong><br />
Setting Alarm Limits:<br />
4. To exit press EtCO2 Main.<br />
1. Press CHANNEL SELECT key.<br />
5. Press MAIN SCREEN.<br />
2. Press LIMITS.<br />
3. Select limit parameter to be changed.<br />
4. Enter a numeric value using keypad or up/down arrow keys. Change Waveform Height:<br />
5. Press CONFIRM.<br />
1. Press CHANNEL SELECT key.<br />
6. Press MAIN SCREEN.<br />
2. Press OPTIONS.<br />
3. Select WAVEFORM HEIGHT.<br />
4. Select 60mmHg or 99mmHg.<br />
Trend Data:<br />
5. Press MAIN SCREEN.<br />
1. Press CHANNEL SELECT key.<br />
2. Select TREND.<br />
3. Press PAGE UP and PAGE DOWN to navigate through trend Change Waveform Time Scale:<br />
data pages. To move cursor bar press up or down arrow keys. 1. Press CHANNEL SELECT key.<br />
4. Press ZOOM to change time period.<br />
2. Press OPTIONS.<br />
5. To exit press EtCO2 Main.<br />
3. Select WAVEFORM TIME SCALE.<br />
6. Press MAIN SCREEN.<br />
4. Select 5 or 10 seconds<br />
(for lower respiratory rates select 10 seconds).<br />
5. Press MAIN SCREEN.<br />
Alarms / Messages<br />
Response<br />
• Patient is not breathing<br />
• Assess patient, check disposable.<br />
• Disposable is not properly attached to patient and/or device • Consider using different disposable type<br />
• Disposable is not detecting exhaled breath (shallow breath) • Follow hospital protocol actions.<br />
• Patient has true measurement of high EtCO2<br />
• Fever or hypermetabolic state<br />
• Disposable is not properly attached to patient<br />
• Patient has true measurement of low EtCO2<br />
• Disposable not correctly attached to patient or<br />
securely connected to module<br />
Respiratory Rate is above the specified limit<br />
Respiratory Rate is below the specified limit<br />
• Patient is inspiring exhaled CO2 or disposable not<br />
properly attached to patient<br />
• O2 mask may not be properly attached (if patient<br />
is wearing an O2 mask)<br />
• O2 flow to mask may have stopped<br />
• Drapes or covers may be over patient’s face<br />
• Purging operation failed<br />
• The disposable is occluded or needs to be reset.<br />
The module is performing an autozero calibration.<br />
During this time no data is obtained<br />
Pre-Silencing Alarm:<br />
1. Press SILENCE to pre-silence monitoring alarms for 2<br />
minutes.<br />
Note: Infusion alarms will not be silenced.<br />
• Assess patient, check disposable<br />
• Compare value to baseline<br />
• Follow hospital protocol actions.<br />
• Assess patient, check disposable,<br />
• Check O2 flow<br />
• Check mask and/or drape position<br />
• Follow hospital protocol actions<br />
• Try disconnecting disposable and then reattach.<br />
• If the device again reads<br />
DISCONNECT OCCLUDED DISPOSABLE,<br />
• Obtain and attach a new disposable.<br />
Monitoring will automatically resume when completed.<br />
No intervention is necessary.<br />
The module is trying to clear the clogged disposable. If unable to clear, the module will go into a DISCONNECT<br />
If cleared, the module will automatically resume monitoring. OCCLUDED DISPOSABLE alarm.<br />
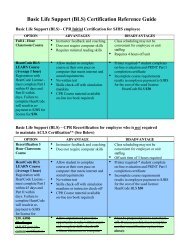
EtCO2 Waveform Examples<br />
The following are examples of common EtCO2 waveforms. The waveform trends are examples only and do not represent all potential abnormal waveforms. Analysis<br />
of these waveform trends may provide an early indication of the noted possible causes. The associated possible responses are suggestions only and are not meant<br />
to replace current clinical practice or hospital protocols. Always consult hospital protocols. Abnormal waveforms are not always associated with alarms<br />
Normal /Abnormal Waveform Clinical Findings Possible Causes Possible Responses<br />
Operator Precautions: For proper operation of the Alaris® System (formerly Medley®System) the user must be familiar with the features,<br />
disposables, administration sets, set-up and programming. This guide includes selected information and suggestions and is not intended to be<br />
comprehensive instructions for the set-up and operation of the Alaris® System. For complete instructions along with Warnings and Cautions,<br />
refer to Alaris® System Directions for Use (v8). © 2005 Cardinal Health, Inc. or one of its subsidiaries. All rights reserved. 3POC0331<br />
page 3 page 4<br />
References: 1. Capnography in the Management of the Critically Ill Patient, EducationPAK<br />
for Critical Care and Procedural Sedation - A <strong>Guide</strong> to Capnography,<br />
CD-ROM - Needham, MA Oridion Medical, 2003.<br />
2. AACN Procedure Manual for Critial Care 4th Ed. (2001). Ed. Lynn-McHale,<br />
D.J. & Carlson K.K., American Association of Critical-Care Nurses.<br />
3. Thalan’s Critical Care Nursing Diagnosis and Management 4th Ed. (2001) Ed.<br />
Urden, L.D., Stacy, K.M. & Lough, M.E., C.V. Mosby<br />
• Normal breathing, Normal EtCO2<br />
A - B: Baseline period of no CO2, End of inhalation<br />
B - C: Exhalation begins, Begin rapid rise in CO2<br />
C - D: Sustained exhalation, Alveolar plateau<br />
D: End of expiration, end tidal CO2 (EtCO2) value<br />
D - E: Inhalation, Rapid decrease in CO2<br />
Normal Waveform<br />
(Normal Ventilation; 35-45 mmHg)<br />
Always follow hospital protocols<br />
• Treat cause of increased respiratory rate<br />
• Assess ABCs (Airway, Breathing, Circulation)<br />
• Decrease pain stimulus or encourage calm<br />
• Notify RT or MD<br />
Increase in pain level or<br />
splinting area of pain<br />
• Increase in anxiety or fear<br />
• Respiratory distress or<br />
shortness of breath<br />
Hyperventilation<br />
• Rapid breathing,<br />
Low EtCO2<br />
• Always follow hospital protocols<br />
• Access ABCs<br />
• Assess sedation level<br />
• Stimulate patient<br />
• Notify RT or MD<br />
• Over medication or<br />
increased sedation<br />
• Snoring or possible obstruction<br />
Hypoventilation<br />
• Slow breathing,<br />
High EtCO2<br />
created 0808<br />
• Always follow hospital protocols<br />
• Assess ABCs<br />
• Maintain patient airway<br />
• Encourage patient to take deep breaths<br />
• Notify RT or MD<br />
• Over medication or increased<br />
sedation<br />
• Low tidal volume<br />
Hypoventilation with Shallow Breathing<br />
Slow breathing,<br />
Low EtCO2 followed by<br />
deep breath (see pointing<br />
arrow)<br />
Always follow hospital protocols<br />
• Assess ABCs<br />
• Encourage patient to take deep breaths<br />
• Perform a head tilt or chin lift;<br />
Check position of cannula<br />
• Notify RT or MD<br />
• Poor head or neck alignment<br />
• Over medication or sedate<br />
Irregular breathing, possible<br />
audible sound or snoring,<br />
EtCO2 may be above<br />
or below baseline<br />
Partial Airway Obstruction<br />
Always follow hospital protocols<br />
• Assess ABCs<br />
• Stimulate patient<br />
• Open airway<br />
• Notify RT or MD<br />
• No Breath or Apnea<br />
• Very shallow breathing<br />
• Over medication or sedate<br />
• Displaced cannula<br />
No Breath<br />
Sudden loss of EtCO2<br />
reading, Very shallow or no<br />
respiratory rate pattern<br />
observed