

Introduction: Leather Watch Strap: Hand Made or Laser Cut


This is a continuation from an Instructable I wrote on making a watch strap a couple years ago. I made a lot of my own tools and the result could have been better. I wanted a more precise, repeatable process that would yield higher quality results every time.
In this Instructable I do use a laser cutter because it has a high level of precision but I do include work arounds because I know not everyone has access to one.
To help people get started I have a few tools available including designs for use with a laser cutter and those without that can be printed out and hand cut as well as a fully cut out kit that you can assemble yourself. Purchase will give you access to files for 18mm, 20mm, and 22mm watch strap designs.
Design for laser: https://www.etsy.com/listing/647010509/dxf-file-l...
Design for hand cut: https://www.etsy.com/listing/633179234/pdf-watch-...
Step 1: Tools

Pictured are all the tools used in this instructable. I'm also including some links to the specialized tools below.
Hole punch: https://www.tandyleather.com/en/product/deluxe-ro...
Awl: https://www.tandyleather.com/en/product/flat-side...
Beeswax: https://www.tandyleather.com/en/product/beeswax-b...
Gum Tragacanth: https://www.tandyleather.com/en/product/eco-flo-g...
Edge Paint: https://www.tandyleather.com/en/product/eco-flo-e...
Not sponsored by Tandy Leather, looks like that's where all this stuff came from though.
You will also need a buckle and maybe some spring bars, here is where I get mine:
Step 2: Establish Design


This Instructable is based off my own designs that I made with CAD. I welcome you to create your own designs and the rest of this intructable should still be applicable but I am not going to walk through making the design. As I mentioned in the intro, my designs are available.
Step 3: Laser Cut Leather or Hand Cut Paper


If you have access to a laser cutter, you can just cut it out and skip to Step 6. If the smell bothers you, it should disappear completely after a couple of days. You can also use water on the edges and rub them on a piece of paper to remove the burnt areas to expedite the process.
If you don't have access to a laser cutter, print out the design on paper. Make sure the scale is 100% when printing or it will not fit the watch. Then use an Xacto knife to cut the parts out. Using a ruler on the straight lines helps keep the edges clean.
Step 4: Glue Onto Leather and Cut


After the paper designs are cut out nicely, glue them onto the backside of the leather. I use a glue stick for this because it holds it in place but it isn't very permanent. The paper will be peeled off shortly and you won't want much residue. Use the Xacto knife to cut each piece out of leather .
Step 5: Poke Holes


This step is pretty tedious and the main reason I moved to a laser cutter but the strap really starts to take shape after this. I use an awl which really helps to poke hold that are the right size and is relatively comfortable to hold for a while but if you don't have one you can just use a needle; the bigger it is the better for this step. You also have the option to use a hole puncher to cut out the buckle holes at this stage but when I hand cut straps I usually wait until the last step when the strap is finished. After you're sure that every hole has been poked all the way through, the paper can be peeled off the back of the leather.
Step 6: Thinning Edges


Whether you laser cut or hand cut, you will be at the same step here. Use the Xacto knife at a low angle to cut the indicated edges down as thin as they can be. I start cutting between the first and second stitch hole. On the two loops, on one side thin the edge from the outside and thin from the inside on the other half. This is so when they become loops they interlock smoothly as seen above.
Step 7: Fold and Glue


Now that the two top pieces have had the edges thinned, they need to be folded in a couple places. The pointed side needs to be folded in one place, the buckle side needs to be folded in two places. I use the same glue stick as I used with the paper. Again, it holds it in place but doesn't need to secure it for long, thats what the sewing is for. Apply the glue to the top half thats being glued and when you fold it over, make sure the sewing holes line up by sticking a needle through. Repeat this on all sides that need to be folded.
With the loops, glue the two thinned surfaces together. Then sew them together and tie off the thread on the inside of the loops.
Step 8: Attach Linings


This is where the strap really comes together. If you're using my designs, the first hole on the lining should correspond with the second hole down on the top piece. Use a needle to make these sure these holes line up See pictures for reference.
On the buckle side, place one of the loops a couple stitches back from where the buckle goes between the lining and the top of the strap. Again, see the pictures for reference of where I put it.
Step 9: Sewing!


I don't like to take risks with not having enough thread so I often have a lot of extra. For the pointed end I use a little bit less than two arm lengths. For the buckle side I use about one arm length. Waxing the thread isn't totally
necessary but it helps a lot with holding the thread in place so I would strongly recommend it. Run the thread through a piece of beeswax a couple of times, take off any larger chunks that may stick to the thread.
For the sewing, I use the saddle stitch method. This method uses two needles at the same time, working your way around the leather. At the end of the stitching you will double back over a few stitches to make sure it holds so for the sake of being even, I start on the other side by doubling back over the same number of stitches. I chose a side to start on and pull one needle through the fourth hole from the top. I pull it through until the thread is at the halfway point in the hole. Then, I take the needle coming out of the top of the strap, and pull it through the hole above it. Then the other needle will go through the same hole. Give both sides of the thread a pull but not too tight. You don't want to break the thread or have an uneven amount of tension between stitches. This is one completed stitch. Repeat this; one needle through at a time. When doubling back on stitches it should be exactly the same as normal but theres more material in the stitch so it will hold better; this is important when ending the stitch. When you have stitched all the way around and doubled back the same amount on this side as you did at the beginning, pull the thread tight and use an Xacto knife to cut the thread as close as you can to the leather. Between doubling back on the stitching and waxing the thread, this should hold quite well.
When stitching the buckle side, one of the loops has to be sewn between the two layers of leather. I don't punch holes in the lining, I just place it in-between the linings where I want it and be careful when sewing to go through the loop and then the other side of the strap. They can sometimes become misaligned during this step so take care to not poke holes in the strap where there shouldn't be any.
Check out this Instructable for a more comprehensive lesson on how to do the saddle stitch: https://www.instructables.com/id/How-to-saddle-stitch-leather/
Step 10: Finishing Touches


You're almost finished! If you hand cut the strap and are using a hole punch for the buckle holes and decided to wait until the strap was put together, now would be the time to punch them. Use the holes in the display side to line up the punch and just punch it through again to get a hole that goes all the way through in the same place.
Theres a few options for edge finishing. If you laser cut the strap, you can leave it as it came out. It gives it a bit more of a rustic look with the laser burnish. If you hand cut it you can leave it raw if that's the look you want.
My preferred look is to use edge paint. The process starts by smoothing down the edges. This can be done with a relatively high grit sandpaper. You can also just use a small amount of water or, if you have it, gum tragacanth on a Q-Tip. After the edge has dried and the edge is relatively smooth, use another Q-Tip and dip it in the edge paint. Don't get too much that it's dripping off. Paint a thin layer onto the edge. If any spills over the edge and onto the top or bottom surface of the strap, I just wipe it off immediately with one of my fingers. After one of the edges on both halves of the strap are painted, give it about 10-20 minutes to dry completely. Then paint the other edge on each side of the strap. You can leave it with one layer of paint but if you want a smoother edge, lightly sand the painted edges and repeat the painting process. I wouldn't recommend doing more than two layers because the strap needs to fit between the lugs of the watch and the paint makes the strap wider. Then the only thing left to do is add the hardware and attach the strap to your watch and wear it!
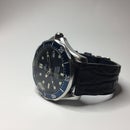
Step 11: Finished!

In the first picture in this step the strap on top was hand cut and the one below it was laser cut. The laser cut strap has been worn for a while


