
QBO home page and left navigation bar
To explore what the QBO home page looks like, we will use our sample company, Small Business Builders, LLC:
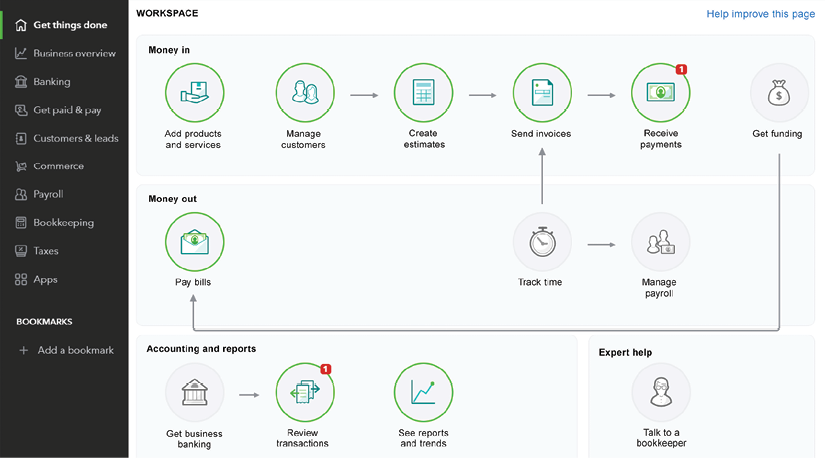
Figure 1.19: QBO home page
From the home page, you can switch between two views, Get things done and Business overview.
The Get things done view includes a workspace broken down into Money in, Money out, and Accounting and reports. Icons that represent tasks associated with a particular transaction, such as Money in, appear in the order that they should be completed, with arrows pointing to the next step in the process.
Below the Get things done tab is the Business overview tab. When you click on Business overview, the following screen will appear:
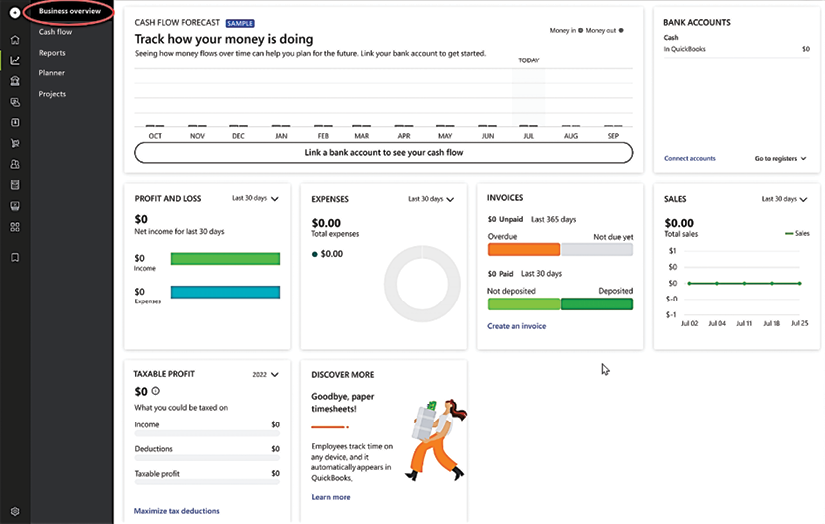
Figure 1.20: Business overview tab
A brief explanation of the information that appears on the QBO dashboard is as follows:
- PROFIT AND LOSS: A snapshot of your total income and expenses will appear in this section. You can select the time period (for example, monthly, quarterly, or annually) you would like to view from the drop-down menu in the upper right-hand corner. Click on the Income or Expenses bar to drill down to the details that make up the totals.
- EXPENSES: In this section, you will see a summary of expenses by type (for example, office supplies, bank fees, and so on). You can select the time period you would like to view this information for (for example, monthly, quarterly, or annually) from the dropdown in the upper-right corner of the tile.
- INVOICES: In this section, you will see a summary of paid and unpaid customer invoices. Plus, you will see the number of payments that have been received from customers that have been deposited or are waiting to be deposited. If you click on the tile, you can drill down to the specific invoices and deposits that make up the totals that appear there.
- BANK ACCOUNTS: A list of all the bank accounts you have connected to QuickBooks Online will appear in this section, along with the balance per bank and, below that, the balance currently in QuickBooks.
You can connect bank and credit card accounts to QuickBooks so that your transactions will automatically be downloaded for you. In Chapter 9, Reconciling Uploaded Bank and Credit Card Transactions, we show you how to manage downloaded banking transactions.
- SALES: This tile shows a line graph of how sales are trending for a period of time. You can select the time period from the drop-down menu in the upper-right corner.
The left navigation bar is another way you can maneuver around QuickBooks. In addition to the Get things done and Business overview tabs, it includes quick access to key areas such as Banking, Get paid & pay, Customers & leads, Commerce, Payroll, Bookkeeping, Taxes, and Apps. You can also add a bookmark of any additional menus you want to access from the left navigation bar. Click the + Add a bookmark option to do this, as shown below:
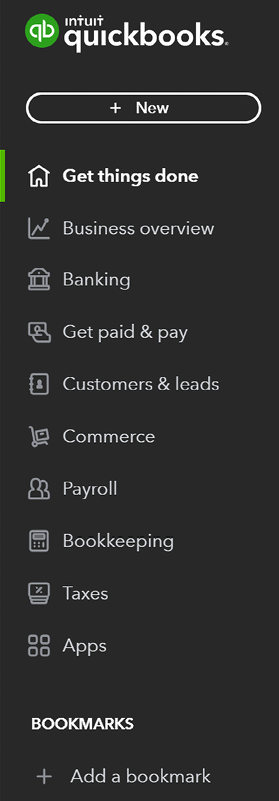
Figure 1.21: The left navigation bar
Now that you have a better understanding of how to navigate QBO from the home page and the left navigation bar and how to customize them to fit your needs, let’s look at the next navigation tool: icons.
QuickBooks Online icons
The following screenshot shows the common icons that can be found on the QBO home page:
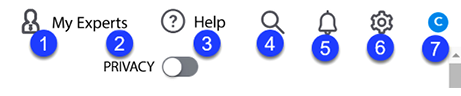
Figure 1.22: Icons on the home page
The following are the options you can see:
- My Experts (1): Access to a live bookkeeper who can help you get your books set up is available through this link. You can also upgrade your QBO subscription or access a QuickBooks ProAdvisor through My Experts.
- Privacy (2): Turn this radio button on and it will hide the financial information that appears on the home page and the business overview tab. This is a great feature to use when accessing your data in a public place such as a coffee shop.
- Help (3): If you have a question or need to learn how to do something in QBO, you can click on this icon to launch the help menu. You will find detailed support articles, video tutorials, and access to a sample company file in this section.
- Search (4): If you need to locate an invoice, bill, or any transaction, you can do a global search of the program by typing an amount name, the name of a vendor, or any information in this field to search for it.
- Notifications (5): Notifications about changes that have been made to your account or upgrades to your QBO subscription can be found here.
- Gear (6): This icon will display a menu of tasks that you can perform in QBO. Tasks related to global company settings, lists, and tools such as reconciling and budgeting can be found here.
- Account info (7): This button allows you to log out of QuickBooks or manage your Intuit account.
As we mentioned previously, the QBO icons allow you to navigate the program so that you can quickly get to the information you need. In addition to icons, the QBO menus allow you to access your overall company settings, lists, tools, and your company profile. We will cover QBO menus next.
QuickBooks Online menus
In addition to the left navigation bar, there are a couple more menus you can use to navigate QBO.
The first menu is accessible through the gear icon, located in the upper right-hand corner, next to the Notifications icon. The following screenshot shows the menu that will display when you click on the gear icon:
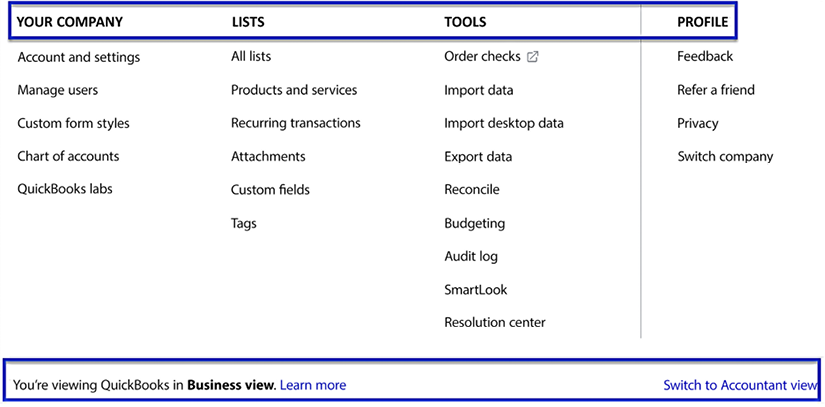
Figure 1.23: Menu options after clicking the gear icon
A brief description of the areas of QBO that you can access through the gear icon is as follows:
- YOUR COMPANY: This section includes global company account settings, which we will explore in detail in the next section. It also allows you to access Manage users, which is where you can give others access to your QuickBooks data. You can launch the Chart of accounts from here and also QuickBooks labs, which is the testing area for new features that are in beta.
- LISTS: The LISTS menu includes all QuickBooks lists, such as customer listing, vendor listing, and products and services listing. Recurring transactions are available here and any files or images that you have attached to QuickBooks transactions, such as receipts or signed contracts, are accessible in the form of attachments. If you have added custom fields or tags, you can access those lists from this menu.
- TOOLS: The QBO subscription that you have will determine the tools that are listed in this section. We are using the QuickBooks Plus subscription, which includes budgeting and SmartLook. It also provides us with the ability to import data such as banking transactions, customer and vendor lists, a chart of accounts, and products and services.
- PROFILE: The profile menu includes a user profile (specific to the user that’s currently logged in), a Feedback section where you can submit recommendations or issues to the Intuit team, the option to refer a friend, and the built-in privacy features included in QBO. If you have multiple QBO companies, you can choose Switch company to navigate from one company to another.
At the bottom of Figure 1.23 there is a reference to two types of views available in QBO: the new Business view and the existing Accountant view. These are compared below:
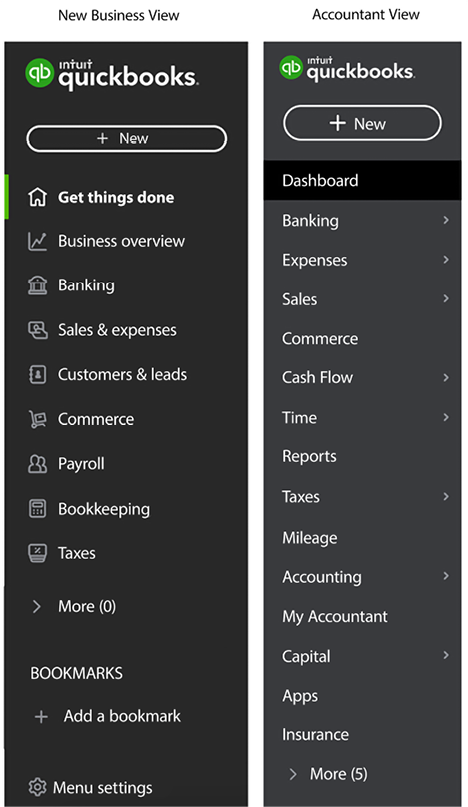
Figure 1.24: Comparison of the Business view and Accountant view
If you’ve been using QBO prior to October 2021, you are familiar with the Accountant view. However, if you became a QBO customer after October 2021, then the new Business view is what you are accustomed to. The Business view was designed to simplify the menu options by grouping them. For example, the Accountant view shows separate tabs for Sales and Expenses, whereas the Business view shows one tab, Sales & expenses. In addition, on the business view menu, Get things done and Business overview are located at the very top. On the accountant view, these two tabs are located within the Dashboard tab. Both menus can be customized by adding your most frequently used areas of QBO. You can do this by clicking the Add a bookmark option located at the bottom of the menu in the Business view, or by clicking the More option located at the bottom of the menu in the Accountant view.
Another menu that is available in QuickBooks is the Quick Create menu. You can access this menu by clicking on the + New button located at the very top of the left navigation bar. The following screenshot shows the menu that you will see when you click on the + New button:
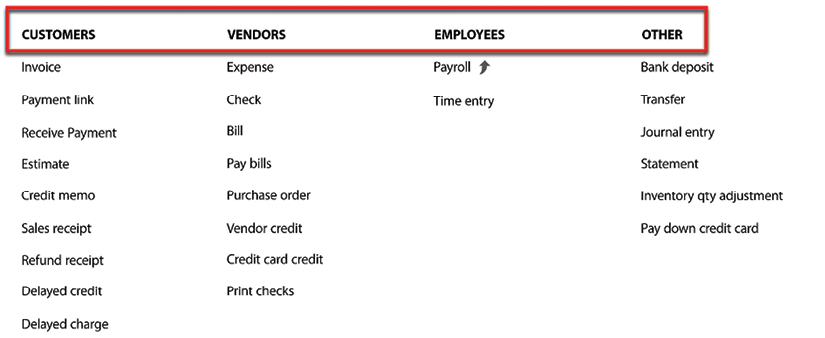
Figure 1.25: The Quick Create menu
Brief descriptions of the areas of QBO that you can access through the Quick Create menu are as follows:
- CUSTOMERS: Most of the transactions that pertain to customers can be found here, from creating invoices and sales receipts to accepting customer payments.
- VENDORS: The tasks related to vendors can be found in this section. This includes recording expenses, writing checks, tracking unpaid bills, and creating purchase orders.
- EMPLOYEES: If you sign up for a QuickBooks Payroll subscription, you can access all payroll-related tasks in this section. This includes adding new employees, setting up employee deductions, running payrolls, and making payroll tax payments.
- OTHER: This section includes making bank deposits, bank transfers, recording journal entries, generating customer statements, making inventory adjustments, and paying down credit cards.
In this section, we have learned how to access the menus of QBO, all of which give you access to your company information, lists, tools, and profile. In addition, the Quick Create menu allows you to access customers, vendors, employees, and other areas of QuickBooks. From Chapter 2, Company File Setup, onwards we will show you how to navigate through these and customize QuickBooks for your business. To conclude this chapter, we will introduce you to a few important bookkeeping concepts you need to help you use QuickBooks.