Commandos 2: Men of Courage

Commandos 2: Men of Courage

Not enough ratings
Commandos 2: Men of Courage - Ultimate Guide
By danisoff
In-depth guide about Commandos 2: Men of Courage.
   
Award
Favorite
Favorited
Unfavorite
Information about the Guide
Every time I plan to make a guide the toughest part is choosing a good topic, this time around I have chosen a great game called Commandos 2 as my topic. This is not my first time writing a guide about this game and most likely it will not be the last. This guide has a sole purpose to educate people on Commandos 2, the guide should be interesting to both new and experienced players of Commandos 2. All of the written information was assembled by the guide creator (danisoff), all of the pictures were taken from the internet where they were freely available for free use. You can download all of the pictures from my guide, but the text is mine and I forbid any copying of the text for publishing on other sites or similar. All of the information used in the guide is from my personal experience playing the game for over 1000 hours and from some Commandos 2 official sites. If you need more information ask me in the comment section and I will respond in the shortest time possible. If you are in a hurry, you can contact me directly on my Steam profile, or you can join my Discord and ask there.

This Guide has it all, from Tips and Tricks to Cheats!

I hope you enjoin the guide and please do not forget to rate it when you are finished with your reading.

Discord[discord.gg]
Steam Group

-danisoff
Basic Information about the Game
Commandos 2: Men of Courage is the sequel to Commandos: Behind Enemy Lines and Commandos: Beyond the Call of Duty. Developed by Pyro Studios and produced by Eidos Interactive, Commandos 2 has been one of the most successful World War II strategy games ever created for PC. This entry into the series is arguably the best and most played in the Commandos universe. The Mac OS X version of this title is published by Feral Interactive as part of the Commandos Battle Pack.

The game places the player in command of a squad of commandos and various other Allied forces as they fight behind enemy lines to defeat the Axis. The action stretches from 1941 to 1945 and takes place on both the Western Front against the Germans and in the Pacific Theatre against the Japanese Empire .

In my opinion of the best games ever made, most of you are reading the guide where probably playing the game when you were 5 or 6 years old and still to this day have fond memories of playing the game.

In the Next pictures we can see the PC cover for the game and the old studio logo. On Left is The PC cover.


Pyro Studios-History
Pyro Studios was founded in 1996 with the purpose of developing quality video games. The result of this commitment was the development of Commandos: Behind Enemy Lines, which was released in 1998.The success of this title led to the release of a disk containing new missions entitled Commandos: Beyond the Call of Duty.

In October 2001, the Microsoft Windows version of Commandos 2: Men of Courage was launched, followed by its release on Microsoft Xbox and Sony PlayStation 2, in September 2002. Commandos 3: Destination Berlin was released in October 2003. In total, the Commandos series has sold more than 5 million copies worldwide.

Praetorians, a 3D strategy game for Windows set at the time of Julius Caesar's campaigns was released in February 2003.

Imperial Glory was released at the beginning of 2005 and its latest offering, Commandos: Strike Force released during the first months of 2006, is far more similar to the Medal of Honor or Call of Duty games than to earlier entries of the series. The game was heavily criticized and sold poorly; this led to the split with the publisher Eidos.

In late 2008, the studio cancelled an Xbox 360 and PS3 game named Cops, laying off 30 employees. For its sister company's film Planet 51, Pyro developed the console version of the game, released in November 2009.

Pyro Mobile

In 2012, Pyro Studios merged with Play Wireless, establishing Pyro Mobile, a company to develop applications for smartphones, tablets and social media. Its first mobile game, The Moleys, was released in December 2012.

In the Next picture we can see the Logo of Pyro Mobile.


Game Plot
in May 1941, commandos Paul Toledo and Natasha Nikochevski capture an Enigma machine and its codebook in a German submarine base at La Pallice in La Rochelle, France. While Natasha leaves the base, Toledo is ordered to stay behind with the Enigma to assist the other commandos (Jack O'Hara, Thomas Hancock, James Blackwood & René Duchamp) when they arrive at daybreak to rescue the crew of a Royal Navy submarine, the E-423, sheltered and under heavy guard in a submarine pen. They destroy the base's anti-aircraft guns and torpedo warehouse before escaping in the submarine.

While in the North Sea, the Royal Navy submarine is caught and forced to surface in the frigid waters after being depth charged by a German destroyer. The enigma machine is confiscated and the entire crew captured with the exception of Blackwood and Hancock, both of whom evaded capture. After rescuing the crew, the commandos proceed to recover the Enigma and disable the destroyer's main guns and boiler room. Under orders that the Enigma be hastily brought to England, O'Hara and Duchamp takeoff in a Fieseler Fi 156, while the rest escape in the submarine.

A year passes and the commandos are deployed to the Pacific Theatre. In Burma, they rescue a spiritual leader and assassinate a Japanese tyrant with the help of Gurkhas. On 17 June 1942, the commandos are sent to northern Thailand, where they rescue a Colonel Guinness, who in turn helps them destroy the bridge over the River Kwai by revealing its structural weakness. The bridge is blown up just as a train of the Imperial Japanese Army high command crosses it, plummeting into the river.

In July 1942, the commandos land on the strongly fortified Savo Island to disable the large artillery guns, before Operation Watchtower can commence. While on the island, they are assisted by a castaway named Wilson. After destroying the artillery and rescuing a downed American pilot, he returns the favour by piloting a Kawanishi H8K to help them escape the island, but not before telling them of a gold monkey statue which is symbolic to the Japanese. O'Hara steals it as a souvenir.

In Spring of 1944, the commandos are sent to Haiphong, Indochina, destroying the port's fuel depots and infiltrating the Japanese aircraft carrier Shinano. While out at sea, the commandos sabotage the rudder of every A6M Zero and report the carrier's position before escaping in two intact Zeroes. The Shinano is then bombed by American Vought F4U Corsairs.

Following their tour of duty in the Pacific, the commandos are recalled to the Western Front for the Normandy invasion. During the battle of Cherbourg, they rescue a wounded Private Smith, and with the help of American soldiers, successfully defend the town from waves of German infantry and Panzer III tanks. A few months later, Toledo is captured and taken to Colditz Castle where he is to be executed. The commandos save him and they help the prisoners of war housed there escape by disguising them in German uniform. While the prisoners escape, the commandos acquire top secret documents from three high-ranking German officers, revealing plans to devastate Paris with planted explosives before it is liberated.

In August 1944, the entire commando corps arrive in Paris and thwart plans to destroy much of the city, before leaving in an airship from top of the Eiffel Tower.


Characters - Jack O'Hara (The Green Beret)
Jack O'Hara (born 10 October, 1909 in Dublin, Ireland), also known as the Butcher, Tiny, or the Green beret.

Green Beret (or Jerry McHale in Commandos 2: Men of Courage) is a former heavyweight boxer of Irish origins and Army boxing champion from 1934 to 1937. He was sentenced in 1938 by a military court to 14 years of forced labour after hitting an officer. His sentence was however suspended when he joined the Commandos . He was promoted to sergeant after the raid on the island of Vaagsö .

An extremely violent and agressive character, his military career has been marred by serious discipline problems throughout. A hard bone to gnaw for his superior officers... and a real nightmare for enemy combatants. His strong leadership and determination have allowed him to become the Commandos leader

The Green Beret is the biggest member of the group and his tremendous strength allows him to fight, knock out and tie enemies very quickly. He is able to knock down virtually every door, jump from incredible heights, climb poles and swing along wires. In terrains such as sand or snow, the Green Beret can camouflage himself, using a small shovel, making him invisible to the enemy. He is also the second fastest member of the Commandos and his amazing stamina allows him to withstand flesh wounds and gunshots that would kill any other member of the group.

His preferred weapons are the combat knife, his bare hands, and any enemy weapon picked up, with either choice the Green Beret is a an effective killing machine.

On the pictures we can see Jack O'Hara.


Characters-Francis T. Woolridge (The Sniper)
Sir Francis T. Woolridge (born 21 March, 1909 in Sheffield, England), a.k.a the Sniper or Duke is a descendant from a noble family.

In 1936, he won a gold medal in shooting in the Berlin Olympics. In 1937 he enlisted in the army and between 1937 and 1939, he was stationed in India, where he was recognised as an outstanding marksman. In 1940 he joined the Commandos. He was awarded a military medal when he killed the Commandant of the German garrison in Narvik with a single shot from a distance of more than a mile. He is considered one of the best snipers in the world. His prefered weapon is the Springfield rifle .

The Sniper has a limited amount of ammunition per level and so he will very rarely waste a bullet. His missions usually involve quietly clearing the path of enemy combatants for his colleagues from a distance. He will then stand behind debris or other objects which provide him safety while he provides cover for the Commandos. He can also climb poles and position himself to snipe at the enemy. The Sniper is the team's medic if the Driver is not available.

On the pictures we can see Francis T. Woolridge.


Characters-James Blackwood (The Diver)
James Blackwood (born 3 August, 1911 in Melbourne, Australia), better known as Fins, the Marine, or the Diver, is an Oxford alumnus and Naval Engineer.

He was a member of the University rowing team that won the world famous regatta between Oxford and Cambridge for three consecutive years. He is a fantastic swimmer and was the first person to swim across the English Channel on a bet. In 1935 he enlisted in the Navy and was promoted to Captain in 1936 but later demoted to Sergeant two years later due to an 'incident' during a stopover in Hawaii. Further problems made the General Staff give him the option of being expelled from the Navy or entering the Commando Corps as an ordinary soldier, the latter of which he did.

Blackwood previously had problems with alcohol which are apparently under control. He continues to love gambling. His skills as a sailor make him invaluable in any mission that involves naval operations.

The Marine is a specialist trained for aquatic and amphibious assault based missions. With his harpoon gun and his diving equipment he is able to spend hours underwater without worrying about oxygen supply or about danger he may encounter at sea. He also carries a zodiak (inflatable boat) to row across waters, transporting his comrades in a mission. On land he has complete mastery of throwing knives and carries a grappling hook which he is able to use to climb buildings, walls and trees. When he collects a couple more knives, his lethality and efficiency increases.

On the pictures we can see James Blackwood.


Characters-Samuel Brooklyn (The Driver)
Samuel Brooklyn (born 4 April, 1910 in Brooklyn, USA), better known as Tread or the Driver is an ex-con, who was convicted of grand theft, burglary, and other such felonies in 1937.

Before his prison sentence he managed to escape to England with a new identity. He became known as Sid Perkins. As soon as U.S. Agents pursued Perkins, he immediately enlisted in the British Army. Two years later he collaborated with the Foreign Office in testing vehicles and arms stolen from the enemy. Impressed by his knowledge and skills, Sid enlisted in the Commandos in 1941. In one of his early missions he destroyed eight German fighter planeswith a jeep's machine gun and, after running out of ammo, he destroyed four more by crashing his jeep into them. Amazingly he suffered only minor burns during this action.

The Driver's main purpose on each mission is to drive various vehicles during the level. He becomes most useful when a mission involves an escape truck for all the Commandos once the mission is complete. During the mission, he is useful in operating German positions such as artillery and mounted machine guns. He is also equipped with an M3 "Grease Gun"submachine gun which fires a three round burst into any enemy. However, it has a magazine of twenty rounds which limits the amount of times it can be used. The Driver is also the primary medic of the team. In Commandos 2, the Driver can throw various gas grenades and molotov cocktails. With the help of the Sapper, he can also set booby traps that can trigger an explosion.

On the pictures we can see Samuel Brooklyn.

Characters-Thomas Hancock (The Sapper)
Thomas Hancock (born 14 January, 1911 in Liverpool, England), also known as Inferno or the Sapper started working as a fire-fighter in the Fire Department in his hometown of Liverpool in 1933.

In 1934 he joined the high-risk Explosives Department. In 1939 he enlisted in the army and the following year he volunteered for the Commandos. During the assault on St. Nazaire, he was responsible for the explosions that caused a great number of casualties in the German garrison and which rendered the installations useless to the Third Reich . He was captured during this operation and after 4 escape attempts in two months, he managed to escape his captors and return to England.

An expert in calculating, placing and developing explosives such as time bombs and remote bombs, he is the Commando responsible for demolition. The materials he carries in his backpack are delicate and heavy, forcing him to move slowly. He can operate other weapons such as bazookas, flamethrowers, and and the mine detector also. He can detect and deactivate mines and collect them for later use. He can prepare minefields in areas where enemy foot soldiers and/or vehicles will pass, causing maximum damage and destruction.

On the pictures we can see Thomas Hancock .


Characters-Rene Duchamp (The Spy)
Rene Duchamp (born 20 November, 1911 in Lyon, France ), also known as the Spy or Spooky joined the French Secret Service in 1934 and between 1935 and 1938 was the Chief of Security at the French Embassy in Berlin.

After the German invasion in 1940 he joined the Resistance. Soon after he was contacted by the Commando corps about becoming a part time member. Since then he has collaborated frequently with them in special operations, participating in numerous sabotages and responsible for the destruction of at least three trains, fourteen tanks and over fifty land vehicles. His information about the German troops is essential for the British Secret Service.

Rene has amiable character and is great at making conversation. He harbours a feeling of absolute hatred towards the Nazis. The skills he learned while he was in the Secret Service have made him expert in communications and techniques of infiltration and sabotage and has a natural instinct for imitation which probrably earned him his other nickname "Spooky". Beside speaking French he can speak English, German, Russian, and Italian fluently.

Being fluent in five languages allows him to infiltrate enemy lines wearing a stolen enemy uniform and divert or give deceptive orders to enemy soldiers. His attack involves silent and cautious movement and he attempts to use minimum force if possible. He has the ability to wear an enemy uniform for an infinite amount of time, or until a soldier of a high ranking sees through his guise. His preferred weapon is a syringe loaded with a lethal poison which eliminates his enemies in complete silence. He can lift bodies and hide them to avoid raising the alarm. The Spy is the team's medic when neither the Driver nor the Sniper are deployed on the mission.

On the pictures we can see Rene Duchamp.


Characters-Paul Toledo (The Thief)
Paul Toledo (born March 1, 1916 in Paris, France), known better as the Thief or Lupin is a recent addition to the Commandos.

Growing up in an orphanage in the suburbs of Paris, he ran away at the age of 10 and fell into the hands of a young pick-pocket gang. Two years later in 1928 he was arrested and put in a remand home. As he got older, he chose a career in crime as an expert thief. In 1940 he stole Rene Duchamp's suitcase, thinking he was a German officer. He was surprised when he found important documents inside the suitcase and decided to put them in the hands of the French resistance . After that incident he was recommended by Duchamp to the Commandos and has been of great help ever since.

Being the smallest and fastest of all of the Commandos, Lupin is quiet, soft spoken, and reserved. He has mastered several forms of martial arts helpful in disabling much bigger men quickly. His small stature is more than compensated by his agility to access small areas, break into houses, climb poles, swing on wires, climb walls, hide, pick locks and a host of other Ninja-like" talents. He can also open safes with his tools.

Paul does not appear in Commandos: Behind Enemy Lines. In Commandos 3, the Thief is given the ability to silently kill enemies using a garrote.

On the pictures we can see Paul Toledo.

Characters-Natasha Nikochevski (The Seductress)
Natasha Nikochevski, originally known as Natasha Van De Zand, nicknamed Lips is a Dutch contact, who first appears in Commandos: Beyond the Call of Duty.

Natasha's primary ability is distraction, which she does with a combination of her natural charm, sexy clothes and lipstick. She can effectively handle a Sniper Rifle and can walk around freely, although she will be attacked if spotted by a commander. This character is not widely used in the game all though her abilities can be very effective sometimes like the spy.

On the pictures we can see Natasha Nikochevski.


Characters-Whiskey (The Dog)
Whiskey, a bull terrier, was found with a wounded ally in The Night of the Wolves in Commandos 2: Men of Courage. The commandos decided to take care of him after his owner died.

Whiskey is ideal for transferring items between commandos, because he can move quickly and enemy soldiers won't attack him. A high-pitched whistle is used to call Whiskey. Whiskey has been trained to run up to soldiers and bark loudly, which distracts them for a small amount of time. The Sapper benefits greatly from Whiskey's ability to sniff out mines quickly.

Whiskey can run around at a fast pace or be carried by the commandos. However, he cannot stray far from the commando who is nearest to him at the time. He can be called from a very far distance by the whistle, unless there are ladders or doors in the way.

On the pictures we can see Whiskey.

Other Characters
As most of you have noticed in the previous tabs we have covered our main game's protagonist (The Commandos) in this tab we are going to cover the less know characters that appear in Commandos 2: Men of Courage.

Colonel Montague Smith
Is a high-ranking allied officer who in-charge in the Commandos team who always give brief instructions during missions. His full name was mentioned in the first mission.

Royal Navy Submarine Crew
Are the group of British sailors and their captain of the Royal Navy that was captured by the Germans for attempting to escape with the U-Boat in the mission Das Boot, Silent Killers. They are saved by the Commandos and board the submarine after completed their task then they captured again in White Death along with the other Commandos (except for James Blackwood). Later, they are saved by the Commandos again and board into their submarine that they captured in the previous mission, but Jack O'Hara and Rene Duchamp are escaped in their own.

Spiritual Leader
Is a Burmese spiritual leader and monk who guides the Commandos in the mission Target: Burma. He escape with his own barge along with the Commandos after the ambush and never seen again after the mission.

Gurkhas
Are the indigenous people from Southeast Asia which served to the British Empire and allies with the Commandos in order to help them liberate a Burmese town from Japanese control. They only appears in the mission Target: Burma.

Colonel Guinness
Is a British colonel who aids the commandos in destroying a railroad bridge. He only appears in Commandos 2 Mission 5: The Bridge of the River Kwai.

Wilson
A former Royal Air Force Pilot who was shot down by the Japanese and helps the commandos by distracting enemies with his trumpet and carrying items. He only appears in Commandos 2 Mission 6: The Guns of Savo Island.

Allied Pilot
An unnamed US Air Force pilot who was captured by the Japanese but later was freed by the Commandos in order to escape the island. He only appears in the mission The Guns of Savo Island.

Private Smith
Is a wounded US Army soldier that the commandos rescue in Commandos : Men of Courage. He was saved and he radio in headquarters that a German attack is coming. He character is modeled on the Matt Damon in Saving Private Ryan.

US Army Infantry Battalion
Are the soldiers of the US Army who aided Private Smith and the Commandos. They first appeared as a playable units in Commandos 2: Men of Courage which only appears in the second training mission and Saving Private Smith. They later appeared again in Commandos 3: Destination Berlin.

The Tyrant
Is a cruel tyrant of Burma who defected to the Imperial Japanese Army. However, he was eliminated by the Commandos along with the Japanese soldiers. He is the only Asian antagonist in the game since there is no other named villains for the Japanese.

General Heinz
Is a German general that appears in Commandos 2: Men of Courage mission Castle Colditz. He kept and hide the code template then was eliminated by the Commandos

Field Marshal Desfell

A Reichsführer-SS Officer who kept the code book in the mission Castle Colditz. He was eliminated by the Commandos.

Major General Rudolf
Is one of the High-ranking German officers who kept an encrypted plan in the mission Castle Colditz. He is eliminated by the Commandos.
Contents-General
The Contents tab is found in the game and displays a lot of info on the basic game mechanics, in this case the General game mechanics.The other content tabs are for Weapons,Equipment and Commando Techniques.

Cameras
Using the different camera distribution modes will make the mission easier to complete. You can select the various different camera modes using keys F2 to F7. Click on each camera to make it the active camera. Each camera mode lets you use zoom, use the tracking camera, etc. Access the default mode by using F2.

Crawl/Get Up
The best way to move around undetected is by crawling. Press the 'SPACEBAR' to make your commandos crawl or stand up again. When your men are crawling on the ground, they will only be visible in the enemy's short-range view.

The Enemy
They will try, by all available means, to prevent you from completing your mission objectives. Enemy soldiers can see and hear you. Their vision and hearing is divided into two areas. In the furthest areas, your men will be discovered unless they are lying flat on the ground or protected by a wall. In the nearest area, they will always be located. If they discover any of your commandos, they will shoot him.

Tracking Camera
Allow you to center the screen on a scenario spot or element and keep it focused there. Your hot key is 'F12'. You can also zoom in and out and use the multi-screen mode when the camera is assigned to an enemy soldier.

Ladders
Moving around the map using ladders. With the SHIFT button pressed, click the LMB on the ladder. You can change direction up or down or even stop when climbing a ladder by clicking the RMB. Be careful though, you can't defend yourself while on a ladder.

Examine
Obtain information about any item or character in the scenario. Hit key 'W'. You can examine practically everything: dead bodies, windows, boxes. You can also access the item exchange menu.

Interface
Consists of:
-Health bar
-Stamina bar
-List of actions:
-Functions
-Items
-Actions
-Weapons
RMB expanded menus. Moreover, if you can find:
-Marker/field of view
-Map
-Tracking camera
-Notepad
-Examine
-Lay down/get up
-Attack mode
Remember you can interact with the scenery holding SHIFT and placing
the cursor on the area where you want to do it.

Inventory
Indicates the distribution of the items contained by the scenario elements. Displayed when you click RMB on the face of the commando or when you examine boxes, soldiers, cupboards, etc. It is divided into cells. Each item occupies a specific number of cells. Press on an item
to move it to another inventory or to another spot in the scenario.

Map
Keep the enemy controlled by using the map. The map shows the position of enemy forces. Press the 'MAP' icon on the upper right hand side of the screen to open the map. Press on the icon again to exit.

Multi-Selection
You can select several of your commandos at the same time. Press the RMB and drag an area around your chosen commandos. You can also select a single commando and then add more by pressing CTRL and the number of the commando. Alternatively you can press CTRL and the face of the commando on the screen. To de-select all the commandos press '0'.

Door
A door closed in time can be the key to solving a mission. Keep SHIFT pressed and click LMB on the door to open or close it. You can hide behind an open door. Some doors may be closed. In cases like this, use the THIEF to pick the lock of the door. Just like your men, the enemy is also able to open and close doors.

Selecting a Commando
Select the most appropriate commando for each occasion. To select one of your men, press the key that corresponds to his number on the keypad. You can also click LMB on the face of the chosen commando on screen or use the selection box. Click RMB and drag the cursor until you create a selection rectangle. If you press '0' on the keypad, you will de-select the active commando.

View Marker
Use the marker to discover whether an area is covered by the enemy's field of vision. To use the marker, keep the ENTER or TAB keys pressed and click LMB on the spot you want to investigate. If a view sweeps over the marker, the enemy's field of vision will activate. The fields of vision of all enemies who can see that spot will light up in turn.

Windows
You can look through the windows of a building to find out whether it is safe to enter. Select EXAMINE and click LMB on a window. A small screen will appear that will show you the interior. Moving the mouse will allow you to move the image. If the THIEF is looking through the window, click the LMB and he will climb in.

Explosive Barrels
Shoot at barrels and you will experience a real explosion. Pick up a barrel using the GREEN BERET and place it next to the object you wish to blow up. Shoot at the barrel with any firearm and it will explode. It should destroy most objects and any soldiers nearby. Be careful though as this includes your men.

Extreme Cold
Keep your men safe in the harsh weather. The low temperatures of the Arctic missions can kill all of your men. If any of your commandos are outside then their STAMINA BAR will begin to go down. If it reaches zero then their LIFE BAR will begin to decrease. It can be avoided using an allied ARTIC SUIT or stealing one of them from an enemy soldier. Remember that the enemy suits can only be used for a limited period of time. Be careful.

On the picture we can see the game Interface.

Contents-Weapons
Pistol
Hot key 'G'. Point with the cursor and shoot with the LMB. When the target is out of range, the weapon's gun sight will be red. When you use an allied pistol, you need not worry about ammunition. You can pick up and use enemy weapons although they will have a limited amount of
ammunition.
Allied Pistol: Colt 1911A.
German Pistol: Luger P 08.
Japanese Pistol: Type 94.

Piat Bazooka
Hot key 'K'. Select it in the 'Weapons' section. The bazooka is an anti-tank weapon used mainly to combat enemy armored troops. It is a light weapon with massive firepower. Point with the mouse and FIRE with the LMB. To cancel the shot, press the RMB. The bazooka is to be used
by the SAPPER. Some Allied soldiers may also have one of their own. The number on the icon indicates the amount of ammo left.

Remote Control Bomb
High power explosives that can be detonated by remote control. Hot key 'S'. Can be selected in the 'Weapons' section. Click on the spot you wish to place the bomb. Head for cover. Press the detonator in the interface function section or use the - key to detonate the bomb. It is used by the SAPPER. The number of available bombs is displayed in the icon.

Fairburn Commando Knife
Double-edged assault knife with a combat handle. Hot key 'A'. Can be selected in the 'Weapons' section. Point with the cursor and click LMB to attack. Click the RMB to cancel the action. It is used by the GREEN BERET and MARINE. Be careful and ensure you are not seen or you may be in for an unpleasant surprise.

Hand Grenade N36M, MK1 'Mills Bomb'
Explosive grenade. Hot key 'A'. Select it in the 'Weapons' section. To throw, press the LMB when over the chosen spot. You can throw grenades through doors, trap doors and windows, from both inside and outside buildings. The SAPPER is in charge of handling the grenades. An expeditious weapon, but very noisy and likely to attract attention.

Rifle
Hot key 'F'. Select it in the 'Weapons' section. Point the cursor and fire with the LMB. When the target is out of range, the guns sight will be shown in red. Remember, if you manage to steal an enemy rifle it will have limited ammo.
Allied Rifle: Lee-Enfield No4 MK1
German Rifle: Karabiner 98K
Japanese Rifle: Type 38.

Sniper Rifle
Hot key 'A'. Select the rifle in the 'Weapons' section. Stow the rifle by pressing the RMB. Available ammunition is scarce. You may find ammo on enemy Snipers. To shoot from a window look through it using hot key 'W' and select the rifle. To go back inside, click the RMB.
Allied Rifle: M1903 .30 Springfield
German Rifle: Gewehr 43.
Japanese Rifle: Type 97.

Sub-Machine Gun MP40
The Sub-Machine Gun is a light automatic weapon with a high rate of fire. Hot key 'M'. Select it in the 'Weapons' section. Point with the cursor and fire with the LMB. It fires in short bursts and has limited ammo. You can reload it by taking weapons from the enemy. Its long range makes it a very dangerous weapon.

Anti-Personnel Mine
Very efficient when used for traps and ambushes. Hot key 'O'. Select them in the 'Items' section. They are sufficiently powerful to destroy any enemies close to the explosion. Click LMB on the spot you wish to place a mine. When you plant it, don't worry about your own men, they will know where you have placed it and will avoid blowing themselves up. The Anti-Personnel Mines are used by the SAPPER.

Antitank Tellermine 35 Mine
Powerful explosive mine. Hot key 'P'. Select them in the 'Items' section. Click LMB on the spot you wish to place a mine. They will only explode when a vehicle passes over them. Keep this in mind when they are placed. They are used by the SAPPER.

Timed Bomb
Plastic explosive detonated after a short period of time. Hot key 'Y'. Select it in the 'Items' section. Once selected, click on the point you wish to plant it. The bomb will explode after a few seconds. If you decide that you no longer wish to use the bomb you can retrieve it for use at another time. But be sure you need it back as you will have very
little time and a mistake could prove fatal.

Trip Wire
Use the DRIVER's reel to prepare an ambush. Hot key 'D'. Select it in the 'Items' section. Select the DRIVER's reel and click LMB twice in two places in the scenery to set the trap between those points. Any soldier that walks or runs past will trip on the rope and be knocked unconscious.

Harpoon Gun M1922
A quick and deadly underwater weapon. Hot key 'L'. Select Harpoon Gun in the 'Weapons' section. The compressed air contained in the Harpoon Gun propels the harpoon at great speed and can cover a distance of 15 meters in a split second. This weapon makes the DIVER a lethal killer
underwater. That said, the Harpoon Gun has a long reload time and many dangers can come to pass in a short period of time.

Personal Flame-Thrower M2-2
Designed for use on bunkers and foxholes. Hot key 'Z'. Select it in the 'Weapons' section. The SAPPER is required to operate the Flame-Thrower. The extremely destructive power is ideal for use against an enemy ambush. The fuel reserve has a limit so try not to waste any of it.

Smoke Bomb MKII
Hide your men behind a curtain of smoke. Hot key 'K'. Select it in the 'Weapons' section. The cloud of smoke created by the bomb impedes the enemy's ability to locate your position. You can also use the Smoke Bomb to hide behind or alternatively confuse the enemy throwing into a group of soldiers. The gas will stop enemy view and hearing ability.

Booby Trap
Explosive device which is ideal for preparing ambushes. When the DRIVER's trip wire has been set, use the SAPPER to select a remote control bomb or a grenade and install it in the trap. When an enemy soldier walks or runs across the trip wire, the explosive will blow up. Don't forget to take cover.

Molotov Cocktail M1934
Really useful against patrols and in ambushes. Hot key 'S'. Can be selected in the 'Weapons' section. The fireball they create will eliminate any enemy soldiers who are in the area. They can be found in crates and cupboards. Use them carefully because their number is limited.

CS Grenade
Neutralize enemy soldiers without killing them. Hot key 'O'. Throw the CS Grenade into a group of enemy soldiers and they will be knocked out. They can be tied up and be examined. You should act quickly because the effect doesn't last long.

Mantrap
DRIVER's lethal trap. Hot key 'P'. Select it in the 'Items' section. Click the LMB on the spot you want to set it. If an enemy soldier walks over it, the mantrap will close and the soldier will die. Don't be afraid about your allied soldiers because they will avoid the trap.

Grappling Hook Trap
Construct a simple but effective trap using the Grappling Hook. Attach the hook to the low part of a wall and select a point across from the hook and stand there with the rope in your hand. If an enemy soldier walks or runs past he will trip on the rope and be knocked unconscious.
Contents-Equipment
Wirecutters
Wirecutters are used to cut through barbed wire and wire fencing. Hot key 'I'. To use the Wirecutters select them in the 'Items' section and click on a wire fence. You can alternatively keep SHIFT pressed while clicking on the wire fence. Some wire fences may be electrified. In
which case you have to disconnect the power source.

First Aid Kit
Heals injured commandos. Hot key 'C'. You can select it in the 'Items' section. Click on one of your men to heal him (including the commando carrying the first aid kit). You can heal the commando carry the first aid kit too, pressing the USE icon in their inventory and clicking on the first aid kit. You can see how many doses are left on the first aid kit icon.

Cupboards
Cupboards may contain interesting and useful items or can be used to store items you do not wish to carry around. You can see inside cupboards by selecting 'EXAMINE' and clicking on the cupboard you wish to search.

Boxes
These are scattered around the scenario. They may contain weapons, ammunition, items, etc. Metal boxes are locked in which case you must use the THIEF to open it to allow examination. Wooden boxes can be examined by any of your men. If you shoot at boxes, its contents may
explode. The GREEN BERET is the only commando that can move them.

Mine Detector
Hot key 'D'. It detects buried mines. Select the detector in Functions and click LMB to direct the search. Stop and stow by pressing the RMB. This item is used by the SAPPER. To deactivate a live mine, place the cursor on the mine and click LMB when the 'DEACTIVATE' cursor appears. Be careful, your SAPPER will not stop when a mine is discovered and may blow himself up. Patience is important.

Rope Ladder
The Rope Ladder allows your commandos to reach otherwise inaccessible areas. Hot key 'E'. Select it in the 'Items' section. To place it, click on a wall or a window. The ladder cannot be placed from below. To use it, press SHIFT and click on the ladder. You can retrieve the Rope Ladder by using SHIFT and clicking LMB on its top area. Remember, you can only retrieve it from above.

Lockpicks
Apparently a useless bunch of wires bent in every direction. Hot key 'S'. Select it in the 'Items' section. Click the LMB on a closed door and it will open. From then on, any commando can use that door to enter or exit the house. The Lockpicks can also open supply boxes and safes,
allowing you to examine the contents.

Leica SLC 8x56 binoculars
They are an excellent way to spy inside buildings without putting your men in danger. Hot key 'B'. Select them in the 'Actions' section in the interface. Place the cursor on a window and click LMB to see through the window. You can use them from indoors and outdoors. If you click on an enemy soldier, you will get detailed information about him.

Radio Unix 38
Long-range field radio. Has a manual dynamo so it can be utilized without connecting to a power source. Keep SHIFT pressed and click on the radio to use it. It can be used by any of your commandos and by allies. In some cases you may need to find cipher codes to use it.

Spike
THIEF's mascot. Hot key 'A'. Select it in the 'Items' section. Click the LMB on the spot you want to send SPIKE to. He will go to the spot and jump around, distracting all enemies who hear or see him. He will then go directly back to the THIEF.

Philips L12 Decoy
Radio-controlled decoy. Hot key 'R'. Select it in the 'Items' section. Click LMB on a given spot on the map and you will drop the decoy on the ground. Activate the decoy with the 'R' key. The decoy will make noises to attract any enemy soldiers within its range. To turn it off, press the 'R' key again. Don't forget to pick up the decoy after you have used it. You only have one decoy.

Portable Acetylene Blowtorch
Very useful for field engineering tasks. Hot key 'L'. Select it in the 'Actions' section. Click LMB on the spot at which you want to use it; it will penetrate some closed metal doors. The blowtorch is not a weapon, but can be used as such in an emergency.

Cigarettes
Imported cigarettes. Hot key 'T'. Select them in the 'Items' section. Click on the spot you wish to throw the cigarettes to. When an enemy soldier sees the cigarettes, he will go and pick them up. You can find cigarette packs on some enemy soldiers.

Diving Equipment
You can stay underwater for long periods of time. Hot key 'D'. Select them in the 'Items' section. The oxygen supply allows the DIVER to stay underwater for very long periods of time.

Canned Food
An individual ration of concentrated food. Hot key 'V'. Select them in the 'Items' section. Replenishes your commando's health bar. Utilize the tin when one of your commandos has been injured. Remember, there is a limited number of tins, don't waste them.

Keys
Set of security keys. Hot key 'K'. Select them in the 'Items' section. Some doors closed due to security and need to be opened using the correct key. Look for keys in enemy clothing, cupboards and boxes. You can use them by pressing SHIFT and clicking on the locked door.

Lipstick
Distraction with seduction. Hot key 'S'. Select it in the 'Actions' section. Keep enemy soldiers busy using Natasha and her charms. Whilst they are distracted by her, your other commandos can sneak past or even sneak up on the enemy and take care of business.

Whistle
Ultrasonic whistle. Hot key 'H'. Select it in the 'Actions' section. Use the dog whistle to call Whiskey to you. He will come to you from anywhere on the map if he is able.

Grappling Hook - Assault and Infiltration
An indispensable tool for subtle attacks on enemy strongholds. Hot key 'S'. Select it in the 'Functions' section. Place the cursor over the wall you wish to climb and click the LMB. To retrieve the hook hold down the SHIFT and click on the top part of the rope. You can only retrieve the hook once you have scaled the wall.

Enemy Uniform
Hot key 'U'. To put the uniform on, click on the uniform icon in the 'Functions' section. To change back into normal clothes, click again on the UNIFORM icon or press the hot key. The uniform will permit you to pass unseen in the long-range enemy view. If you do anything suspicious while an enemy is looking at you, you will be unmasked. You can only use infantry soldiers' uniforms. Each uniform you acquire has a time limit. The amount of time left is displayed in the inventory. This
figure will only decrease when the uniform is worn.

Narcotic Compound MKIV-R
Fast effect and powerful narcotic. Hot key 'N'. Can be selected in the 'Actions' section. It can be used on wine bottles or meat pieces. If an enemy soldier drinks it or an animal eats it then they will be knocked out.

On the pictures we can see some of the previously mentioned Weapons and Equipment.


Contents-Commando Techniques
Stalk and rob an enemy soldier
The THIEF can use his skill to get close to the enemies and steal item from them. Hot key 'D'.When you click on an enemy soldier, the THIEF will go and stand behind him. Wherever the enemy
moves, he will follow. He can also steal from the enemy he is stalking. To do so, place the cursor on the soldier he is following. Click LMB and you will be able to see his inventory. You can then steal his belongings. But be careful, you can be seen by other soldiers.

Hit, tie and gag
Select the hit icon in the weapons section. Hot key 'Q'. Click on the enemy you wish to stun and your commandos will hit him. Once he is on the ground, press the SHIFT key and click on him to tie him up and prevent him from moving. With the exception of the THIEF and NATASHA, all your commandos may tie up enemy soldiers.

Hit with a bottle
Despite her appearance, Natasha can leave enemies in a crumpled heap on the floor with the minimum of effort. Hot key 'Q'. Select Hit with Bottle in the 'Weapons' section. Click LMB on the enemy you wish to knockout. The soldier will remain unconscious for a short while. He won't be very pleased when he wakes up!

Knocking on a wall
Distract the enemy by knocking on the walls. Hot key 'Q'. Select the action in the 'Weapons' section. Click on an inside wall and the commando will knock on that wall. Enemies within hearing distance will turn to see where the sound came from and may even investigate.

Pick up/drop
Use this option to move large items. Press the SHIFT key and click on the item you wish to pick up. Click LMB on the spot you want to drop the item. Press the RMB when you have reached the target location. In this way you can move barrels, boxes and dead enemy soldiers around the map. The commandos cannot run if they are carrying an item. Make sure that you take this into account, as this will greatly increase the time taken to move.

The allies
Seek their help to fulfill your mission. They are not part of your unit, but that does not mean you should send them out to be slaughtered. Use them wisely. Allied soldiers can be used in a variety
of ways and can take cover in three different positions: standing, kneeling and laying down. Their ability to resist enemy attack is dependant on their position. They can operate heavy weapons such as the bazooka.

Dive
Your men may swim underwater. Hot key 'B' to dive or return to the surface. When one of your men is swimming, select DIVE to submerge. When underwater, an oxygen bar will be displayed. If the bar reaches zero, your commando will drown. Control your commando by using the LMB.
To return to the surface, select 'B'.

Telephone pole
Give your SNIPER the maximum advantage by placing him on top of a telephone pole and shooting from there. Climb the pole by keeping the SHIFT key pressed and clicking on the pole. You can stop climbing the pole and drop down at any time by pressing the RMB. The GREEN BERET and THIEF are also able to climb poles and swing around cables.

Slip through a hole
The THIEF may access areas that are inaccessible to the rest of your men. The THIEF must be in the crawl position to pass through the hole. While pressing the SHIFT, click the LMB on the hole
you wish to crawl through.

Bury oneself
The GREEN BERET can bury himself in some types of terrain to evade enemy detection. Hot key 'A'. Select the shovel in the 'Actions' section. Press the LMB on a surface in which it is possible to bury him. The buried commando remains invisible to enemy soldiers. To surface, click any mouse button.

Climb out of a window
Flee from inside a building by jumping through the window. Only the THIEF and the GREEN BERET can perform the feat of agility. To exit via a window, hold down SHIFT ad click on the desired window. The commando will either land on the floor, cling to the windowsill or hang from a
telephone wire, depending on which window you have clicked on.

Climb
Use the THIEF to climb walls. While keeping SHIFT pressed, click the LMB on the chosen wall. Some walls will allow sideways movement. While climbing, a stamina bar is displayed. The bar slowly decreases over time. If the bar reaches zero, the thief will fall to the ground. This will cause injury is the fall is from a substantial height.

Hiding
The THIEF can hide almost everywhere. With the SHIFT button pressed, click on the desired hiding place with the LMB. To come back into play, click any mouse button.

Swim
Take advantage of the fact that your commandos can swim across rivers and canals. To make one of your commandos enter the water, click LMB on the water. With a single click, your commando will swim at a normal speed. With a double click, he will swim faster, but also make more noise and will be easily detected.

Stick to a wall
Hide from the enemy by sticking close to a wall. If you place a commando next to a wall, he will stick to it. While he is sticking to the wall, he will only be visible in the enemy's short-range view even though he is standing up. He can move along the wall and remain hidden. To move him away from the wall, press the LMB.

Distract with Spy
Keep the enemy distracted while the rest of your men complete the objectives. Hot key 'S'. Select it in the 'Functions' section. Left click on an enemy you wish to distract. If you distract a soldier at a
close range, you can order him to look and walk further away. Remember that you can only do this if you are wearing an enemy uniform.

Whiskey's bark
Due to his extensive training, Whiskey is able to run to enemy soldiers and bark in an attempt to attract their attention. Hot key 'A'. Select it in the 'Actions' section in the interface. Whiskey's bark distracts enemies for a short period of time at which point they resume their actions.

Hiding enemy bodies
Eliminate all indication of your presence behind enemy lines. You can hide the bodies of fallen enemies in tall grass and plants and even dispose of them at sea. Pick up the body by pressing SHIFT and clicking LMB on the enemy. Walk to a shore or to a patch of tall grass and click LMB holding SHIFT to drop the body.

Driving vehicles
All the commandos are able to drive vehicles. Press SHIFT and click LMB on the vehicle to enter. Once inside, the cursor keys control direction. Alternatively you can also click LMB to the target
destination. Holding don the SHIFT key will cause the vehicle to accelerate. Specialized vehicles can only be driven by the DRIVER. In armed vehicles, you can use the Ctrl key to shoot using the vehicle's weapon, but only if the SAPPER is also inside the vehicle.

Attack mode
Place commandos in auto-fire positions. Commandos will automatically fire on enemy soldiers if set on attack mode. By holding down Ctrl and clicking with the RMB, the field of view will move to the desired position. You can set commandos to attack mode in either crawling or standing positions. This is by no means an easy path to victory as your soldiers can also be shot in this mode.

Seduction
Exploit Natasha's natural charms. Hot key 'U'. Select it in the 'Functions' section. Natasha won't be discovered by the enemy. Dressed in sexy clothes and using her lipstick, she can distract enemy soldiers so that her comrades can avoid detection.

Throw a bottle
Empting distraction. Hot key -. Can be selected in the 'Items' section. Enemy soldiers can refuse a good wine. When they drink it, they will be stunned for a while during which they can't see or hear allied soldiers. If narcotics have been used on the bottle, enemy soldiers will be sent to sleep until they are woken up by a comrade.

All of the interesting information from the Content tabs is found in this beautiful book that you can see on the picture bellow.

Hot-Keys
On the following picture you have every single Hot-Key in the game.


Training Camp 1 (Bonus Books-Not Available)
In this part of the guide we are going to analyse the missions in Commandos 2 and we are going to write down the locations of the bonus books on missions that they are available .In Commandos 2, you can unlock Bonus Missions by finding all pieces of the Bonus Puzzle in the level. These pieces are hidden in Bonus Books, and those are hidden in furniture, chests, and cabinets throughout the level.

Is the first Training mission. The main objective is to eliminate all the enemies.

Objectives:
-Neutralise all the enemies at the border gate. To do this you should:
-1)Get to the guard post
-2)Take the wirecutters from the metal box
-3)Cut through the barbed wire and deactivate the mines on the other side
-4)Fight the officer's group

Secondary objectives:
-Obtain the contents of the wooden box.

The Team:
-1) Inferno (The Sapper)
-2) Lupin (The Thief)


On the picture we can see a frame from Training Camp 2 mission.


Training Camp 2 (Bonus Books-Not Available)
Is the second Training mission. The main objective is to rescue the allied soldiers, and defend against an enemy attack.

Objectives:
-Rescue the allied soldiers who have split from their unit. You have to:
-1)Obtain the key to the house
-2)Contact your allies
-3)Use the enemy radio to inform HQ
-4)Defend against the enemy attack
-Destroy the enemy tank

Clues:
-Obtain the contents of the boxes
-Position the allied soldiers

The Team:
-1) Tiny (Green Beret)
-2) Inferno (The Sapper)
-3) Tread (The Driver)

On the picture we can see a frame from Training Camp 2 mission.


Night of the Wolves (Bonus Books)
Is a mission set in La Pallice, France. The main objective is to infiltrate a German naval base.

Objectives:
-1)Contact the wounded Ally
-2)Steal the office key from the General's assistant
-3)Steal the Enigma's machine from the General's safe
-4)Decipher the message using the Enigma machine
-5)Use the radio
-6)The thief must hide under a bed

Secondary objectives:
--Steal the security papers

Clues:
-Contact Natasha
-Disconnect the power to the electric fence
-Use the sleeping pills to knock out the assistant
-Natasha can call the General on the phone

The Team:
-1) Lupin
-2) Lips (After you contacted her in the main building)
-3) Whiskey (After you talked to the wounded ally soldier)

-Bonus Books Locations-

This one is in the house with the phone used to distract the general
The same room and building as #1, but this Book is in the other of the two lockers
In the Mess Hall, where the general's assistant is drinking . It's in the cupboard in the corner
This one's in the room where Natasha starts
Opposite of the Mess Hall there's a small building with showers inside


-Bonus Book Pieces 5 in Total

On the picture we can see a frame from Night of the Wolves mission.

Das Boot, Silent Killers (Bonus Books)
Is a mission set in La Pallice, France. The main objective is to rescue a captured Allied
submarine.This mission continues the next morning after Night of the Wolves.


Objectives:
-1)Deactivate the underwater mines
-2)Rescue all the allied sailors
-3)Call the Green Beret using the radio
-4)Open the hangar door
-5)Get the Enigma codes
-6)Rescue the Captain

Secondary objectives:
-Destroy the torpedo
-Destroy the AA guns
-Destroy the fuel tanks

Clues:
-Cut the barbed wire and deactivate the landmines
-Pass the security papers to the Spy using the Dog
-Steal a vehicle
-Enter the base disguised as an official

The Team:
-1) Fins (The Marine)
-2) Inferno (The Sapper)
-3) Spooky (The spy)
-4) Lupin (The Thief)
-5) Whiskey (The Dog)
-6) Tiny (Green Beret) (After calling him from the base, comes in via Parachute)

-Bonus Books Locations-

-Inside the Submarine. Go to the center of the Submarine to find some sort of kitchen, with a lot of cupboards on the walls. This Bonus Book is in one of the cupboards.
-Inside the Submarine Pen. Standing on the Submarine you have to steal,walk off the plank, back onto solid ground, and then turn left. Enterthe building here (it's the same building where the Captain is beingheld captive). On the ground floor of this building, search the file cabinet near the door to find this Book.
-This one's in the same building as #2. Go to the second floor, where the Captain's cell is. Search
the two lockers in the corner near thestairs to find the Book.
-Remember that, in the previous mission, Natasha could phone the general? Well, go to the building with the phone (it's near the general's office). There are three rooms in this building: one anteroom,the room with the phone, and a room with some beds and a lot of enemies. The Book is in this last room, in the locker next to the door behind the Officer. If you want to get it without being seen, enter the building through the door behind the Officer.
-This one's in the room where Natasha started in the previous mission,near the missiles you have to destroy. Check the big cupboard in thisroom to find the Bonus Book (same location as #4 in Mission 1).
-Enter the general's office (with the safe you had to crack in the previous mission). In the anteroom (the little room before the actual office), there's a file cabinet in the corner. Check this cabinet to
find the next Book.
-This one's also in the general's office. Enter the actual office this time, and search the shelves next to the desk.
-Opposite of the Mess Hall (where the assistant was drinking in the previous mission), there's a small building with some showers inside.The Book's in a locker in this building, next to the door.
-There are two gates to the enemy complex. Go to the gate with the train tracks (near the fuel tanks). Facing this gate from inside the complex,there are two doors, one on either side of the gate. Enter the left door (you have to walk over a catwalk first), it leads to a small room with two enemies and a switch to open the gate. The Book is in a desk in this room.
-North from the train station, you'll see an anti-aircraft gun on a wooden platform. Just north of that, in the complex wall, there's a bunker. Enter this bunker, and look for an officer and a lieutenant in
a small office. This Book is hidden in the desk in this office.
-Enter the Submarine you're supposed to steal, and make your way to the
rear end. In the small room at the rear, you'll see a cupboard. It
contains the last piece of the Bonus Books.

-Bonus Book Pieces 11 in Total

On the picture we can see a frame from Das Boot, Silent Killers mission.

White Death (Bonus Books)
It is mission set somewhere on the North Pole. The main objective is to escape with the enigma machine. This mission is related to 'Night of the Wolves' and 'Das Boot, Silent Killers' It continues some time after you have taken the German U-Boat and escaped the german U-Boat base.

Objectives:
-1)Contact the Sapper
-2)Rescue the Green Beret
-3)Recover the three parts of the Enigma machine
-4)Rescue the Spy, the Thief and the allied sailors
-5)Rescue the Captain
-6)Use the radio in the camp
-7)Destroy the engine
-8)The Green Beret and the Spy must use the plane to take the Enigma machine to the HQ
-9)All the others must escape in the sub

Secondary objectives:
-Disable the bow gun
-Disable the central gun
-Disable the stern gun

Clues:
-Use the balloon to obtain the explosives

The Team:
-1) Fins (The Marine)
-2) Inferno (The Sapper)-Must be rescued from captivity by the Germans first
-3) Spooky (The spy) -Must be rescued from captivity by the Germans first
-4) Lupin (The Thief) -Must be rescued from captivity by the Germans first
-5) Tiny (Green Beret)-Must be rescued from captivity by the Germans first

-Bonus Books Locations-

-This one's in the room where you start, in the Submarine.
-In the center of the Submarine, you'll find some sort of kitchen, with a lot of cupboards on both sides. This Book is in one of them.
-Enter the building with the radio, and search the cupboard near the door to find the next Book.
-Enter the ship, and make your way to the crew quarters where the Captain is being held, you'll find 4 lockers. The Book is in one of them.
-This one's in the crew quarters of the ship, where the Captain is held captive.
-Enter the room two doors away from the Captain's cell, andsearch the cupboard to find the next piece.
-When you're on the bridge (where they're holding the Enigma Machine),enter the door that leads down to the room below. Go down the stairs.There's another set of stairs leading down, a door leading outside, and a narrow office on the other side of the room. Enter this narrow office.There's a desk with some equipment, but you should look for a really small, brown cupboard on the wall to the right.The Book is in this cupboard.


-Bonus Book Pieces 6 in Total

On the picture we can see a frame from White Death mission.

Target: Burma (Bonus Books)
This mission is located in Burma. The main goal is to liberate a Burmese town from Japanese control. The player can use the help of local Gurkhas during this misson.

Objectives:
-1)Rescue the spiritual leader
-2)Rescue the Ghurkas
-3)Order the Ghurka to operate the radio
-4)Eliminate the Tyrant
-5)Escape on the barge with the Spiritual leader

Secondary objectives:
-none

Clues:
-There are quite some snipers during this level, if you take their ammo you have plenty for your sniper, make good use of him
-This level contains Gurkhas, If provided with a weapon they will have unlimited ammo
-Be prepared for a raid at the end of this level. Make sure all the Gurkhas are armed and hidden where they can take a shot
-You will need a Gurkha to call over the radio
-The water is filled with crocodiles, try to avoid these as much as possible, if you do find yourself in the water, try to swim to your destination as fast as possible

The Team:
-1) Tiny (The Green Beret)
-2) Duke (The Sniper)
-3) Tread (The Driver)
-4) Lupin (The Thief)


-Bonus Books Locations-

-From your starting position, head to the bridge. Cross the narrowbridge, and the immediately turn left, and pass the stairs on theright. Walk on the path between the water and the yellow building, thengo around the corner and enter this yellow building. Search the cupboardin the room with the two officers to find the Book.
-There are three bridges over the river: a narrow one, and two big ones.Get onto the big bridge in the southeast corner of the map (the one that isn't near the escape boat). On this bridge, walk towards the square.Just before you pass through the gate with the green roof, enter the door on the left. Two guards are cleaning their guns here. Check thegun racks to find this piece of the Bonus Mission.
-Not far away from the escape boat, you'll see a garden with several monks walking in it. Enter the building across the road from this garden. When you're in, enter the room on the right, and search the cupboard.
-Near the big statue, and also near the two watch towers at the end of the bridge, you'll see a big building in the center of the square. There are two snipers on the balcony. Anyway, enter this building, and stay on the ground floor. There's a room with two guards, some radio equipment,
and an officer that is constantly pacing around. Enter this room, and check one of the cupboards.
-From the starting point, follow the river, staying on this side. After passing the narrow bridge, keep going. When you come near the big bridge, you'll see some stairs leading into the water. On the other side of the river, big stairs are leading out of the water. Cross the river here, and enter the big building across the road from those broad stairs (the building with a guard on the roof). On the second floor, you'll see a room with a bunch of shelves. The Book is on one of those shelves.
-Go to the same building as #2 (the one on the side of the southwestern bridge). Enter it, and then climb a ladder to reach a room with some bookshelves. The Book is on one of these shelves.
-Go to the radio building. On the ground floor, check the cupboard to find the Bonus Book.
-Across the entrance to the statue is another building. Go through the entrance (it doesn't have a door as entrance, just a hole). There are four rooms here, two of them have bookshelves in them. Check one of the two bookshelves for this piece.
-In the same building as #8, but this one's on the other bookshelf.


-Bonus Book Pieces 9 in Total

On the picture we can see a frame from Target: Burma mission.

Bridge over the River Kwai (Bonus Books)
Mission 5 is set in River Kwai, Thailand. The main objective is to destroy important bridge.

Objectives:
-1)Rescue Guinness
-2)Obtain the explosives
-3)Find the bridge's weak spot by taking Guinness to the bridge model
-4)Plant the explosive trap
-5)Summon the train by sending a telegraph

Secondary objectives:
-Rescue the prisoners

Clues:
-Cross the river on an elephant

The Team:
-1) Tiny (Green Beret)
-2) Fins (The Marine)
-3) Tread (The Driver)
-4) Lupin (The Thief)

-Bonus Books Locations-

-On the bridge are two spots you can search (at the barrels). The Bonus Books is hidden between one set of barrels.
-Go to the prisoner camp, across the river. There are 4 buildings between the fences. Go into the one furthest away from the bridge. Here, you'll find some shelves. Search them to find the second Bonus Book.
-Go to the prisoner camp across the river. Enter the biggest one of the four buildings between the fences. Inside, search the cupboard.
-Cross the bridge, and turn right. Walk past the building, then turn right, and walk down the sloped path. At the bottom of path is a small house. Inside are an officer and a normal soldier. Once you've cleared this one room building, look for a really small cabinet on the wall.Once you've found it, search it for the Bonus Book.
-To complete the goal, you have to show Guinness the model of the bridge.Go to the room with the model. Next to the model is a small cupboard,the Bonus Book is inside.
-Enter the building nearest to the start, with the car next to it. On a table in this building is a small cupboard with the Bonus Book inside.
-Near the start are two buildings. Enter the west one, the one closest to the bridge. Search the little brown drawer next to the door for the piece.


-Bonus Book Pieces 7 in Total

On the picture we can see a frame from Bridge over the River Kwai mission.

The Guns of Savo Island (Bonus Books)
It is mission located on Savo Island in the South Pacific, north of Guadalcanal. The main objective is to disable a Japanese coastal artillery emplacement.

Objectives:
-1)Rescue the Allied pilot
-2)Get explosives
-3)Destroy the guns
-4)Escape in the seaplane

Secondary objectives:
-Steal the golden monkey
-Blow up the wall behind the golden monkey

Clues:
-Contact the shipwrecked sailor
-Steal the key to the tunnels
-Find the blowtorch in the sunken ship, in order to open the bunker door

The Team:
-1) Tiny (Green Beret)
-2) Fins (The Marine)
-3) Inferno (The Sapper)
-4) Tread (The Driver)

-Bonus Books Locations-

-If you check your goals, you'll see that you have to get some explosives. Use the directions given in the Objective menu to find the bunker where the explosives are kept. Enter it, and search the
cupboard nearest to the entrance to find the Bonus Book.
-In the camp nearest to your starting position there are several houses, and a bunker. Facing the bunker,turn 90 degrees to the right, and walk to the wooden platform up ahead.Enter the small hut on this platform. After taking care of the officer inside, search the cupboard.
-In the southern village (the one above the guns), face the narrow bridge across the river. To your right will be a wooden platform with two buildings, a big one and a really small hut. The big one has a sniper on the second floor. Enter this building, and look in the only cupboard in this hut.
-This one's in the southern village, that's the village above the bunker with the guns. There's a white bunker with a steel door in this village.Facing the door, turn 120 degrees to your left. You'll see a pretty big,T-shaped hut. Enter it, and search the shelves in the corner for the next Book.
-When you finally get to the guns you have to destroy, you'll see a couple of cupboards near those guns, in the same room. This Bonus Book is in one of the cupboards.
-Like #5, this one's in one of the cupboards in the room with the guns.
-Standing at the three guns you have to destroy in the bunker, enter the only door in this room. Walk down this corridor, and take the first door left to enter a room filled with soldiers in white clothes. There's also one cupboard in this room, the Book is in it.
-One of the clues you'll get in this mission is to steal the keys to the bunker. Select this clue to find out where the keys are, then make your way to that room. It's a big room, with a lot of radio's, a table with a map, and the Admiral who has the keys. There are also a lot of cupboards and closets here, search them all to find pieces #8, #9 and #10.


-Bonus Book Pieces 10 in Total

On the picture we can see a frame from The Guns of Savo Island mission.


The Giant in Haiphong (Bonus Books)
It is mission located in Viet Nam. The main goal is to sabotage the Japanese aircraft carrier Shinano.
Objectives:
-1)Contact the Sapper and the Thief
-2)Find the explosives
-3)Destroy the large fuel tanks
-4)Destroy the small fuel tanks
-5)Infiltrate the aircraft carrier

Secondary objectives:
-None

Clues:
-Talk with the shopkeeper
-Rescue Natasha
-Hide inside the truck

The Team:
-1) Tiny (Green Beret)
-2) Lupin (The Thief)
-3) Inferno (The Sapper)
-4) Natasha (The Seductress)

-Bonus Books Locations-

-On one of the shelves in the warehouse where the Lupin and Inferno start.
-Like #1, on one of the shelves in the warehouse.
-In the southwest corner of the map is a stationary truck. Enter thesecond floor of the house with the green roof near that truck. Go to the kitchen, and look in the stove to find the Bonus Book.
-Go to the white building where Natasha start. On the ground floor of this building, look in the cupboard for a Book.
-In the village, stand on the square in front of the gate to the enemy base. Face the gate, then turn 90 degrees to your left, and enter the door in front of you. Search the shelves with the clothes for another Bonus Book.
-Leave the white building where Natasha starts via the front door, and turn left (seen from your Commando). Walk down the street. After passing the house with the green roof and the balcony, enter the door on the left, into a stone-colored building (it's on the same block as Natasha's house). Get to the top floor of this house. In the bedroom,check the small drawer next to the 'bed' to find this Book.
-Go to the same house where you can find #6. On the ground floor, go into the room with the counter, and there search the small cabinet on the wall.
-Between the row of houses with Natasha, and the house with the Storekeeper, there's a lone house with a walled-off garden. Enter this house, and head into the room with the general and the soldiers. Here,check out the shelves to find the piece.
-If you go towards the enemy base gate from the starting point, you'll come past couple of houses on the right side of the street. Enter the first big house you come by, it has a green and a red roof, and a balcony. Make your way to the second floor, and there enter a room with a desk and some file cabinets. Check the fallen file cabinet and the normal one to find two Books.
-Near the Green Beret's starting point are two small houses. One has got some white flowers near the entrance; enter the other house, the one on the corner of the street. Inside, check the shelves.
-Go into the house with the Shopkeeper (check your Goals to find the house). Inside, climb a ladder to the second floor. In the small room on the second floor, look for a chest near the window. The Book's inside.
-Like #9, this one's inside of one of the file cabinets on the second floor of the big house west of the start. Read the description for #9 to get there.
-From the town, go through the gate, into the enemy base. Enter the first building on your left, the one with the short stairs in front. Inside,go through the only other door. Above you, you'll see the corridor that runs above the gate. Don't climb up the ladder, however. Check out the cabinets next to the door you just came through to find a Bonus Book.
-This one's inside the house of the Shopkeeper (check your goals to find him). It's on the shelves behind the Shopkeeper.


-Bonus Book Pieces 14 in Total

On the picture we can see a frame from The Giant in Haiphong mission.

Saving Private Smith (Bonus Books)
It is mission set in Cherbourg, France. The main objective is to rescue Private Smith.This mission apparently is reference to the movie "Saving Private Ryan".

Objectives:
-1)Heal Smith
-2)Steal the radio codes from the safe
-3)Smith must radio HQ
-4)Resist the invasion
-5)Destroy the tanks

Secondary objectives:
-Free the Green Beret.
-Save the Sapper
-Rescue the Sniper
-Prepare your men for the incoming invasion

Clues:
-You need a first-aid kit to heal Smith
-Find the wirecutters

The Team:
-1) Tiny (Green Beret)
-2) Lupin (The Thief)
-3) Inferno (The Sapper)
-4) Duke (The Sniper)

-Bonus Books Locations-

-In the rover is a sunken ship. There are two ways to enter it: you can swim into the nose from underwater, or you can use the blowtorch to open the rear end. Once inside the plane, take care of the enemies, and then look in the green cabinet here.
-In the building where the Sapper (Inferno) is being held. Go to the big living room, and search the big cupboard here to find the Book.
-This one's in the room where the Sniper is being interrogated. After you've rescued him, check out the cupboard in this room. Check the Goals to locate the right building.
-Also in the building where the Sniper was held captive. Go downstairs,and search the small
cupboard here to find the next piece.
-Go to the second floor of the building where the Green Baret was imprisoned. There are two Books on this floor: one in a cabinet in the bathroom, the other one in the cupboard in the bedroom.
-See #5: either in the bathroom or in the bedroom.

-Bonus Book Pieces 6 in Total

On the picture we can see a frame from Saving Private Smith mission.

Castle Colditz (Bonus Books)
In a small town in eastern Germany, on the top of a hill,surrounded by the river Mulde, rises the impregnable fortress of the Third Reich, Colditz Castle.

Objectives:
-1)Rescue the Thief from certain death without setting off the alarm
-2)The code template has been hidden by General Heinz
-3)The code book is kept by Field Marshal Desfell
-4)The encrypted plan is kept by Major-General Rudolf
-5)Join the three parts of the secret plan and transmit via the allied radio
-6)Escape in the balloon

Secondary objectives:
-Distribute the enemy uniforms to the prisoners so they can escape (58)

Clues:
-None

The Team:
-1) Tiny (Green Beret)
-2) Lupin (The Thief)
-3) Tread (The Driver)
-4) Duke (The Sniper)
-5) Spooky (The Spy)


-Bonus Books Locations-

-In the Castle itself, make your way to the inner prison yard (thecourtyard without the execution squad). You'll see a flat roof you can walk on on one side of the yard. On this flat roof, there's a small structure. Immediately underneath it, on ground level, is door. Enter it, you should be in a room with some benches and a door leading to a kitchen. Enter the kitchen, and search the cupboard for the Book.
-Go into the same building as you did for #1. In the room with the benches, go down the stairs.
Open the metal doors, and search the two shelves in the room behind them to find no less than 2 Bonus Books.
-Go to the inner prisoner yard, the one without the firing squad. Look around to find a really tall window (2 or 3 stories high). Facing this window, turn right, and enter the door here. You should be in some sort of a gym. Head into the room under the stairs, and search the small cabinet on the wall.
-The same place as #2. Search both shelves to find two pieces of the Bonus Puzzle. Read #2 for more information.
Go to the inner prisoner yard, the one without the firing squad. Look around to find a really tall window (2 or 3 stories high). Facing this window, turn right, and enter the door here. You should be in some sort of gym. Go up the stairs to reach the first floor. In the room with the beds, search two shelves and one cupboard to find a total of three
Bonus Books.
-Same as #5.
-Same as #5.
-Go to the inner prisoner yard, the one without the firing squad. Look around to find a really tall window (2 or 3 stories high). Facing this window, turn right, and enter the door here. You should be in some sort of gym. Go up the stairs twice to reach the second floor. There are two bedrooms here. Check all the furniture in those rooms to find 4 Bonus Books.
-Same as #8.
-Near the Green Beret's starting point, there's a factory with a sign that says 'Brouwerij'. Go into this factory (the one with the pipes on the roof, not the other one). Head into the little office on one side
of the room, and search all furniture here to find two Books.
-Same as #10.
If you follow the river from the church where the Spy start, you'll come past a factory. Get inside the fenced-off area, and then enter the smallest of the two buildings. Search all the furniture in this small house to find three Books.
-Same as #8.
-Same as #8.
-Go to the inner prisoner yard, the one without the firing squad. Look around to find a really tall window (2 or 3 stories high). Facing this window, turn right, and enter the door here. You should be in some sort of gym. Go up the stairs twice to reach the second floor. There are two bedrooms here. Walk past them, and enter the door. To your left is a small boiler room. Search for a 'secret' cabinet in the wall. Look for a metal plate in the wall, then look into it to find a Book.
-Same as #12.
-If you follow the river from the church where the Spy start, you'llcome past a factory. Across the road from the factory's main gate is a house with a greenhouse attached to it. Enter this house, and search the furniture in the living room and in the back room for 2 pieces.
-Same as #12.
-Go to the inner prisoner yard, the one without the firing squad. Look around to find a really tall window (2 or 3 stories high). Facing this window, turn right, and enter the door here. You should be in some sort of gym. Go up the stairs twice to reach the second floor. There are two
bedrooms here. Walk past them, and enter the door. Head over to the
piano, and search it.
-Same as #17.
-Cross the road from the church where the Spy starts. Go onto the fieldof grass behind the houses here. Now look for a ladder on the back of one of the houses. Facing this ladder, turn left, and enter the small house with the red roof you see here. Search all the furniture inside to find 3 Bonus
Books.
-From the church where the Spy starts, walk down the street, away from Tread's starting point. On your left, there will be a row of houses.Enter the tall house with the red roof on the corner. This is the cafe.On the ground floor, you can find 3 Books by searching all furniture.
-Same as #22.
-From the church where the Spy starts, walk down the street, away from Tread's starting point. On your left, there will be a row of houses.Enter the tall house with the red roof on the corner. This is the cafe.Go up the stairs to get to the first floor. Here, search all furniture
in the bathroom and the bedroom to find two pieces.
-Same as #21.
-Same as #21.
-Same as #22.
-Same as #24.
-From the church where the Spy starts, walk down the street, away from Tread's starting point. On your left, there will be a row of houses.Enter the tall house with the red roof on the corner. This is the cafe.Go up the stairs twice to get to the second floor. Here, search the cupboard in the corridor and the one in the other, small room (not thebedroom) to find two more pieces.
-Same as #29.


-Bonus Book Pieces 30 in Total

On the picture we can see a frame from Castle Colditz mission.


Is Paris Burning? (Bonus Books)
The very last mission on Commandos 2 Men of courageit is set in Paris, France. The main objective is to prevent bomb detonation.

Objectives:
-1)The Sapper must disconnect the detonation device in the general's office
-2)Contact Natasha
-3)Use the radio at the top of the tower

Secondary objectives:
-None

Clues:
-Obtain mines and grenades
-Steal a tank
-Obtain the key for the tower from the SS general

The Team:
-You control all the commandos you have played with in the other levels


-Bonus Books Locations-

-In the subway station where you start, look into the trash can next to the stairs that lead up to the next area.
-There are three houses in this level. Enter the middle one (you can only enter it via the back side, not via the street side). Go to the second floor, where you will find a pretty large library.Search all the book shelves, and the little cabinet in the bedroom, to find a total of 4 Books.
-Go into the house where Natasha starts, the one with the elevator. Take it up to the second floor. Here, search all little cupboards next to the beds to find 2 Bonus Books.
-Same as #3.
-Go into the house where Natasha starts, the one with the elevator. Take it up to the first floor. Here, search all little cupboards next to the beds to find 2 Bonus Books.
-Same as #5.
-Go into the house where Natasha starts, the one with the elevator. On the ground floor, search the desk behind the counter.
-There are three houses in this level. Enter the middle one (you can only enter it via the back side, not via the street side). Go to the third floor to find some sort of atelier. Search the shelves with the paint buckets to find the Book.
-Same as #2.
-Same as #2.
-Same as #2.
-There are three houses in this level. Enter the middle one (you can only enter it via the back side, not via the street side). On the ground floor (the restaurant), you can find 2 Books: one in the cabinet in the corridor, the other one on the shelves behind the bar.
-Same as #12.
-Go into the building where the General's Office (and the bomb you have to diffuse) is. Go to the top floor, and search the desk here for a Book.
-There are three houses in this level. Enter the middle one (you can only enter it via the back side, not via the street side). Go to the first floor, where they're sewing some clothes. search the desk in the Lieutenant's little office.
-Go into the building where the General's Office (and the bomb you have to diffuse) is. Go to the second floor. There are two Books to be found here: one in a file cabinet in the long room, the other one on a shelf in the room with the desk.
-Same as #16


-Bonus Book Pieces 17 in Total

On the picture we can see a frame from Is Paris Burning? mission.

Historical Inaccuracy
In all honesty, this is a greatly designed game so there were not many mistakes to list, the only reason I did is for education and intrigue.

-In mission "The Giant In Haiphong", the city Haiphong resembles a Chinese city, when in fact the city is in Vietnam .This inaccuracy extends to the game's website, which places Haiphong in China, and even wrongfully locates South East Asia.
-In the mission "Target: Burma" where the player must liberate a Burmese town from Japanese control, there is a giant Buddha statue in the temple area. In reality, there is no giant Buddha statue in Burma , it appears to be very similar to the Great Buddha of Kamakura of Japan.
-In the mission "The Guns of Savo Island" where the player must destroy the naval coastal battery guns, there is an enemy patrol boat that bears a resemblance to the US Navy PBR which was used during the Vietnam War. In reality, the PBR was neither built by the Americans nor operated by the Japanese during World War II.

On the following pictures we can see the in game boat compared to a real picture of the Vietnam era boat (US Navy PBR).

Cheat Codes
Personally in my opinion, this is a great game and if you play on normal difficulty you could beat it easily but for the players that don't have that time or the nerves, I will write down the cheat list. If I didn't write down the cheat list there would definitely be questioned about why didn't I write them somewhere in the guide

Level Codes (Normal)
  • Night of the Wolves - XHGDR
  • Das Boot Silent Killers - WKUC4
  • White Death - YSM51
  • Target Burma - B7D8F
  • Bridge over the River Kwai - 3GHSL
  • The Guns of Savo Island - AZLM1
  • The Giant in Haiphong - JAHSG
  • Saving Private Smith - UN63A
  • Castle Colditz - VAZ2P
  • Is Paris Burning? - 9TT5W
Level Codes (Hard)
  • Night of the Wolves - PLKUM
  • Das Boot Silent Killers - JE5SH
  • White Death - DFY3B
  • Target Burma - K9D3H
  • Bridge over the River Kwai - NMWQ9
  • The Guns of Savo Island - 16G3L
  • The Giant in Haiphong - WL3CZ
  • Saving Private Smith - LPQ6T
  • Castle Colditz - SRCM8
  • Is Paris Burning? - PAEN8
Level Codes (Very Hard)
  • Night of the Wolves - PVTSL
  • Das Boot Silent Killers - SKDJF
  • White Death - 3DYNG
  • Target Burma - 9BG3S
  • Bridge over the River Kwai - NMWQ9
  • The Guns of Savo Island - E2J7H
  • The Giant in Haiphong - ZX78Y
  • Saving Private Smith - TRIB4
  • Castle Colditz - TRD78
  • Is Paris Burning? - 1LPQD

You can activate cheat mode in a couple of ways. Either enter the name "GONZOANDJON" for your player, or, during gameplay, select a commando and type "GONZOANDJON." Either way, cheat mode will be activated, allowing you to get at the goodies.
To use a cheat, type the command to unlock the corresponding cheat: <P> Invincible: CTRL+I
Invisible: CTRL+V
Kill Enemies: CTRL+SHIFT+X
Show Current Framerate: CTRL+-
Teleport: SHIFT+X
Win Mission: STRL+SHIFT+N
My Opinion
In my opinion, Commandos 2 stands out as one of the most exceptional games ever created. I still remember the day my grandfather handed me the original Commandos CD. I used to play it almost every day, struggling to get past the second training mission because I couldn't find the key. Back then, I didn't know much English, but I had a blast playing the game.

The PC where I first played Commandos is still kicking, now in the hands of my grandmother who loves playing Zuma on it. While the Commandos CD sits in my drawer gathering dust, it's still in working condition.

Most of us have fond memories of Commandos, and just thinking about those younger days spent playing the game brings on a wave of nostalgia.

-My other Commandos guide-

Commandos 2: Men of Courage - Bonus Books

Once again, I hope you guys have enjoyed reading the guide!

4 Comments
danisoff  [author] Jan 27, 2021 @ 12:16am 
I'm glad to hear that someone has a similar play style. I hope you enjoyed my guide shbouwhuis.
shbouwhuis Jan 26, 2021 @ 3:15pm 
This game is in my top 3 of all time.
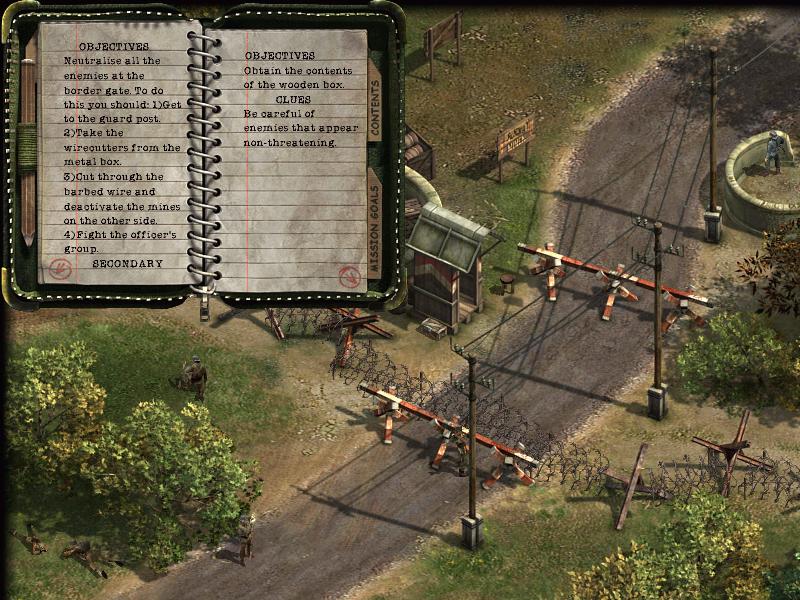
I'm currently replaying it for the umpteenth time. I always play with these (self-imposed) rules:
1. Difficulty on very hard.
2. Full stealth (no alarms raised).
3. Don't kill anyone (some levels force you to kill some of the enemies). That also means I don't throw them in the water after tying them up because that counts as killing to me.
4. Knock out and bind everyone in the level (no enemy left awake).
5. Collect all the bonus mission pieces
6. Complete all the primary and secondary objectives.
danisoff  [author] Dec 4, 2020 @ 8:06am 
I'm glad to hear that someone appreciates it.Thank you Pokey.
Garry Dec 3, 2020 @ 10:45pm 
That is poetry

Job well damm done