In this article, I am going to show you how you can draft and sew a collar, and a collar stand for any dress, shirt, or blouse. You can follow these steps to make a collar for women, children, and men, and in any size.
If you prefer the written instructions, keep reading. If you would rather watch the video, scroll down to the bottom of this page.
You can draft the collar to finish a self-drafted project or change up a commercial pattern that you like.
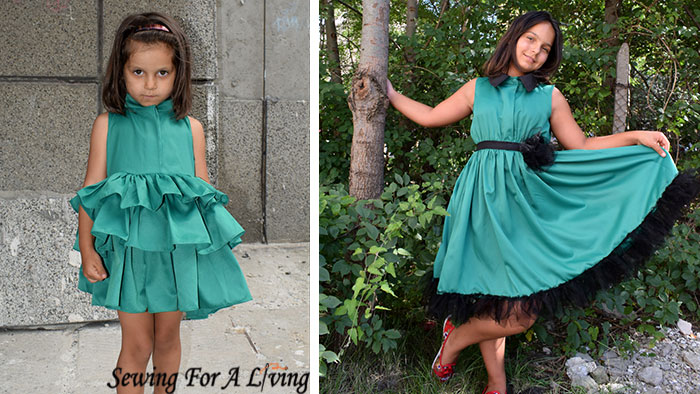
I use the same technique to draft a stand-alone stand like here:
And a collar with a stand like in here:

So, without further ado, let’s see how to do it.
How to measure for a collar and a collar stand
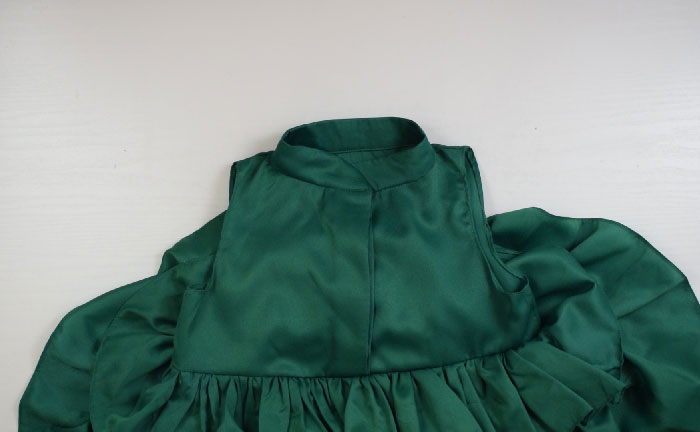
Here is my dress that I want to finish with a collar (image 1). To start drafting the stand, I need the measurement of the neckline.
You can take the measurement on the actual garment that you are sewing. Or, you can measure on the pattern (if your project is not self-drafted).
For best results, one of the most important things here is to match the length of the neckline with the length of the stand. That’s why you need to be careful when you take the measurements.
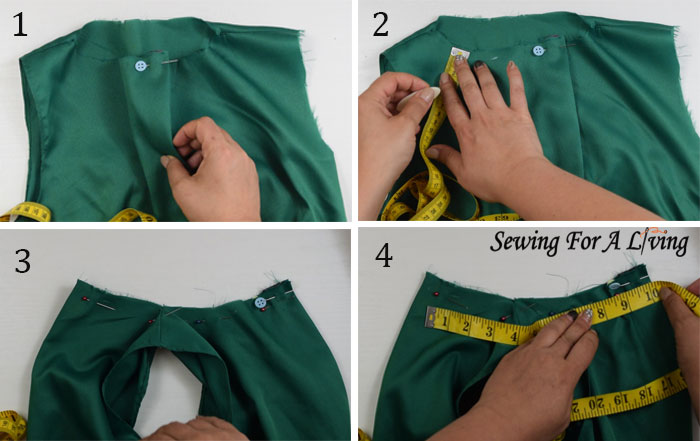
To ensure that I was measuring precisely, I pinned the front placket on both sides (image 2). You can also fix it with a stitch. I do that to make sure it doesn’t open and change the length of the neckline.
To draft the right length of the collar stand, I need to measure at the seam line and not at the edge. That’s because I need my finished stand to match the actual neckline curve. If I measure at the edge, the seam allowance that I’ve already included will make my stand too short.
Consider if you work on a pattern with or without seam allowance included. You need the measurement of the neckline without seam allowance.
I mark my seam allowance with a piece of chalk (image 2).
Then, I fold the neckline in half and pin it while matching the shoulder seams and the fronts. I mark my seam allowance with a piece of chalk (image 3). This way, it would be easier to measure.
Also, I will be drafting the collar and collar stand pattern on the fold, and I will need ½ of the neckline measurement.
I measure at the seam line and write down my center back to shoulder seam measurement, and for the ½ neckline measurement, I mark my seam allowance with a piece of chalk (image 4).
Those are the only two measurements you will need for this pattern. The other two (which are the height of the stand and the collar) are a matter of personal preferences, although there are some standards here. But I’ll get to that when I start drafting.
How to draft a collar stand
For this draft, I am going to use a clear grid ruler, a piece of paper, and a pen.
To start the draft, I am going to measure and apply my ½ neckline measurement, and mark points A and B (figure 1.1). Then, I square up from point A and apply the height of the stand, which I like. That would usually be 1 and a quarter inches or 3 cms for a standard stand look. Here I mark point C (figure 1.2).
Then, measuring from point A, I apply my CB to shoulder seam measurement and mark point D.
Then, I drew the seam line with a piece of chalk and marked point E.
Square up from point D, and apply the height of the stand once again.
Square up from point B as well. Measure 1 inch or 2.5 cm on that new line and mark it point F (figure 1.2).

Connect points D and F with a straight line(figure 1.3). Align the ruler with line DF, put the right square at point F, and apply the height of the stand once again. Mark point G.
Connect points C, E, and G with straight lines (figure 1.3). Use the curved part of the ruler to smooth the lines of the stand at points D and E (figure 1.4).
Shape the edge of the stand at the center front (figure 1.4). I am going to use a bigger curve here and use my free hand to shape it. You can curve more or less. Draw the shape that you want for the finished stand.
Then I am going to mark the CF (center front), CB (center back) fold, and shoulder notch on the pattern (figure 2.1).
I mark the straight grain parallel to the center back fold. Then, mark the seam allowance all around except the fold line. Connect the marks to outline the pattern (figure 2.1).
Go with a smaller seam allowance here, like ⅜ of an inch or so. A bigger seam allowance means more fabric bulking on the inside and this could be an issue when sewing.

Last, I am going to mark the shoulder notch. To sew the collar stand later, I cut one pattern as drafted and then one following the seam allowance and just at the curved part (figure 2.7). I need the second one to mark the seam line later.
How to draft a collar
To draft the collar, I am going to need its length. I would usually make the collar ⅜ of an inch or one cm shorter than the top side of the stand (figure 2.6).
Mark that point on the stand and then square down to transfer to the AB line (figure 2.6). Mark point H. The length of A to H would be the length of the collar.
Start drafting the collar by applying the A to H measurement and mark it A to B (figure 3.1).
Then, we need to apply the height of the collar plus 1 inch or 2.5 cm (figure 3.2). The standard for the collar is 2 inches or 5 cm. You can make it higher or lower depending on your design preferences.
I want a 2’’ wide collar, so I measure 3’’ straight from point A and mark point C. Then, do the same from point B and mark point D.
Connect points C and D to form a rectangle we need to apply the height of the collar plus 1 inch or 2.5 cms (figure 3.2).
Measure 1’’ up from point A and mark point E (figure 3.2). The other 2’’ are going to be the center back fold of the collar.
To further shape the collar, extend 1’’ from point D (figure 3.3). Connect with point B (figure 4.4).
I am going to use the curved part of my ruler to connect points E and B (figure 4.4). Use a part of the curve that makes a smooth and natural curve.

Mark the CB fold and the grainline, which is parallel to the CB (figure 4.5).
I am adding ⅜ of an inch or 1 cm seam allowance all around except at the centerfold (figure 4.5).
And that is the shape of a basic collar. If you prefer a different design, you can shape the collar further. For example, make a pointier angle at the front, as shown in figure 4.6. Or, if you want a different design, you can curve the ends (figure 4.6).
I am going to use the basic collar pattern to sew the dress.
How to sew a collar
I am going to cut out my patterns. I am cutting the pattern with the seam allowance as drafted for the stand. Plus, I’ve cut one from thicker paper and followed the seam line. I am going to use this pattern later when I sew to get the stand even on both sides.
I have my pattern ready, so I start cutting the pieces. I need two collar pieces and two collar stand pieces.
I used my final scraps to cut the stand (image 5). Put the centerfold mark of the pattern on the folded fabric, minding the grainline. I pin and cut the stand (image 5). Also, transfer the notches.

Then, I repeat with the collar (image 7). I made the collar black because my initial idea was to finish the neckline with a stand-alone collar stand like on the first dress.
But then we envisioned the dress with a collar, which led to other design changes like adding black elastic to the waist and black tulle to the hem.
Here are the pieces that I am going to need (image 8). I need one collar and one collar stand from fusible interfacing. The interfacing will add stiffness and shape to the details.
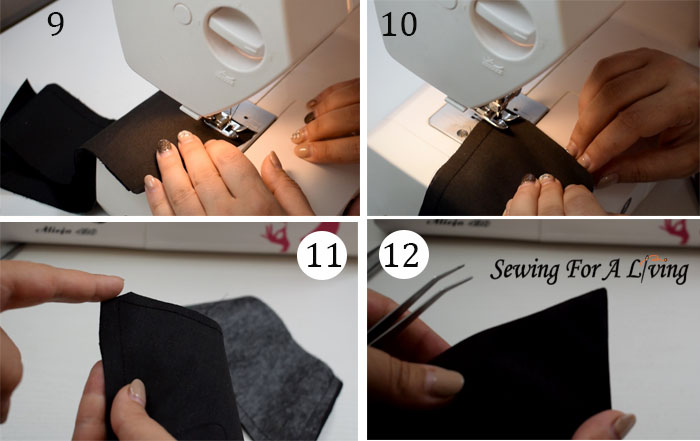
I’ve interfaced one collar and one collar stand, and I am about to start sewing. The first thing I am going to sew is the collar. I sew both collar pieces face sides together at ⅜’’ or 1 cm seam allowance (image 9).
Start at the side and backstitch at the beginning. When you get to the corner, keeping your needle down, lift the foot, and pivot the fabric.
Sew the top side of the collar. Pivot at the other corner, too (image 10). Finish at the end of the side with a backstitch.
To prevent bulks of fabric and to get the corners of the collar sharp and pretty, cut the seam allowance at the corners at a 45-degree angle (image 11). You can also cut the seam allowance all around if you prefer, but not too close to the seam so you don’t break it.
Then turn the collar inside out, and using tweezers or another prop push the corners from the inside until they are nicely shaped (image 12).
At this point, I would also go and iron press to make sure everything is sharp and even on both sides. Because if it‘s not it might really show later on the finished garment.
Then I am going to topstitch at the face side at ⅜ of an inch, pivoting with my needle down at the corners and backstitching at the beginning and the end (image 13).
How to sew the collar stand
The next step would be to sew the collar stand to the collar.
I need to sandwich the collar between two collar stand pieces. But this could be challenging, so I attach one stand piece first (image 14) and then the other.
I ensure that the interfaced details are on the same side because this can really make a difference in the appearance later. This means that the interfaced collar and stand should be facing each other.
I am pinning one stand to the collar and sew it from one notch to the other.
Then I take the interfaced stand, which I pressed at ⅜ of an inch at the bottom (image 15), and pin it to the other side of the collar.

If you are sewing a stand-alone collar stand like on my first dress, just join the stand details at the top like here (without a collar sandwiched in between).
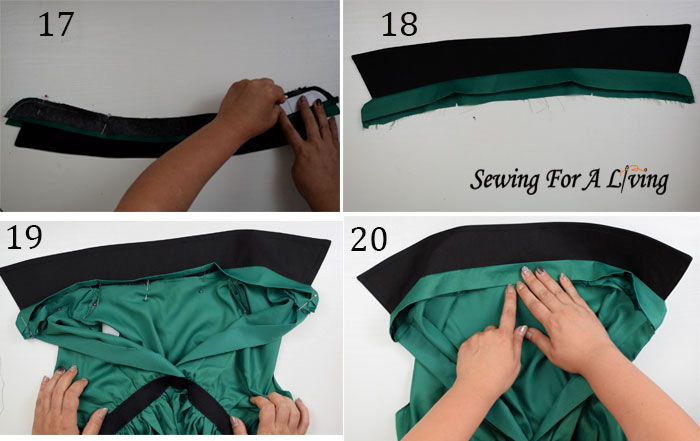
At this point, I am going to use the no seam allowance pattern to draw the seam line even on both sides with a piece of chalk (image 16).
This can be very useful because sometimes you might cut just a bit more or less on one side. And then, the difference will be very easy to notice on the center front where these seams will be (image 17).
I start sewing in the middle and go all the way down while sewing through the folded edge as it is. Then I repeat with the other side.
I have my collar sewn, and I will flip the stand over and iron press it one more time before I attach it to the neckline (image 18).
Sew the collar stand to the bodice
I will pin the collar stand to the neckline starting at the center front on one side (image 19). Take your time to align best here because every millimeter off shows very much on the finished garment.
Pin the non-folded, non-interfaced collar stand to the neckline, and face sides together. This way, the interfaced details will stay on the face side, which is what I aim to get the best appearance and functionality.
Then, I pin the other side, align it nicely to the center front, and then both shoulder seams to the shoulder notches. I put a couple more pins here and there to make sure everything is staying in place (image 19).
Sew the collar stand to the neckline.
The collar is already attached to the dress (image 20). We need to sew the other side of the stand. I’ve seen some seamstresses hand stitch it down. I personally am not a fan of hand stitching and prefer to do most of my sewing on the machine.
Here is how I’ve learned to do it in industrial sewing. I put the seam allowance in and topstitch very close to the edge (image 20).
I pin it and make sure that the backside of the stand is right at the same level as the front side, which I will sew on (image 21). This way, my seam won’t drop down at the back and go over the back bodice detail.
Top stitch over the other side of the collar stand to finish the neckline (image 22).
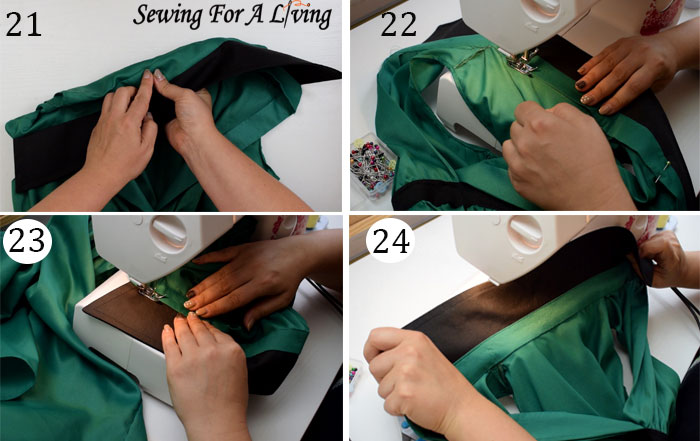
You can stop at the end with a back stitch. Or, you can go all around the stand for extra support like I am going to do (image 23).
I did that on this dress (image 24) but skipped it on the other with the stand-alone stand for a more delicate look.
Like what you read here? Support my site
If you want to help me continue delivering similar content, please consider buying me a coffee to keep it going. It really helps me focus and have more time to prepare these tutorials and develop my lessons.
I can devote more time and do everything involved to make this happen and share with you what I’ve learned about sewing and pattern making.
I would really appreciate it.
Watch the video on collars and collar stands:
More sewing tutorials:
- Sew the perfect rolled hems
- DIY Organza Gift Bags
- How to replace elastic in swimwear
- How to sew an invisible zipper on a dress
- Sewing with elastic thread – make a shirred dress
SIGN UP FOR SEWING FOR A LIVING NEWSLETTER
If you like what you read here, join our mailing list so we can send you our new sewing tutorials, pattern-making lessons, and patterns, as well as some occasional offers that we think, might interest you!
We will protect and use your data in accordance with our Privacy policy.
You may unsubscribe at any time by clicking the link in the emails we send.
Pingback: My Homepage