

This guide is out of date. I’ve written an updated guide on setting up PCem’s successor, 86 box here:
Setting Up 86box and Windows 98
If you have an older computer or just prefer PCem, then carry on with this guide:
————————————————————————
PCem is an impressively versatile emulator, capable of emulating a wide range of IBM compatible PCs. From XT 8088 based machines up to Late Pentium I MMX era machines, making it a viable alternative to DOSbox and virtualization.
The latest version at the time of writing is PCem V12. Heading up the list of improvements are speed optimizations and Vodoo 2 support.
Games from the late 90s era of Windows computing are notoriously difficult to get working on a modern install of Windows. These latest improvements make PCem an attractive option to play around with.
This tutorial will focus on setting up PCem to run Windows games from this era. You should also be able to run older Windows software and even many DOS games well as a bonus. If you need to see any of the images in more detail, right click on them and click view image. The files needed should be easily searchable by the names I give.

Things you will need:
- A fast CPU. At least if you want to run the more demanding 3DFX titles. Something around the 4Ghz mark. Emulation of a single thread CPU is impossible to run on multiple threads. As a result, a slower clocked octo core CPU will be no help to you here. I’m using an i7 3820 running at 4.2Ghz and I’m able to get performance similar to a Pentium 1 200Mhz. This gets me a good frame rate in games like Quake 2, Need for Speed III and even pretty playable frame rates in Quake 3. A host CPU of around half the speed will likely be able to keep up with games made for a Pentium 1 90Mhz.
- PCem. Get it here:
http://pcem-emulator.co.uk/downloads.html - Compatible BIOS files:
https://mega.nz/#!p99klbTb!A5-E97bh290pALB7vayX7t8ibVLgWKfmFf2GoU8oj04 - Windows 95 OSR2.5 CD image:
You can use an actual CD or a .iso disc image.
https://winworldpc.com/product/windows-95/osr-3
From what I understand this version of Win 95 is the one to get. Better compatibility with things apparently. It does cause a slight complication during the setup but it’s not a big deal. - Windows 95 boot floppy disk image:
You’ll need floppy disk image windows95b.img or this boot.img here:
https://mega.nz/#!888XlQ4A!pRdORIFx3W4zw8KAemkOUZVTm3Gu4X0gPzgzn-1mLDY
We’ll need this to setup our virtual hard drive. Make sure it’s a .img file. - Win9x Voodoo 2 drivers:
http://www.falconfly.de/voodoo2.htm
Get the latest reference driver from 2000. Just note that you will need to install DirectX 7 for many games to work properly, even if the games themselves don’t require Dx7.
You’re also going to need to install some additional software:
- A tool to extract compressed archives. I recommend 7zip:
http://www.7-zip.org/download.html - Daemon Tools lite or similar CD image mounting software:
https://www.daemon-tools.cc/products/dtlite
Windows comes built in with it’s own image mounting software but it’s limited in compatibility. - ImgBurn:
http://download.imgburn.com/SetupImgBurn_2.5.8.0.exe
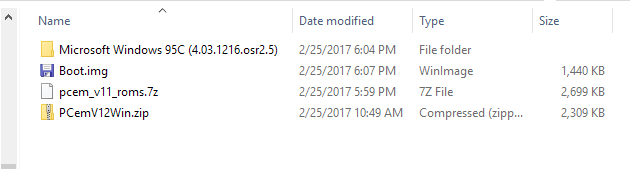
Once you’ve got all that you should have a collection of files that looks something like this:

Initial Emulator Setup
To get things started we’ll need to extract the PCem archive. Plonk it where ever is convenient to you. I’m going to keep everything in the one folder.
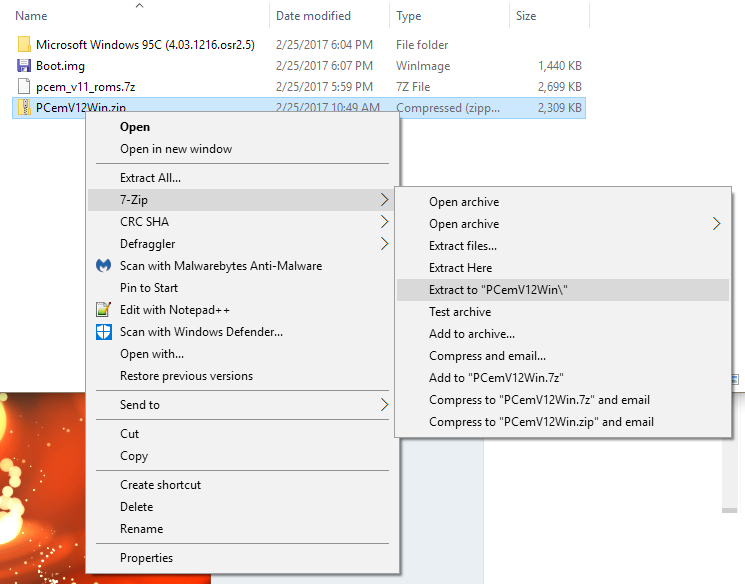
Extract the pcem_v11_roms.7z archive somewhere else convenient too.
Open up your PCem folder and in a new window, open up the folder you extracted the pcem_v11_roms archive to.
In the PCem folder there is a folder called roms. We’ll need to copy the contents of the pcem_v11_roms folder into this folder.
Select all files inside pcem_v11_roms and drag them into your PCem\Roms folder. Overwrite files if it asks.
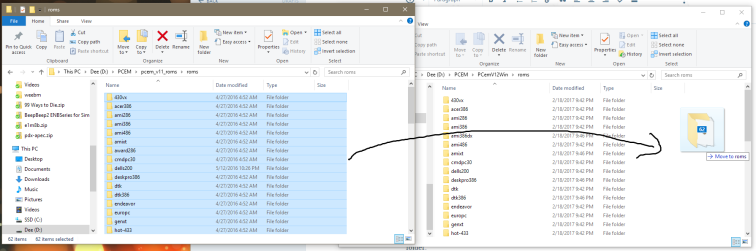
Now all those funny named folders have ROMs inside them. Most importantly you should have a file named 55xwuq0e.bin contained within the 430vx folder. This is the mother board BIOS ROM that we will be using.
Back out to the root of your PCem folder. Fire up PCem.exe
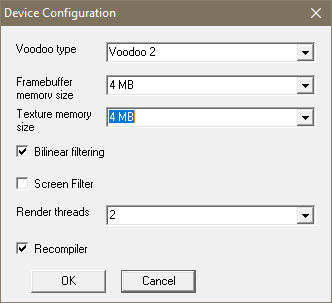
It might start up as some sort of Sinclair computer. Just ignore that. If your mouse cursor has become trapped within the emulator press Ctrl + End to get it back. Open up the settings menu and click configure. Change the options in the window that pops up to look like this:
(Update 27/12/17:
PCem is now on version 15. The configuration menus are a little different now, but all the settings I show are still relevant. The menus just look a bit different so you might need to click around a bit to find the settings I talk about.)
The Award 430VX PCI motherboard is now listed as “[Socket 7] Shuttle HOT-557”
I’m not sure why but this is what you will now have to set as your machine in the current version of PCem instead.
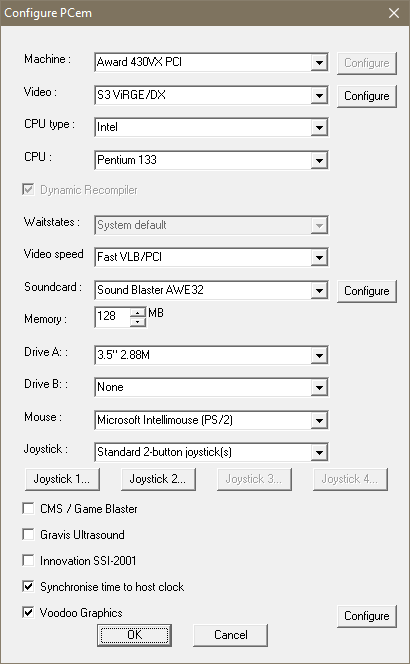
Don’t be concerned about the CPU speed too much, we can bump that up at any time and using a slower Pentium runs better during the initial setup of Windows.
Click the configure button next to Voodoo Graphics and change the settings to these:
It will complain about having to reset, just hit okay in both instances. The emulator will restart and you should be presented with a nostalgic POST screen – at least to some of you:


Setting Up the Virtual Hard Drive
Open up the Disc menu and find Configure hard disks…
Make sure under C: that Hard drive is selected and then click the New button.
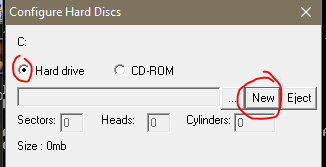
In the window that pops up, click the unhelpfully labelled “…” button.
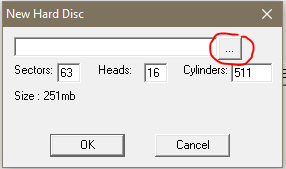
This will let you select a location for your virtual hard drive. The file is going to take up roughly 8GB of disk space. I recommend making a folder labelled “hdd” in your PCem folder and placing it in there. It will ask you to choose a name. Call it something like “Win95”
Next you’re going to want to change the value in the Cylinders field. The maximum is 16383 so lets go with that. Leave Sectors and Heads at their default values of 63 and 16 respectively.
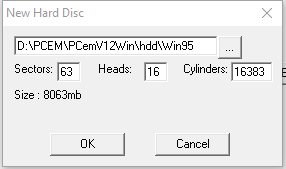
Once you hit OK, PCem is going to lock up. Don’t panic, it’s creating the virtual hard drive file. It’ll take a minute or two before popping up a window reminding you to partition and format your drive. We will get to that soon. Hit OK and PCem will complain about needing to reset again. Hit OK.
You should now be back at the POST display we saw earlier. Click on the display and hit the DEL key to enter the BIOS setup screen. Select STANDARD CMOS SETUP.
Use the down arrow key on your keyboard and select Primary Slave. Primary Master should be set to Auto. To speed up boot times a little we can set the three other drives to None. Press PgDn twice to change this and repeat for Secondary Master and Secondary Slave.
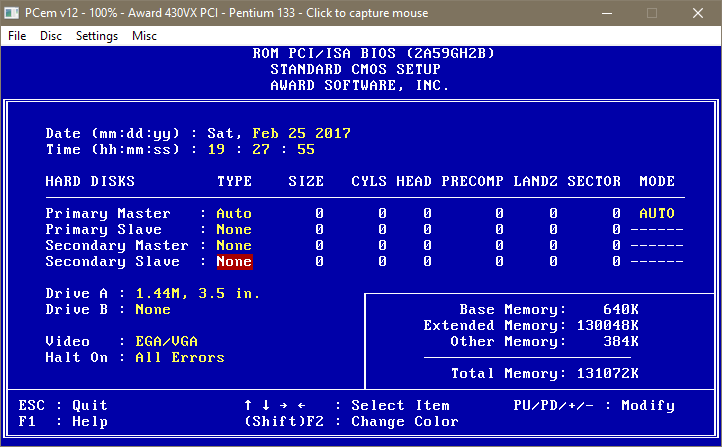
Hit ESC to back out to the main menu and then press F10 then Y and then Enter on your keyboard to save the settings. The emulated system will now reboot, go through the POST screen again and then complain about NOT HAVING ANY BOOT DISK. Time to fix that I suppose.
Press Ctrl + End to release your mouse from the emulator and open up the Disc drop down menu. Select “Change Drive A:” Navigate to the boot.img I had you download, select it and press open.
Now open up the File drop down menu and select Hard Reset.
The emulator will now restart and boot from the floppy disk image we just virtually inserted into it’s virtual floppy disk drive virtually.
You’ll be presented with this screen:
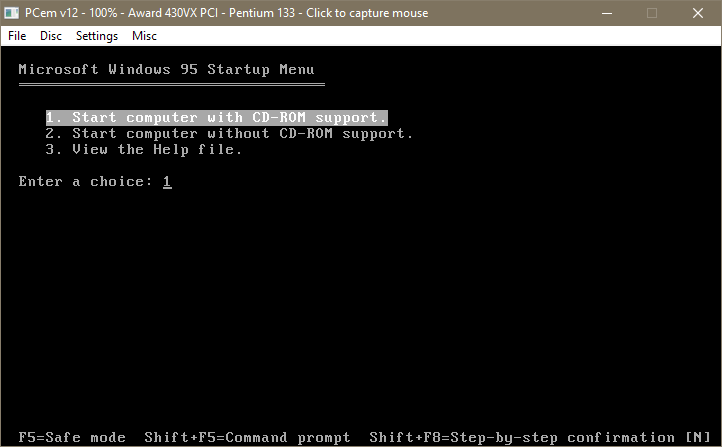
Hit 1 and enter to continue with CD-ROM support. Give it a few moments and you should have something like this on your screen:
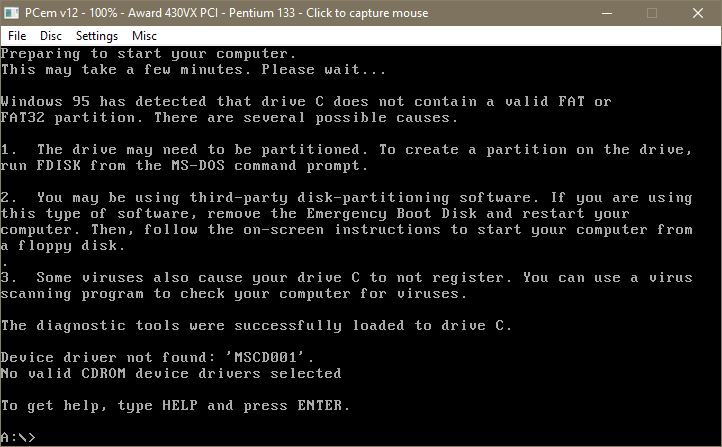
Type in “fdisk” at the prompt and press Y to say yes to large disk support.
Now press 1 and enter to Create DOS partition or Logical DOS drive. Then 1 again at the next screen to Create Primary DOS Partition
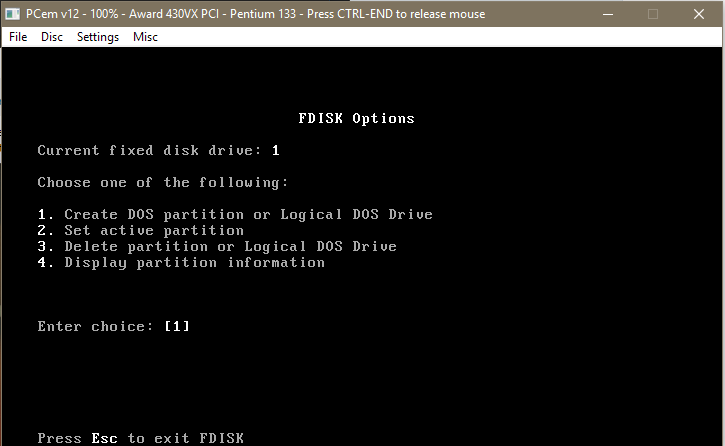
After a brief moment it will ask you if you want to make the maximum space available plus make the partition the active partition. Press Y for yes and then enter.
Fdisk will then inform us that we MUST restart the system. Let’s not upset it. Press Ctrl + End and select the File menu and Hard Reset once again. Say yes to CD-ROM support once again when you’re asked.
Once the system is back to the A:\> prompt type in “format c:” and press enter. It will warn you about erasing all data on c: but since we haven’t put anything on there yet I don’t think we need to worry about that. Press y and then enter.
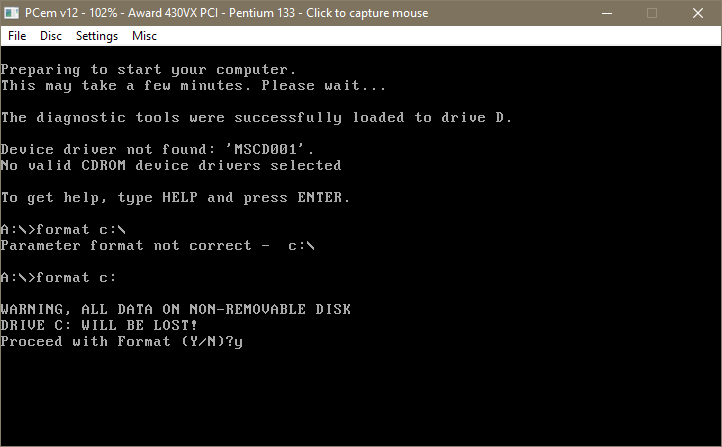
Formatting will take a few minutes. Once it’s finished it will ask you to give it a label. You can hit Enter for no label or call it whatever you like.
That’s the Virtual Hard drive setup and ready to have Windows installed on it.
 Installing Windows
First we are going to need to mount the disc image of the Windows 95 installation CD. There are a couple of ways to go about this.
You can either use Daemon Tools to mount the image, once mounted in Daemon Tools you can then open the settings menu in PCem, navigate to CD-ROM and then select the virtual drive you have the Windows CD mounted to. You may need to close and re-open PCem in order for it to see the newly mounted image.
If you don’t want to use Daemon tools, you can mount it directly within PCem by going to Settings–>CD-ROM–>ISO… Navigate to the Windows 95 OSR 2.5 I had you download at the beginning, select it and click Open.
Whichever method you decide to use you will need to restart PCem. It will again boot from our boot disk floopy image. Again select CD-ROM support.
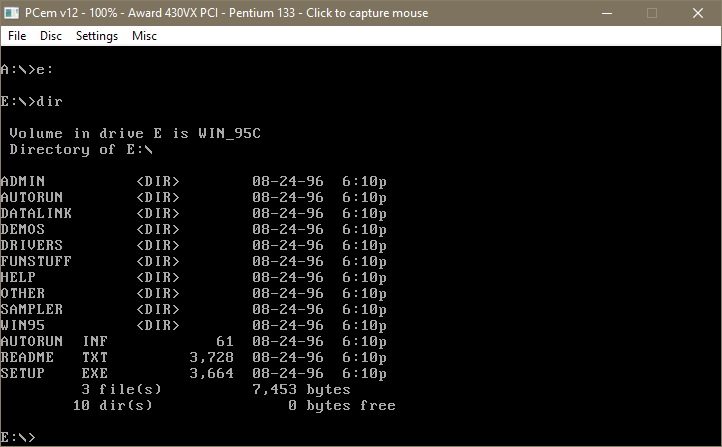
Once you’re at the A:\> prompt, check that the CD is mounted correctly by typing e: and press Enter. You should now be at an E:\> prompt. Type dir and hit enter. You should see these files and folders listed:
There is a bug with the version of Windows that we are installing that won’t let it read from the WIN95 folder on the CD during the install, so we’ll need to copy it over onto the c:\ drive manually.
First let’s make a directory on the c: drive to copy the folder into.
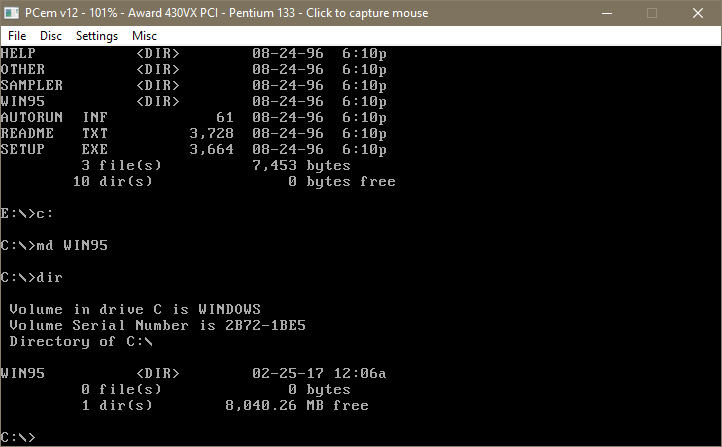
Type c: and press Enter.
Type md WIN95 and press Enter. (md is the make directory command. you can check that it’s made the folder by typing dir and pressing Enter. It should look like this:
Now we can copy the files from the CD onto c:\ . Type:
copy e:\WIN95 c:\WIN95
Press enter and you should see it copying the files. You can navigate into the folder and check that all the files are there by typing:
cd win95
Then:
dir/p
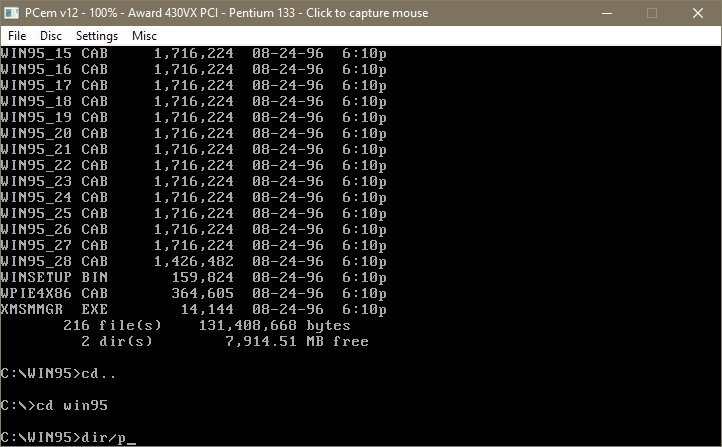
Once you hit enter it will display the list of files contained in the directory. Keep pressing any key until you are returned to the prompt. Once you’ve confirmed the WIN95 folder from the CD is on your c: drive we can go back to the e: and start the Windows setup. Type e: and press Enter.
At the E:\> prompt type setup and press enter. Press enter again and the installer will run through it’s checks to make sure everything is ready to go. Once it’s done, press x on your keyboard to Exit and jump into the Windows setup proper.
 Windows Setup GUI
Alright, you can start using your mouse again. Press Continue to get things started. Press Yes to accept the license agreement and Next two times to get to the type of install you want. Select Typical and hit next. (You can select custom and choose to install additional components like games and mouse pointers but these can also be installed later once Windows setup has completed.)
Once you hit next it will ask you for a COA key. You can search around for one or search around for one.
At the next screen, enter your name and make up a dumb company name if you want and hit next.
It will then ask what type of devices it searches for just check both boxes and hit next.
I forgot to take pictures during this part so here’s a screenshot of a progress bar:
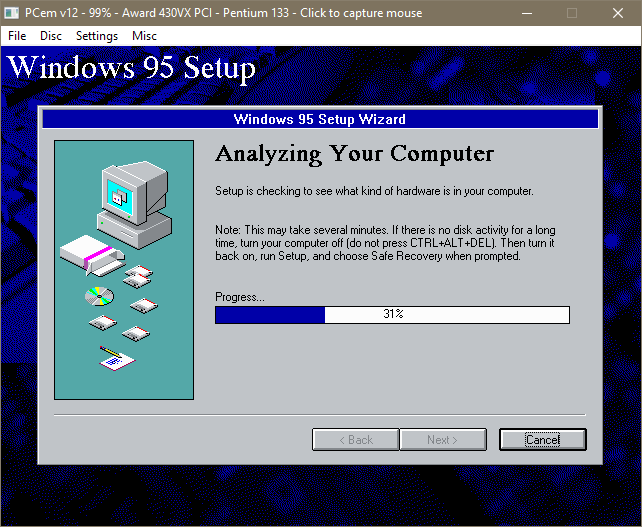
This will take a minute or so. Once that’s done if you selected typical install it will ask you if you want to install the most common components or if you want to choose. Just select common and move on. You’ll then be asked if you want to make a start up disk. Say no and click next and then next again to start it copying files.
It will take a few more minutes to do it’s thing. Once that’s done it will ask you to restart the system. Before doing that make sure to eject the floppy disk image by pressing Ctrl + End and then going to the Disc menu and selecting Eject drive A:
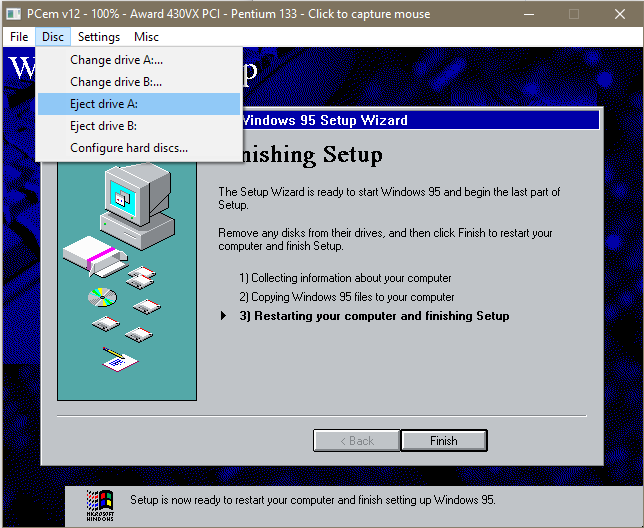
Hit finish and the system will reboot and continue into Windows.
Here’s why we had to faff about, moving files in DOS:
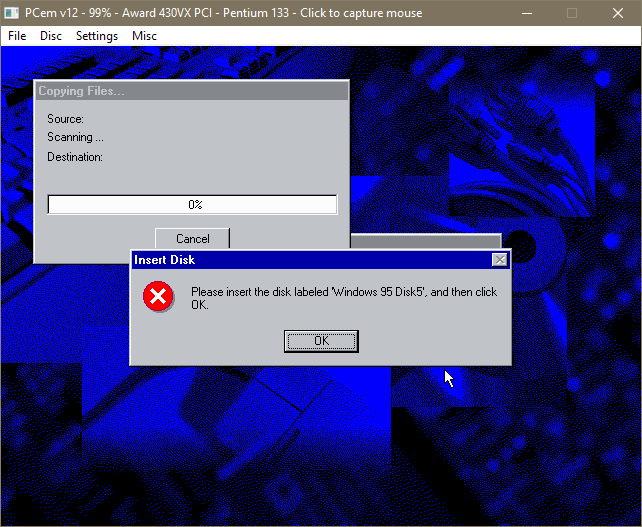
Hit OK. In the next window that pops up click on Browse…
The Win95 folder on c: we created should be right there.
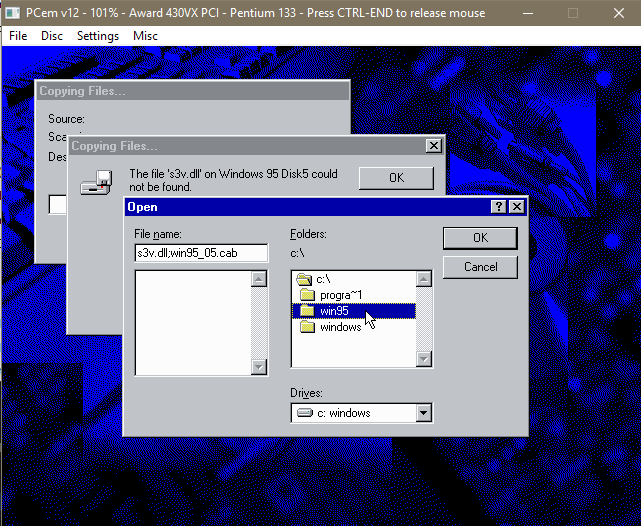
Double click on it.
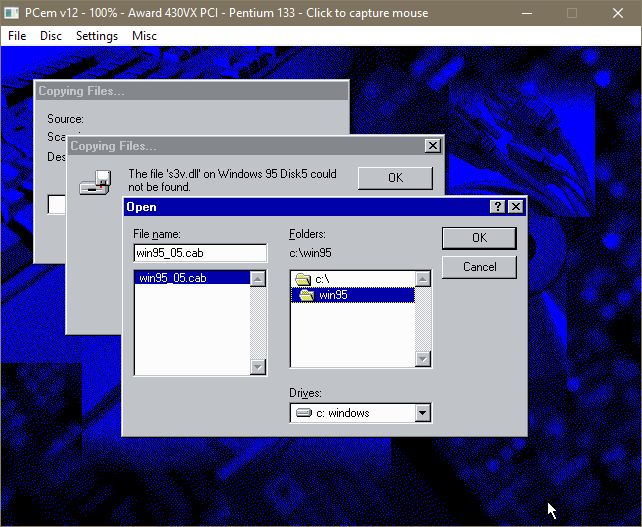
Windows should see the .cab file it’s looking for and display it in the left panel there. Click OK, then OK again.
Windows will now go through it’s unpacking process. Tell it what time zone you are in when it asks. If it asks you to setup a printer or something else you don’t care about just click on cancel. Once all that is done Windows will reboot again.
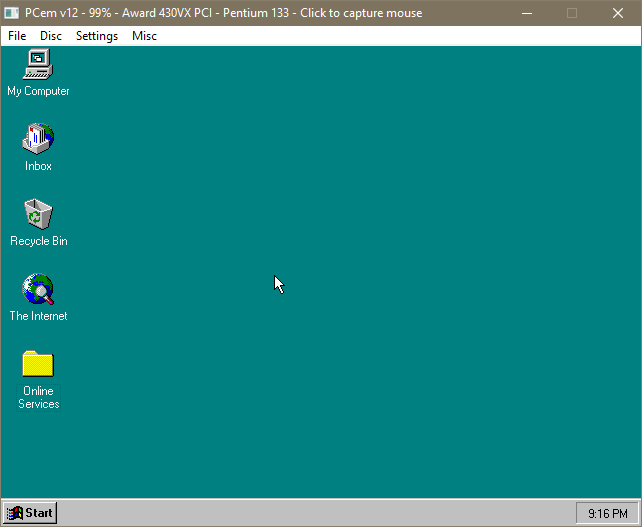
The emulator should now boot into the default Windows 95 256 colour desktop, in all it’s turquoise glory. You should find that the base graphics card has installed itself so feel free to up the resolution and colour depth in screen properties. (If you find that you are stuck on a low resolution and low colour mode it means Windows hasn’t automatically installed the S3 drivers, I talk about fixing that at the end of next section.)
You should have also noticed a startup sound indicating sound drivers are also installed.
If for some reason you don’t get any sound, you can try running the add new hardware wizard in the control panel. If it asks for your Windows 95 CD just point it to the WIN95 folder on the c: drive that we created.
Grab this Soundblaster software suite CD image if you want more advanced features and other related stuff:
http://www.vogonsdrivers.com/getfile.php?fileid=13
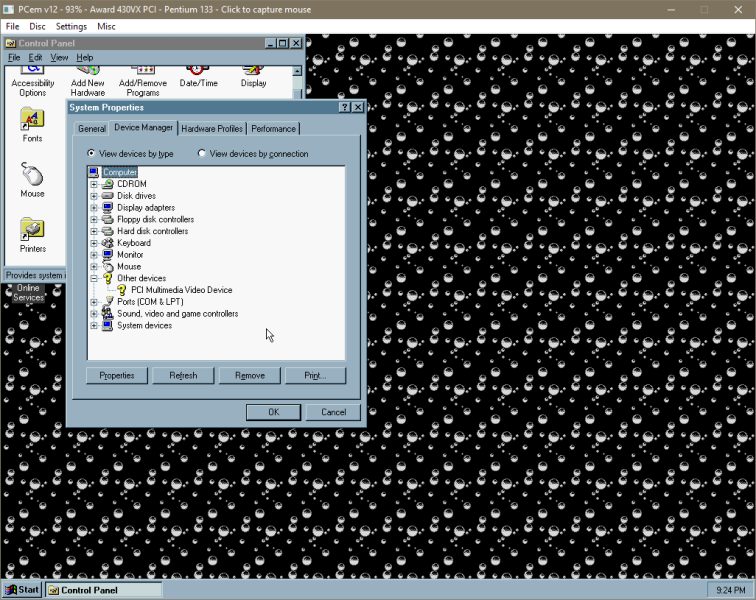
Okay, moving on. Head on over to the device manager, you will find PCI multimedia Video Device without drivers. That’s our emulated Voodoo 2. To install it we’re going to need a way to get files from the host system into the emulator. This is where Imgburn comes in.
 Importing Files Into PCem and Installing 3DFX Drivers
Extract the Voodoo 2 drivers you downloaded and open up imgburn.
Select Create Image File from Files/Folders.
Hit the Show Disc Layout Editor, find your voodoo 2 driver folder and drag it into the lower panel.
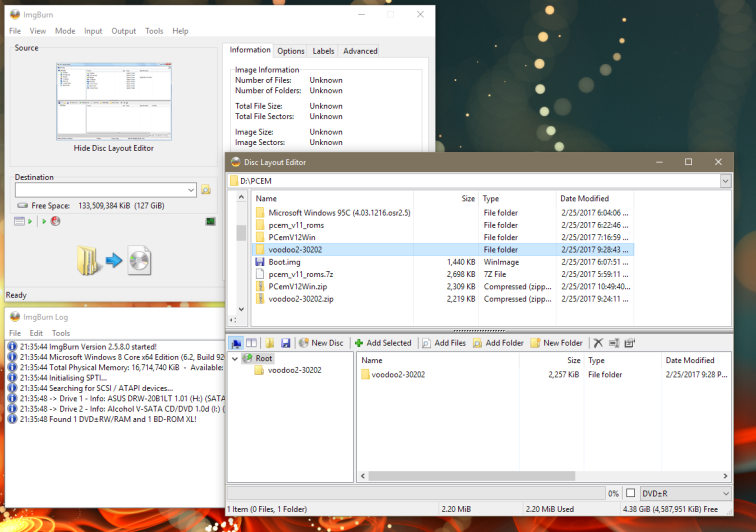
Close that window. And find the sneaky little toggle button I’ve highlighted below that tells Imgburn to write the image to a disc image and not your optical disc drive (if you have one).
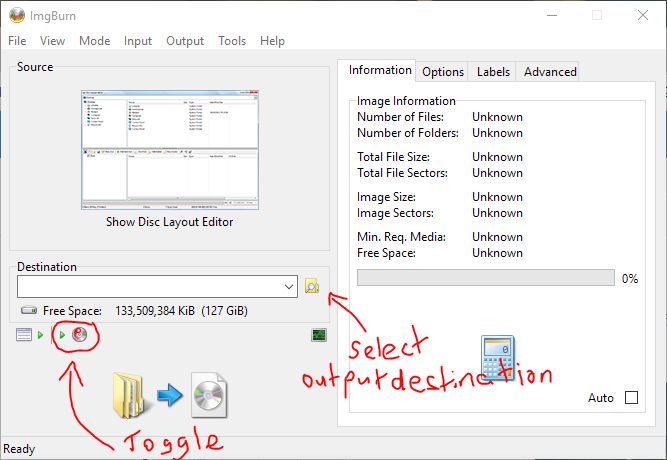
Click the little folder to tell Imgburn where to save the image we’re creating to. Then click the big button in the bottom left to create the image. Hit Yes to select the default image name and we’re done with Imgburn.
Mount the image you just created with Daemon tools or with PCem as described earlier and a CD containing our files will appear within Windows 95.

Run the Voodoo 2 executable and extract the driver files somewhere handy. c:\voodoo2 is good.
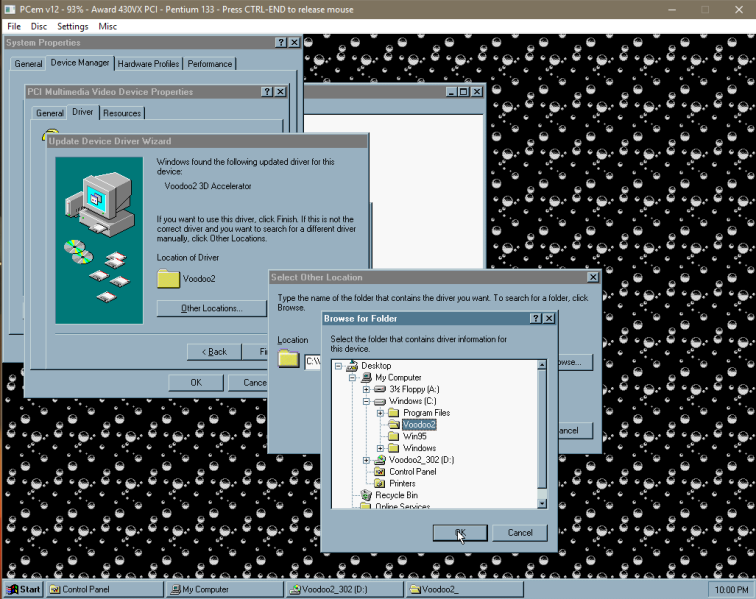
Open up the control panel, navigate to System, open up the device manager tab and find PCI Multimedia Video Device. Double click on it, click on the driver tab and click on Update Driver…
Choose Yes to search for the driver and click next. Give it a moment and it will say it was unable to locate a driver but there will now be a button labelled Other Locations that you can click on. Click Browse, find your voodoo2 folder on c: and click OK and then OK again.
Click Finish and Windows will throw up an error message telling you to insert the disk labelled Voodoo 2.
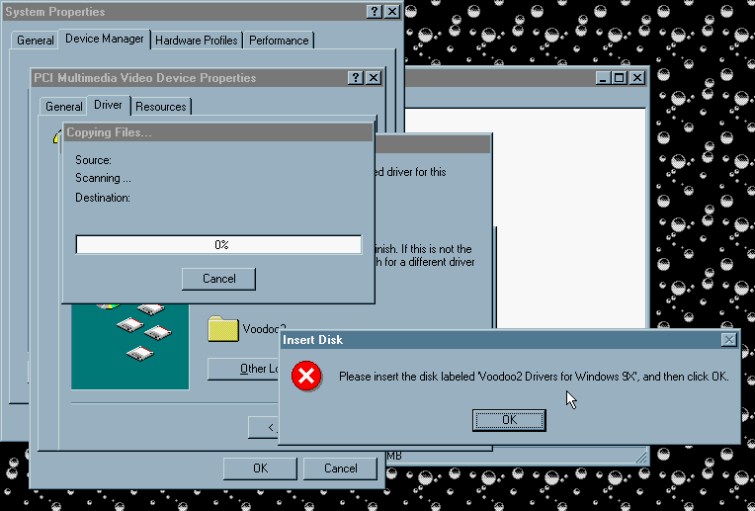 Windows 95! \o/
Hit OK. Again, click browse on the window that pops up and yet again navigate to your voodoo 2 folder on c:\ until a .dll file appears in the left panel.
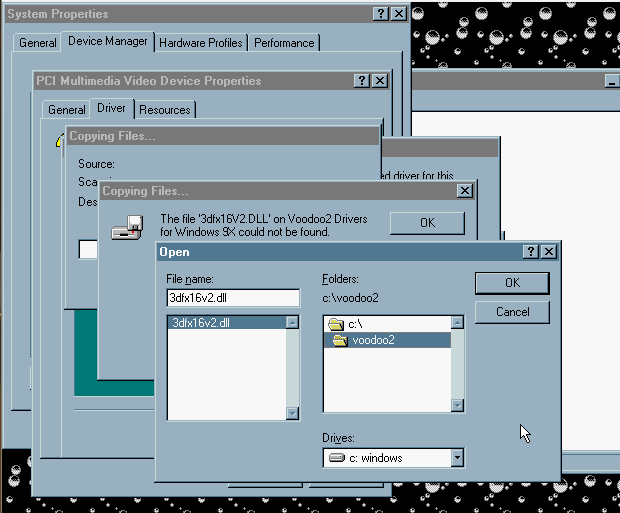
Click OK. Then OK once again. This bullshit is fairly standard procedure when installing drivers in Win9x. Their are many things I remember fondly about Windows 95 but installing new hardware is not one of them.
It will install the driver, prompt you to restart the system. Once rebooted, you should now have the Voodoo 2 drivers installed.
—
If the S3 graphics drivers haven’t installed themselves it should be simple enough to fix.
I’ve uploaded a CD image file which contains the S3 drivers (and vodoo 2 drivers as a bonus) that you will need here:
https://mega.nz/#!d4MhCYCD!kOkZFQaV8Jzpkp9CG2s5RGI1VXRXUEwTvjyh1qlC_Bc
Mount it with Daemon tools just like we did above and right click on the Windows 95 desktop and select properties then click on the settings tab. Click on the Advanced Settings button.
Click on the monitor tab and make sure it says Plug and Play monitor. If it doesn’t, click the change button and change it to that.
Once that is done you can click back onto the adapter tab and click the Change… button there. Click the have disk button and point it towards the S3 folder in the CD drive. With a little luck, after a reboot Windows should now be using the S3 Virge as it’s default display adapter and you will be able to use higher resolutions with more colours.
—
And that’s pretty much it. You’re ready to install some games.
If you think I’ve said something dumb and need to correct something, be sure to let me know in the comments. Please let me know if any of the links are dead too. I hope you have a good time using PCem and that this has been of some use.
 Things to Note
A quirk of PCem to be aware of is that if a program isn’t using much CPU the emulator can slow right down. Sim City 2000 for example will run very slowly when you aren’t moving around the map and in game menus, you might notice sound stuttering. The best fix for this is to lower the CPU down to a slower chip. Like a Pentium 90Mhz. The general rule of thumb is to use the lowest speed CPU that will allow you to run the game smoothly. For 2d games use something like a Pentium 90 and for 3d use a Pentium 200Mhz MMX. You will probably need to experiment with it a bit. You can change the CPU while the emulator is running. It’s best to do it while on the Windows desktop because some games can freeze up if you swap around CPUs while they are running.
If your CPU has hyper-threading (or an AMD equivalent) it’s worth turning it off in your bios if you need some extra performance. Overclocking your CPU will also make a big difference. Raw clock speed is what counts most with emulation like this.
Full screen can be found in the settings menu under video. Direct 3d tends to look best and be sure to set Full screen stretch mode to 4:3 if you don’t want it to look ugly and stretched. Press Alt + Ctrl + PgDn to exit full screen.
 Testing Out Some Games
I’ll throw up a few screenshots of games here and describe the sort of performance I get with each.
The Need for Speed: Special Edition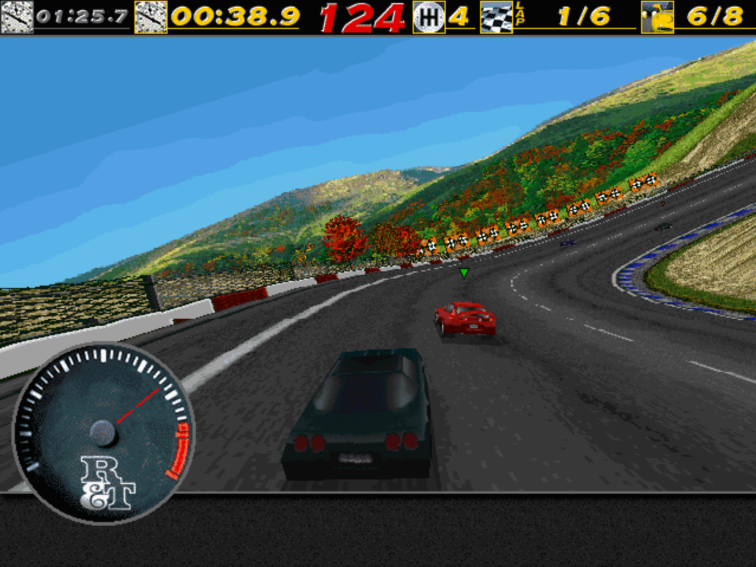
With the CPU set to 166Mhz audio is quite choppy in the game menus. In game it runs perfectly with high settings and no audio issues.
Need for Speed III: Hot Pursuit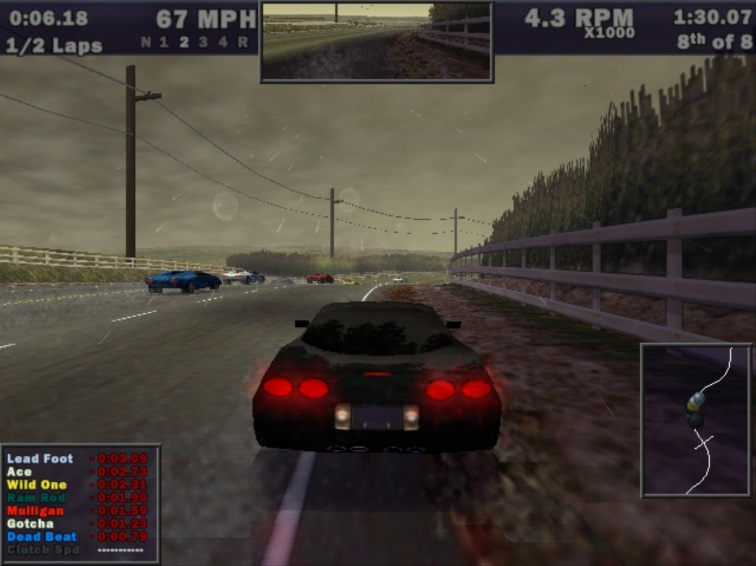
You may need to install the DirectX 5 redistributable that comes on the game’s CD before this game will work properly. Be sure to set the video device to Voodoo 2 using the games video setup program. Running with a 200Mhz CPU the game runs smoothly. The menus are a little bit choppy but in game performance is good with all the graphical bells and whistles turned up.
Quake II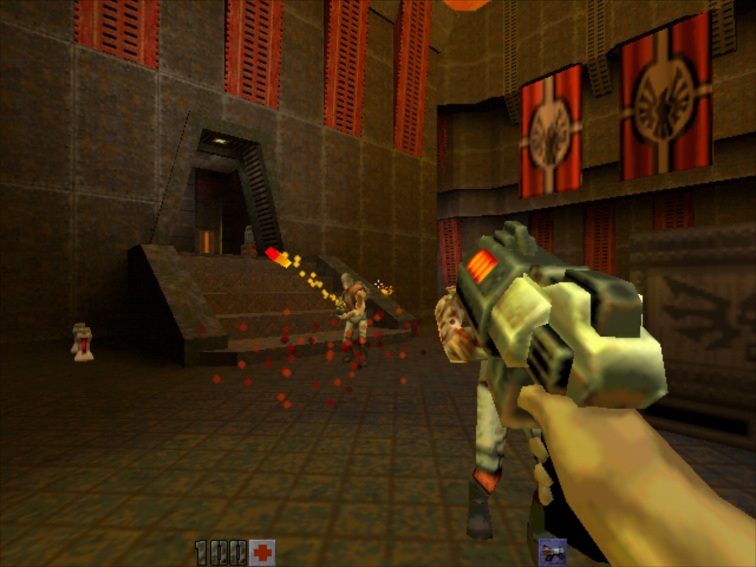
I was running this from a physical CD and was experiencing poor performance and choppy sound. Ripping the disc with ImgBurn to my hard drive and mounting the image solved it. I believe this was due to CD audio played during the game. The game runs great in Glide mode. Very smooth.
Interstate 76
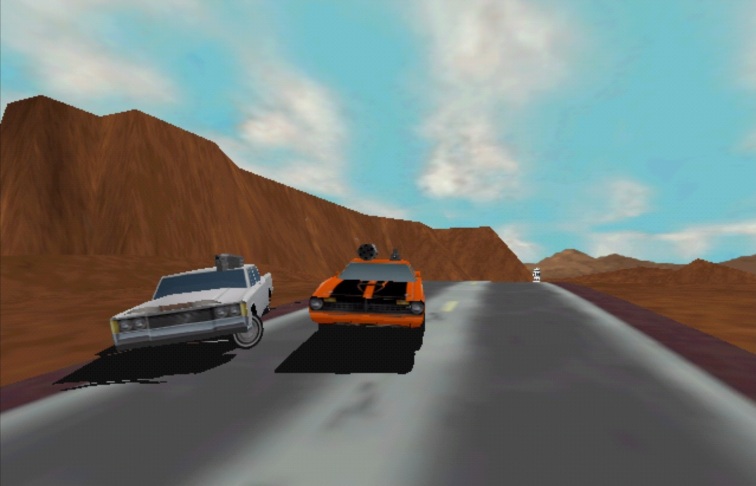
Here we have -at least for me- the best reason to setup PCem. Interstate 76 will not run correctly on a modern computer. Today’s CPUs completely break the physics and AI rendering the game unplayable. Even the gog.com version suffers from this problem. You can make the game playable by limiting the game to below 30FPS to fix the physics issues but flamethrowers will still be broken.
A shame as you aren’t going to find a better game in the car combat sub-genre. I love this game.
At first performance in PCem was disappointing. Running the game at anything higher than 320×240 resolution resulted in a very choppy frame rate. However installing the official “gold patch” allows the game to run in Direct3d or Glide mode instead of the original release’s software renderer. Running in either of these new modes results in a very smooth frame rate and the game becomes perfectly playable. The 3dFX glide mode looks the best. Great stuff.
If you start seeing texture corruption, quickly hit escape to enter the menu and then jump back in and you should be good for the rest of the mission. If you experience a crash soon afterwards, create a .bat file with these two lines:
SET SST_TMUMEM_SIZE=2
i76.exe -glide
And use the newly created .bat file to run the game. You can also limit 3DFX games to 2MB of memory in the 3DFX control panel (the one that is found by right clicking on the desktop and selecting properties.)
As a result of cobbling together a vehicle combat game using the Mech Warrior 2 engine, I76 was never a particularly bug free game. Be sure to check out the games Pcgamingwiki page for more info:
https://pcgamingwiki.com/wiki/Interstate_%2776
i76 gold patch download:
https://mega.nz/#!BwsXxKZb!ySGRNZnCR8AcIkhMO0iaH8tFIilsb2loWgdDrEXxpOc
Sub Culture
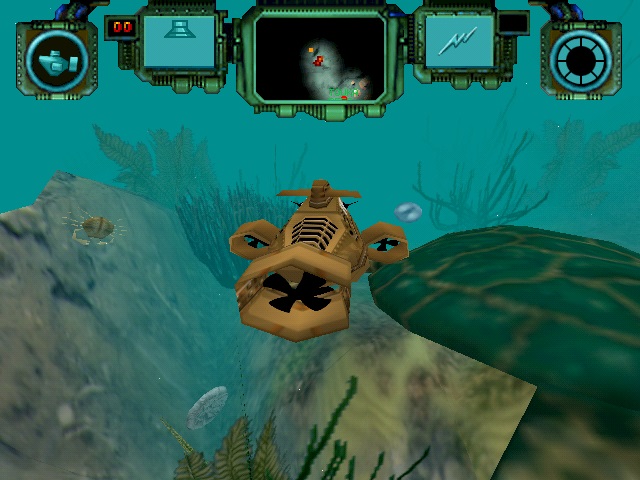
With the CPU set to a Pentium 166Mhz and running the 3DFX version, in game frame rates are 30+. Runs great, very playable. FMVs play perfectly. Menus have choppy music. Running a slower clocked Pentium fixes this but will result in poorer frame rates in game. The Direct3D version of the game seems to run pretty much the same.
I haven’t played much of this game but it seems to have a bit of a cult following. It’s like Elite but miniature and in the ocean. There isn’t much support for this game and as it uses a 16-bit installer program, installing it on a 64-bit install of Windows isn’t much of an option. Another good use for PCem.

Yo, when I search for a new driver for the PCI Device (video card) and select the folder, Windows 95 tells me that there is no updated driver in that folder. What’s going on here?
LikeLiked by 1 person
I had the same issue. You likely forgot to change “voodoo” to “voodoo2” when doing the initial device configuration in PCem. That’s what happened to me. When you’re editing the actual Voodoo settings at the very beginning, make sure that dropdown says “voodoo2”
LikeLike
There’s how to resolve a non-installing Voodoo2 problem : even with the drivers (on the .iso, thanks again!), my Win95 didn’t installed anything. I went to the right folder, clicked ok when updating the driver but nothing happened (? Win95 \o/).
Finally, I restarted without voodoo option (the PCem option), and first installed a New Device (‘‘Sound, video…’’). Win95 created a registry base or something like that.
Then I restarted with the PCem voodoo option (voodoo2), and followed the guide for the Unknown device’s driver update. It worked, Win95 could find the right files and installed 3dfx.
LikeLike
Dude, I never thought I would be able to do this, but I am playing Go West! for the first time in years and it’s all thanks to this tutorial!!!
LikeLike
When I click on the Disc menu, I don’t see any “Configure hard disks” option. I clicked on some other menus and eventually found “Configure machine,” but that doesn’t help me. (I’m using V17.)
LikeLike
You won’t see that option because the version of PCem he was running at the time is obviously out of date now. The new PCem GUI is much different and many of the settings in this article have been moved to a different place inside the GUI. When you click on the hard disk tab, you’ll see where it says “Type: Hard drive” – There are two buttons next to that. One is a hard disk with a little green + symbol next to it, and the other is a folder. The “configure hard disks” option from the old version is that first button. Hope this helps!
LikeLike
It doesn’t work on the latest version of Windows 10
LikeLike
I’m on build 19043.1237 and it’s working fine for me.
LikeLike
I just did it in Windows 11. Everything worked flawlessly. The GUI in PCem is massively different, but you can still match the settings up pretty easily.
LikeLike
I’ve followed everything so far with no issue up until this point: I mount the Win95 in Daemon and select it in the emulator, however, it gives me this error when I type in e: …”invalid drive specification” I tried mounting it to another drive and got the same error. It is mounted and shows up in my regular windows outside the emulator so I know it’s mounted correctly. Any ideas or advice?
LikeLike
Don’t use Daemon Tools. PCem has the “CD-ROM” functionality built in. Just click on “CD-ROM” at the top and then “Load image,” then browse to your ISO for Windows 95. You won’t get any kind of message, but when you type “e:” and hit enter, then DIR, you’ll see that the directory has changed to that of your mounted CD.
I just did this whole process in Windows 11 and didn’t use Daemon Tools once. That’s how I’d recommend doing it. Good luck!
LikeLike
For anyone wondering, yes this works in Windows 11. Make sure you use the exact tools he links you to, with the exception of Daemon Tools. You do not need that. The newest version of PCem does everything that Daemon did in this tutorial. I found that using PCem itself to mount the ISO installation CDs (for Win95 itself and the voodoo drivers) was far easier than using Daemon Tools. If Daemon Tools gives you any errors, just use PCem’s onboard CD-ROM mounting functionality. You will, however, still need ImgBurn to get files from the host to the emulator.
Also, at the time of this comment, the version of PCem that’s available now is massively different from the one used in this tutorial. You just have to be patient and click around a bit. The GUI for PCem is much prettier and has relegated some settings to other places. Just don’t freak out. Click around inside the new GUI to match the settings to the screenshot given.
One other thing I’ll say is that when you’re setting up the initial voodoo settings at the very beginning, make sure that first dropdown says “voodoo 2” instead of just “voodoo.” If you don’t change that, the emulator will not find the right PCI Multimedia device and the drivers that are used in this tutorial will not work.
I hope this comment helps someone!
LikeLike
Also, to add to this, changing hardware on your Win95 VM is fairly simple. Just make sure you shut windows down gracefully, then shut down the emulator so it isn’t using the IMG file. Then, just change whatever configuration settings you want to change to the VM itself, start windows, then go to the Win95 device manager and scan for hardware changes. Be aware that Win95 obviously doesn’t find drivers like Windows 10 and 11, so you have to have the actual DLL files for whatever you’re adding.
LikeLike
Thanks for your helpful comments.
I should really go through this and update it, but I haven’t been mucking about with Win9x stuff lately so haven’t had the motivation.
Glad it was still useful even though it’s out of date in parts.
LikeLike
i get a message thats says there was an error with the vga video adapter after trying to install win95
LikeLike
Hi i need some help regarding the audio. I have tried doing what is suggested but I’m not getting anything. When i get to the add new hardware wizard screen i have tried adding a lot of them but none of them have worked so far. Im quite new to all this so im not sure what im doing wrong and would really like some help from anyone please
LikeLike
Hello, I’ve followed every step from the tutorial and it worked flawlessly on my PC. Unfortunately, my computer is running out of space and getting pretty slow. So I want to know how to fully uninstall PCem, if I can rely on its own uninstaller to remove its core files, drivers and the C: hard drive disk with Windows95, if I have to manually remove or is it recommended to use a program like Revo Uninstaller.
Thanks
LikeLike
PCem itself is a portable program so can be uninstalled by simply deleting the folder.
Daemon tools and imgburn (if you installed these) can be uninstalled via Windows built in program manager, which can be accessed via control panel or by typing appwiz.cpl into your start menu or the run dialogue (accessed by pressing windows key + R)
LikeLike
Hi, so first of all: thank you immensely for this very helpful tutorial. I am trying to run the game Drowned God and keep getting a “1-bit colour mode” error. Could you kindly specify a fix for this? PCem also keeps giving me a display adapter error each time. Thanks again. Words cannot express my gratitude for this!
LikeLike
Hello,
I was trying to configure this as per the tutorial, but i have found an issue in the beginning, and don’t know if it has something to do with the version of PCem or something, but for “Machine” can’t select the “Award 430VX PCI”, the option is not present, therefor, can’t continue with the steps from the tutorial. Do you have like an updated version for this for all the new versions of these apps/files/things ? I really want to make this and play the old stuff.
Thanks in advance.
pic for not having that option in “Machine” – https://ibb.co/cbYNm2B
pic for not having the opcion “Hard Discs” – https://ibb.co/9Vz7vpg
LikeLike
The names have changed in later versions for some reason. The one you’ve selected (Shuttle HOT-577) is the one you want.
LikeLike
i cant seem to get my mouse to work inside the emulator? When i click in the emulator my mouse disappears and if i move it around a lot i can briefly see the mouse move across the emulator screen then disappears again…
LikeLike
This article helped me finally play Dr Sulfur’s Night Lab successfully after hours of trying out different things on VMWare/Virtualbox!! Thank you so much for making a game-centered guide!
LikeLike
Thanks for this clean tuto ! If it can help somebody, there’s how to resolve a non-installing Voodoo2 problem : even with the drivers (on the .iso, thanks again!), my Win95 didn’t installed anything. I went to the right folder, clicked ok when updating the driver but nothing happened (? Win95 \o/).
Finally, I restarted without voodoo option (the PCem option), and first installed a New Device (‘‘Sound, video…’’). Win95 created a registry base or something like that.
Then I restarted with the PCem voodoo option (voodoo2), and followed the guide for the Unknown device’s driver update. It worked, Win95 could find the right files and installed 3dfx.
LikeLike
PC stands for personal computer.
LikeLike
This gen thinks it means something else entirely.
LikeLike
Your link to S3 Drivers from Mega only has Voodoo 2.
LikeLike
The download is a disc image that you need to mount either with daemon tools or directly with PCem, it contains both drivers.
LikeLike
I am using 86box instead of PCem but your instructions were still extremely helpful for setting up my machine and later adding new drives. Thank you.
LikeLike
Did you ever know that you’re my heeeeeerooooooooooooo
LikeLike
ImgBrn link was no good. Found this one:
https://www.techspot.com/downloads/3285-imgburn.html
LikeLike
Awesome walkthrough – saved me hours of trial and error!
LikeLike
There’s a weird new glitch if you change the virtual machine bios or transfer it to another PC and use an existing image it will still run but the CDROM (virtual) will NOT be recognized anymore meaning you cannot put any ISO’s in. It only shows the A and C drive.
LikeLike
To make a real long story short both me and my parents have gone thru Microsoft Hell with the last few updates and Linux isn’t much better now. PCEM is practically broken these days and so is a lot of other stuff such as my steering wheel where I have to push a button now to make it recognize which I didn’t use to have to. It used to be just plug n play and the only setting to change was the amount of ‘force’ between two numbers for different types of driving games that require different steering which had nothing to do with Microsoft.
I also have other various emulators ‘fight’ with MS until driver updates happen which will eventually fix itself.
LikeLike
Oh I remember now. The only thing I had to change was between 270 degrees vs 800 and that was it! Like my truck game worked best at 800 and arcade style racing games worked best at 270 mode for different force of steering. Now I have to push a ‘console mode’ button in so it won’t be seen as an Xbox controller. My wheel is a PXNV900 and is seen as ‘wired wheel’ when correct.
LikeLike
Back when PCEM worked better I actually got my Nintendo Switch Controller to work on PCEM via Microsoft SideWinder option.
LikeLike
After narrowing it down the problem is both PCEM and the USB Drive. Somehow when I make a new VHD it freezes on the USB Drive but not on my main PC. However when I format the disk and do the required restart it will say ‘Missing Operating System’ instead of getting to the point I can format the C Drive and copy the required files from CD which I have done before several times.
You know THAT part.
LikeLike
also having this problem, no idea what to do
LikeLike
Microsoft’s game pass thingy is finally failing for several ‘quraters’ in a row now and I think their failures since Windows 8 is biting them in the ass now. I strongly pray for some good ol American Justice via a M1911 and a firing squad. They are absolute DIRT BAGS.
PS: Did you know Bill Gates actually stole the original Windows code it wasall in court back in the early 90s but the owner lost due to lack of finance.
LikeLike
Turns out I had to redownload PCMV17 and start all over.
It seems to be working now as the old new version somehow got bugged because I can’t delete any of the VM’s I don’t want anymore so I have to delete them manually when I find them one by one when I get the time to do so.
I made a new folder for PCEMV17 calling it Version 2 and it seems to work again. Weird the other version of the same one got so bugged.
Same with Launchbox would not open up till I redownloaded it again and had to copy the old stuff onto it the hard way. Microsoft bought out Github back in 2019ish so Linux isn’t really any better now however an interesting thing is Windows 11 has merged pieces of Linux into their OS and you can even run ANY Linux distrub natively in Windows 11 because of the deal.
We are trying something called Q04 (I think that’s what it’s called) and it created it’s own duel boot between Windows 11 and that.
LikeLike
Same problem again when I change a PCEM bios it will not work anymore ever again making the VM created bricked. Capitalism suuuuuuuuuuuuuuuuuuuuuuuuuuuucks!
LikeLike
Last post: What I’m trying to say is I can DO PCEM so as long as I don’t change any bios configurations such as going from a Socket 7 to another Socket or a Socket 8 to Socket 7 if it turns out Socket 8 is too slow. Instead you have to do a whole new VM.
LikeLike
Anybody here in 2023 and have a question about getting this working? I did it on my Twitch, where I stream, and there’s a lot of differences in the interface, but just search iiviigames on Twitch, and come chat. I’m happy to help!
LikeLike
86 box while trickier to setup if you use their manager and point to the 86box folder (and make a ROMS folder placing roms there) you can have a fairly reliable setup with more bios options. Sim City 2000 seems to stutter a lot though while other (more demanding games ironically) don’t stutter.
LikeLike
While I can run NFS3 at 100 percent on either 86box or PCEM the controls (ugh!) the input lag are NOT at all what the actual game is like and you literally CANNOT see what’s up ahead due to all the pixelation that isn’t present in the actual game on real hardware.
I have an XP Optiplex and the OG game runs much smoother and the graphics are NOT blurry which is how I remember the game on Windows 98.
I consider this game state as (barely) playable due to so many issues so unless you do this for a joke or just to show off a quick race to brag JUST DON’T.
LikeLike
On PCEM NFS3 just crashes when installing it where as on 86Box it can be played but very blurry.
PCEM FOrums itself are dead sadly: and if you post anything that goes beyond a simple fix-it issue on the emulator itself your either ignored or just yelled at about copyrights if you provide any actual details to your problems what your trying to accomplish.
The entire web has become a dumping grounds for the left/right to tackle each other sadly. We need a new web that IS NOT tied to smartphones in any way whatsoever and can’t even be read by them.
LikeLike
Believe it or not until a few years ago there were still a couple websites sites that could ONLY be reached on a Commodore (CBM) modem and not be compatible with anything else.
LikeLike
Is there any way to setup internet for PCemV12?
LikeLike