A warm welcome to my next blog in the Identity Governance series in which we will cover Identity Lifecycle Management for employees with an amazing new feature in Microsoft Entra. In the past I’ve written three blogs about how to manage Identity Lifecycle Management for your guest accounts, so now let’s talk about how to manage the entire lifecycle for your employee accounts.
But first, what’s Identity Lifecycle Management in short? When we talk about Identity Lifecycle Management, we talk about the entire lifecycle of an account, so the moment when the account was created until it’s decommissioned and deleted. In the ideal scenario you want to have your HR system connected to the Microsoft Entra ID (or Active Directory for hybrid accounts) to become the source of truth. With that HR information is automatically synchronized to the employee accounts in Microsoft Entra ID or Active Directory. By doing this the jobTitle, Department or any other value of your preference can match the value in the HR source.
Microsoft Entra ID had options available to do this already, but these were limited to either the use of Workday or SAP SuccessFactors as source (which was one of my main problems to start a blog about this topic as I couldn’t get hold of a trial version). Another option which Microsoft offered later was using the Aquera HR Onboarding bridge, the Aquera HR Onboarding bridge however requires an additional license from Aquera and also had the lack of missing HR sources (only 27).
Luckily these limitations now all belong to the past, this as Microsoft released the Microsoft Entra Inbound Provisioning API since the 14th of July this year, with this feature we’re able to connect any HR source to Microsoft Entra ID or Active Directory by using this API.
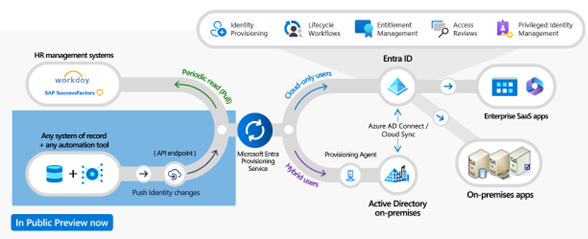
Before we dive into the configuration, let’s explain shortly what the new Microsoft Entra Inbound Provisioning API feature is. In simple words it’s additional API endpoint which you can create yourself in your tenant and is able to receive SCIM payloads. Once these SCIM payloads are received in the API they enter the Microsoft Entra Provisioning Service and will continue the familiar journey whereby attribute mappings can be created and the account either gets created or updated in Microsoft Entra ID or Active Directory. But wait, what about those SCIM payloads I’m talking about? Yes, correct this is where you need to apply your own magic & logic, that’s also why it’s supporting any source which I think is just awesome! This also means the Inbound Provisioning API is as smart and powerful as you make it, you can start simple and literally go nuts!
Now let’s dive into the configuration and how to make use of the Microsoft Entra Inbound Provisioning API in four steps!
Step 1: Configure the Inbound Provisioning API application in Microsoft Entra ID
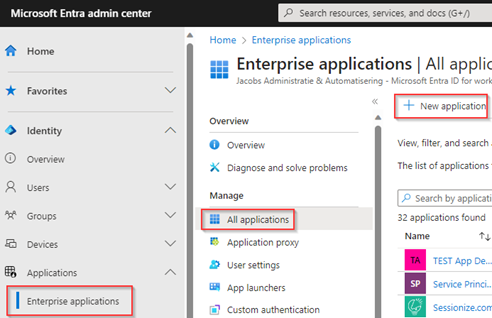
The first step is to configure the Inbound Provisioning API application in Microsoft Entra ID. For That go to the Entra Admin portal, hit ‘Applications’, go to ‘Enterprise Applications’ and hit ‘New application’.
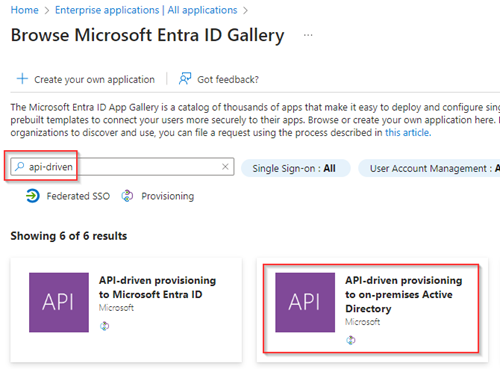
In the search box search for ‘API-driven’ and either choose if you want to provision identities in Active Directory (Hybrid identities) or directly in Microsoft Entra ID (Cloud-only accounts). In my example I’ve chosen to provision accounts to Active Directory, so I’ve selected ‘API-driven provisioning to on-premises Active Directory’.
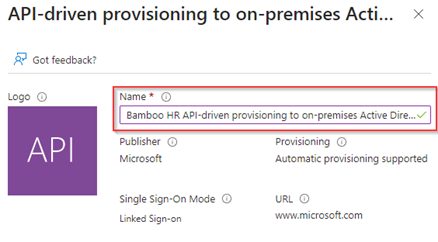
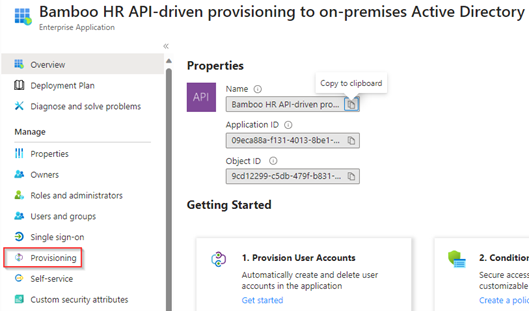
In the next screen I’ve given this new application a friendly name. In my case ‘Bamboo HR API-driven provisioning to on-premises Active Directory’, this as Bamboo HR is in my example the HR source. Once ready hit ‘Create’.
Once the application is created, please go to the ‘Provisioning’ tab of the application we just created in Entra ID. For the Inbound Provisioning API this is the place where we are going to configure our magic and contains all functionality for this feature.
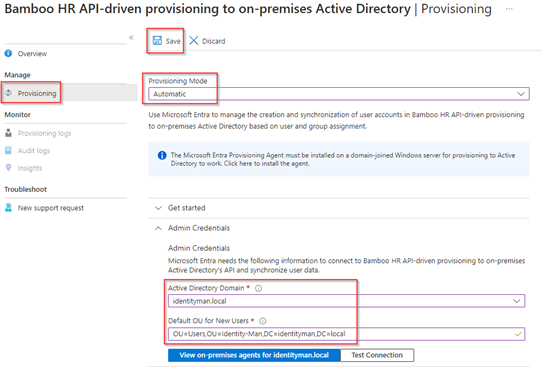
Within the ‘Provisioning’ tab go to ‘Provisioning’ and beneath ‘Admin Credentails’ select the ‘Active Directory domain’ from the drop down and configure the ‘Default OU for new users’. These settings are required as we have chosen for on-premises Active Directory provisioning.
Important to know is that for on-premises provisioning you need to have the Microsoft Entra Connect Cloud Sync agent deployed within your environment, more information about this feature can be found here. Once you’re ready hit, ‘Test Connection’ and once successful hit ‘Save’.
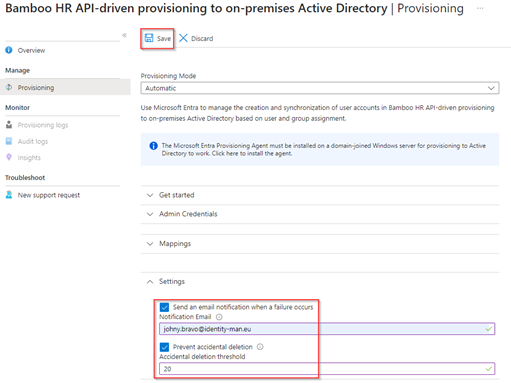
Once saved, configure the the generic ‘Settings’. Within these settings we configure the ‘notifcation email’so the notifications are send out when a failure occurs. Besides notification settings we configure the ‘prevent accidential deletion’ settings as well to prevent accidential deletions from going above the configured number. In my case I’ve set this to 20 but you should decide on a number which fits your organization size and needs. Again once ready hit ‘Save’.
Now the configuration is ready, go to the ‘Overview’ page within the ‘provisioning’ tab, fold out the ‘Technical information’ and copy the ‘Provisioning API Endpoint’ URL as we need this in step 2.
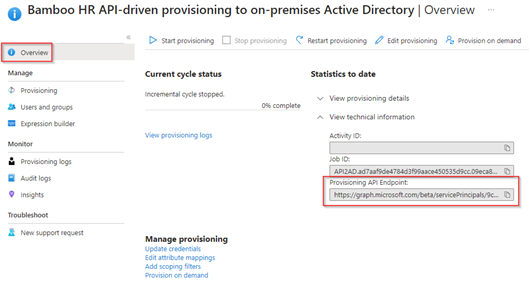
We have now created the Inbound Provisioning API Application within Entra ID, as you can see the provisioning is not actively running, this as by default, when creating a new application, the provisioning is stopped. Now let’s make use of this Provisioning API Endpoint by connecting the HR source to the Provisioning API Endpoint, for that let’s continue to the next step!
Step 2: Connect your HR Source to the Inbound Provisioning API
Now the Inbound Provisioning API Application is created in Entra ID, let’s connect our HR source to the provisioning API endpoint. For that I’m going to use the Bamboo HR product, this as Bamboo has a trial which I could request to build this solution in my lab environment. Eventually, with some API and attribute mapping tweaks, you can use any kind of HR product with this example as long as the HR has an API (and if your HR product doesn’t have an API I would suggest to either use CSVs or move to a product which has an API 😉).
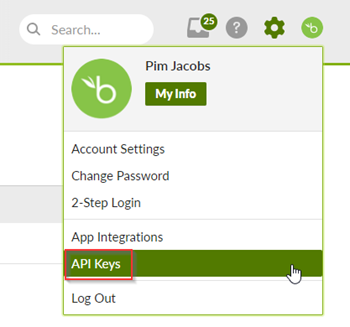
Once my Bamboo HR trial was ready and delivered, I went into ‘My Account’ settings and selected ‘API Keys’.
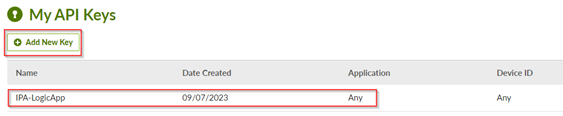
In here I’ve selected ‘Add new Key’ and added the ‘Inbound Provisioning API LogicApp’ API Key.
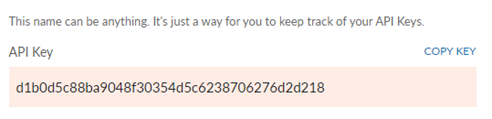
Once the key is created don’t forget to copy the value, this as we need to store this value safely within an Azure Key vault. Furthermore, it’s important to know that this API key has the same permissions as my Bamboo HR user account.
NOTE: At the time of writing, I only had the ability to use a trial version and with that I only was able to access the API of Bamboo HR with a user bound API key. If you have a production instance of Bamboo HR you can request a separate access key at Bamboo so access isn’t bound to a user account and the permission attached to the account.
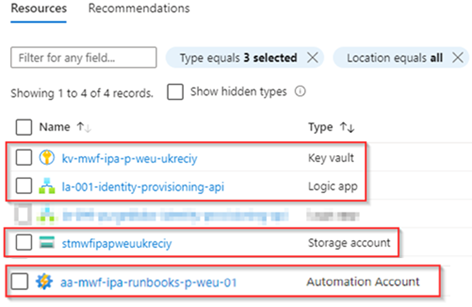
Now once the API Key value is retrieved and copied, let’s make sure to create 4 resources in Azure within an Azure Subscription.
- An Azure Key vault – Which we will use to store the API key from HR (Bamboo HR in my case). Important is to make sure that the Azure key vault has ‘Azure role-based access control (recommended)’ turned on.
- An Azure Automation Account (with system assigned managed identity) – Which we will use transform all HR data from Bamboo HR to a SCIM Bulk Payload .json file using a PowerShell Script.
- An Azure Storage Account – Which we will use to store the SCIM Bulk Payloads generated from the Azure Automation Account.
- An Azure Logic App (with system assigned managed identity) – Which we will use to connect the above resources and send the SCIM Bulk Payloads to the Microsoft Entra Inbound Provisioning API application we just created.
This should result in the resources below being added to your Azure environment.
Once the above Azure Resources are provisioned, two of them with system managed identities, we can provide the right permissions to these system-assigned managed identities. The below table defines what role each managed identity requires on the target resource(s).
| Source Managed Identity | Target Resource | Role |
| Automation Account Managed Identity | Storge Account | Storage Account Contributor |
| Logic App Managed Identity | Storage Account Key Vault Automation Account Microsoft Graph | Storage Blob Data Reader Key Vault Secrets User Automation Operator SynchronizationData-User.Upload AuditLog.Read.All |
NOTE: The SynchronizationData-User.Upload is required and mandatory to post SCIM bulkload payloads against the Provisioning API, the AuditLog.Read.All is required to prevent false positive error messages.
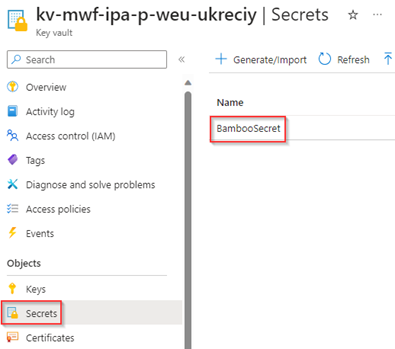
Once these permissions are provided, let’s make sure to upload the API Key which we received a few steps back in the Azure Key Vault as the ‘BambooSecret’.
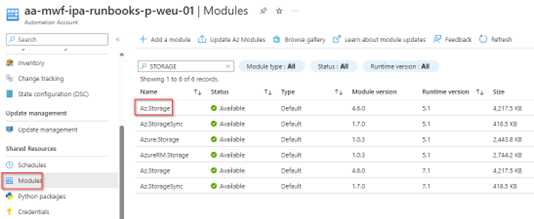
The next step is to go to the Azure Automation Account we just created, hit ‘Modules’ and make sure that the Az.Storage module is added and available on the Azure Automation Account.
The next step is to make sure that the variables are created on this Azure Automation Account, the required variables are:
- ResourceGroupName – The resource group where the storage account resides in, which we just created.
- StorageAccountName – The storage account name, which we just created.

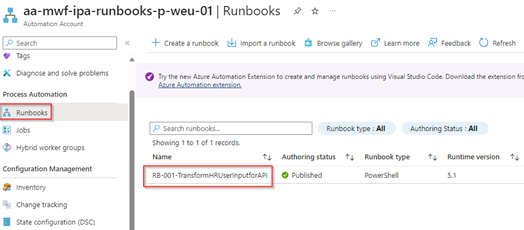
The next step is to create the ‘Runbook’ within the Azure Automation account, in my example I’ve named it ‘RB-001-TransformHRUserInputforAPI’. The contents of this runbook can be found here, make sure this code is fully copied into the runbook and the runbook is published. In step 3 we will walk over the runbook to make sure you’re able to make changes yourself.
Now all the key components are present, let’s start designing the Azure Logic App which we just created. In the following steps we walk through the setup so you can easily attach all these components to each other to deploy this as an end-to-end solution in your environment.
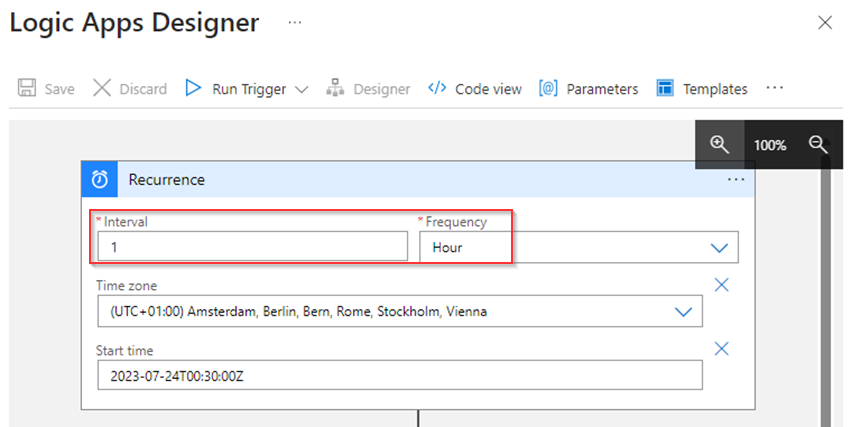
For that go to the Azure Logic App we just created and open the ‘Designer’. In here start by adding a ‘Recurrence Schedule’ which will function as the trigger for the logic app, in my case you can see it’s running each hour.
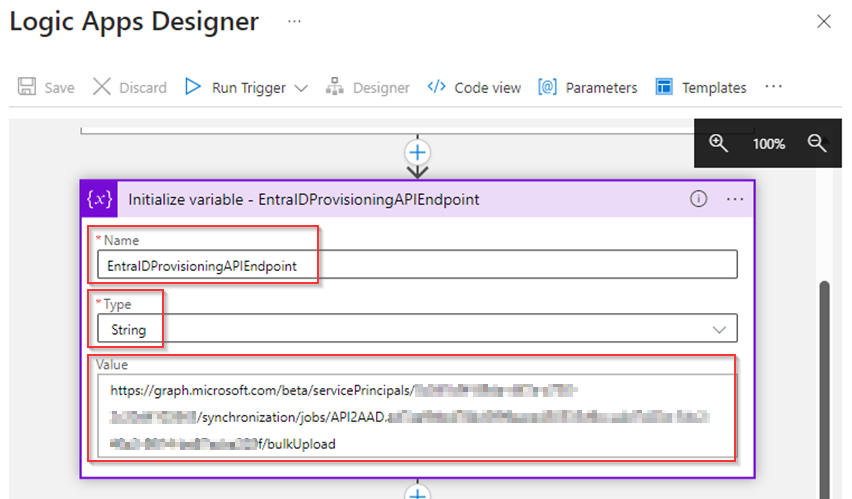
The next step is to ‘Initialize a Variable’, this as we are going to populate the ‘EntraIDProvisioningAPIEndpoint’ variable as a ‘String’ with the ‘Value’ of the Provisioning API Endpoint (which we copied at the end of Step 1).
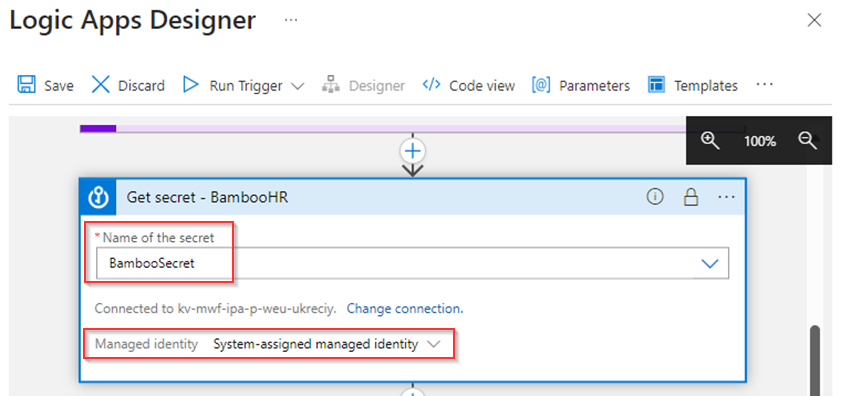
Once the Variable is initialized, we are going to ‘get the BambooSecret’ from the Azure Key Vault which we created earlier, we do this with the system-assigned managed identity of the Azure Logic App which we already provided permissions to do this earlier on.
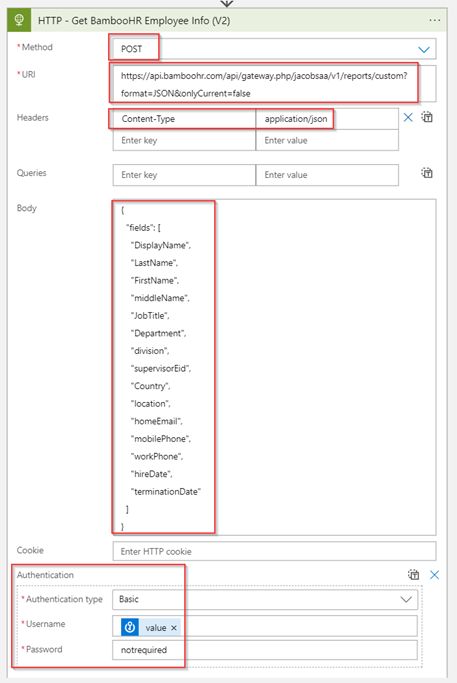
Once the ‘BambooSecret’ is received let’s make an API call to the Bamboo reports API, for that I’ve used the following API call (for which you need to tweak the URL to match your own Bamboo tenant and eventually the body to retrieve the necessary attributes of Bamboo HR):
POST https://api.bamboohr.com/api/gateway.php/jacobsaa/v1/reports/custom?format=JSON&onlyCurrent=false
Headers: ‘Content-Type – application/json’
Body:
{
  "fields": [
    "DisplayName",
    "LastName",
    "FirstName",
    "middleName",
    "JobTitle",
    "Department",
    "division",
    "supervisorEid",
    "Country",
    "location",
    "homeEmail",
    "mobilePhone",
    "workPhone",
    "hireDate",
    "terminationDate"
  ]
}
Authentication type: ‘Basic’
Username: ‘BambooSecret Value’
Password: ‘notrequired’
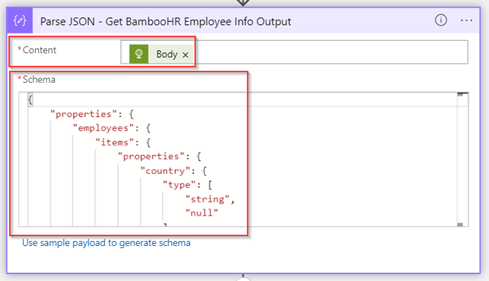
Once we have made the HTTP request let’s Parse the JSON output by validating the ‘Body’ of the received API call against the desired JSON schema.
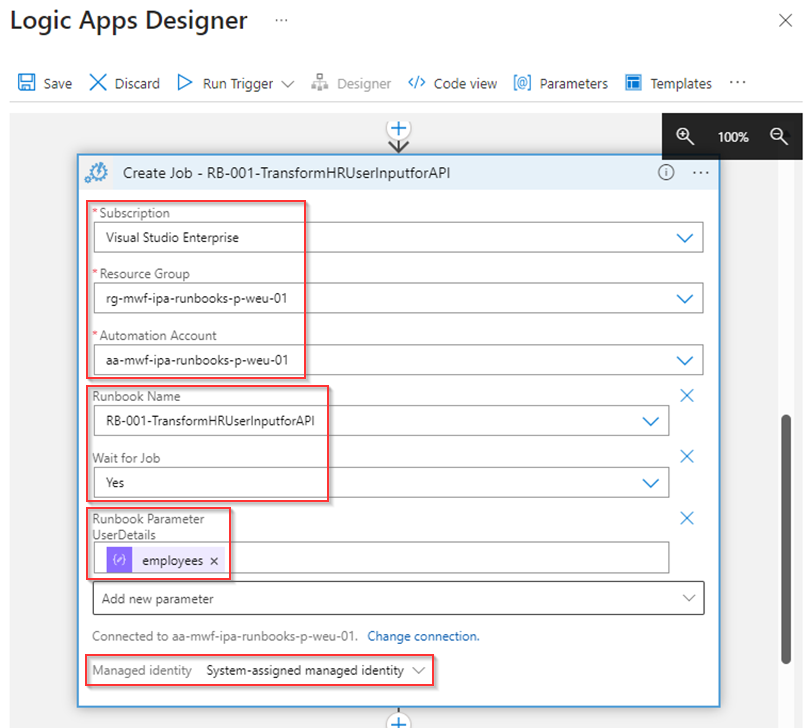
Now the next step is to ‘Create a Job’ and launch the runbook ‘RB-001-TransformHRUserInputforAPI’ which we created and published earlier in the Azure Automation Account. In this case we wait for the job to finish and provide the ‘Employees’ value from the ‘Parse JSON’ action above to the ‘UserDetails’ parameter of the runbook (which is required for the runbook to function properly).
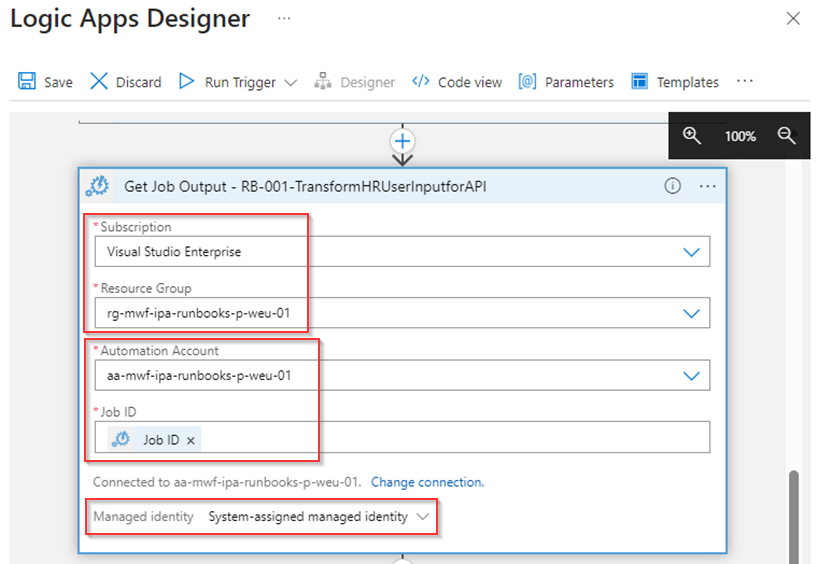
The next step is to retrieve the ‘Job Output’ from the previous action.
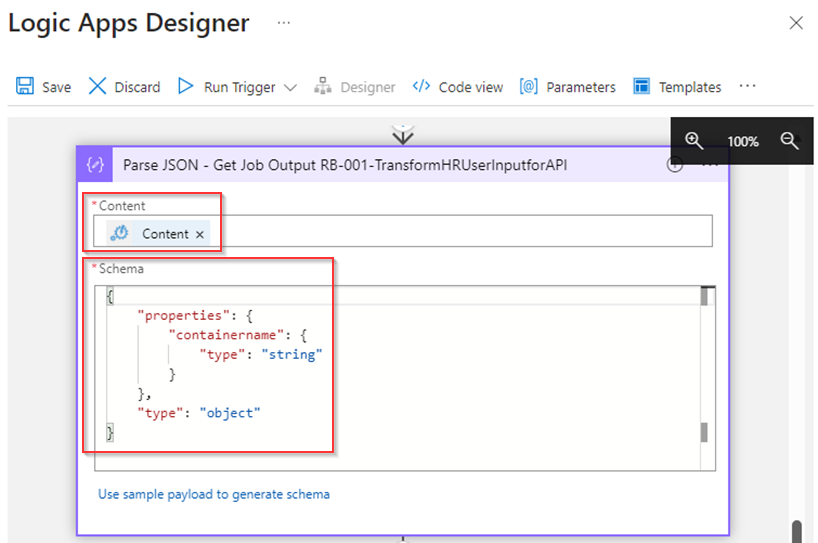
As with previous actions, we ‘Parse the JSON’ against a schema to validate the ‘content’ of the workbook.
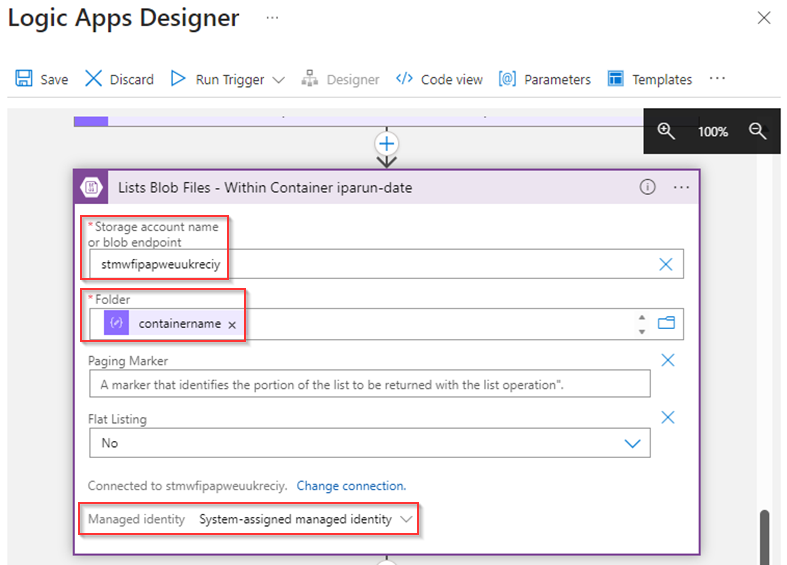
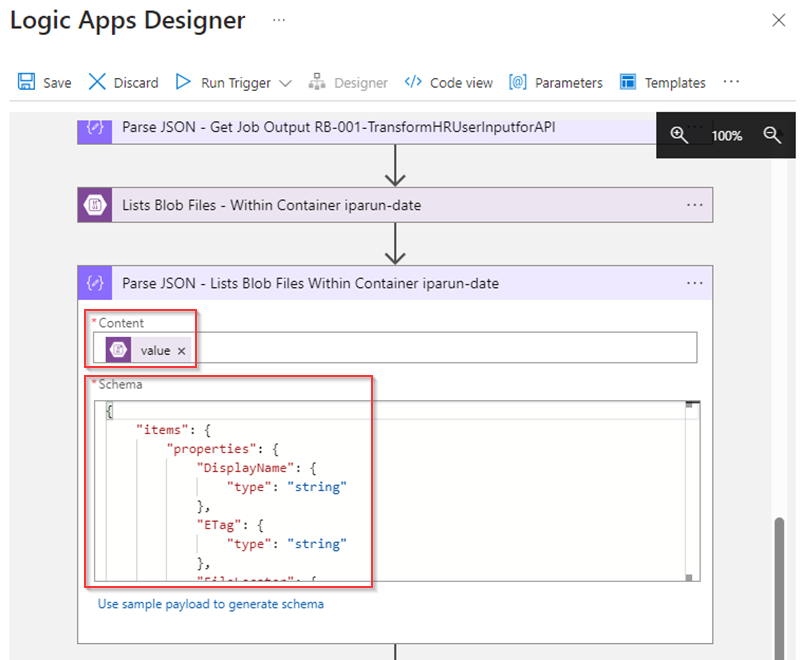
Once the output is parsed correctly let’s ‘List all the blob files’ (which the runbook created for us) within the ‘containername’ which is referred to in the output of the runbook.
And yes, again we ‘Parse the JSON’ output of the ‘List blob files’ action to make sure it’s matching the right schema.
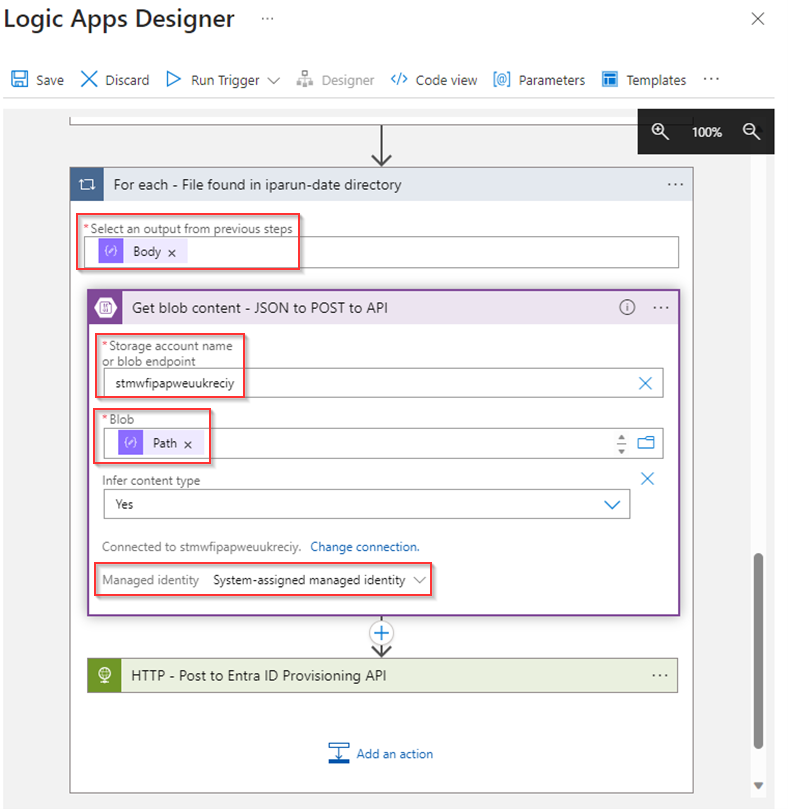
Now we have retrieved all the ‘files’ which are stored in an array of the latest ‘Parse’ action, we run a ‘For each’ loop based on this output and make sure to get the ‘Blob Content’ of each file based on the ‘Path’ received earlier.
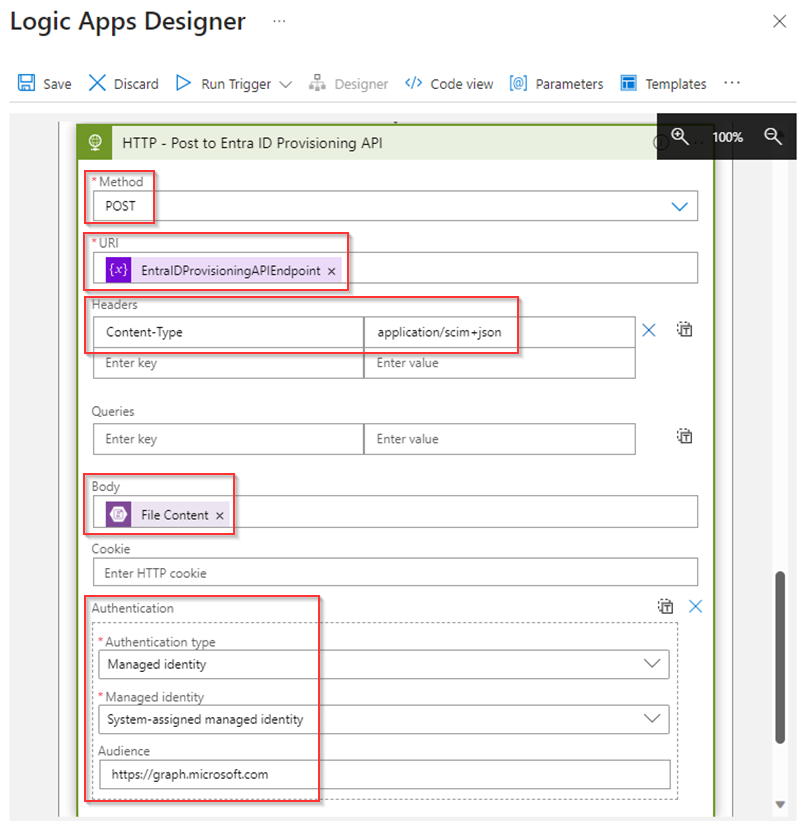
And with that we can conclude with making the API call to the Inbound Provisioning API based on the HTTP request described below. This will POST all the created ‘SCIM Bulk Payloads’ by the runbook on the Azure Automation Account to the Microsoft Entra Inbound Provisioning API.
POST ‘EntraIDProvisioningAPIEndpoint’ variable as created at the start of the Logic App.
Headers: Content-Type – application/scim+json
Body: ‘File Content’ retrieved during the ‘get blob content’ action.
Authentication Type: ‘Managed Identity’
Managed Identity: ‘System-assigned managed identity’
Audience: ‘https://graph.microsoft.com’
Once you’re ready, don’t forget to hit ‘Save’ and make sure the Azure Logic App is still ‘disabled’ as we still need to do some fine-tuning.

NOTE: The original JSON code of this app can be found here in case you just simply want to use copy/paste.
Now the Azure Logic App is configured to make an API call to the Bamboo HR environment, Runs the PowerShell runbook which generates the SCIM Bulk payloads. From her the Azure Logic App can grab these SCIM Bulk payloads and posts them to the Microsoft Entra Inbound Provisioning API.
Before we can enable the Azure Logic App, let’s first have a look at how to customize the PowerShell ‘Runbook’ on the Azure Automation account and how to scope and create attribute mappings at the Inbound Provisioning API within Microsoft Entra.
Step 3: Customize the PowerShell Runbook, attribute mappings and scoping and enable the provisioning service
Once all the required Azure resources are in place and configured you can now entirely customize this to our own needs. For that it’s important to know what you need to alter and where, for that let’s first start with the runbook.
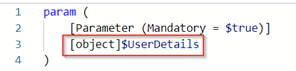
Therefore, let’s open the runbook on the Azure Automation Account, here we can see the runbook starts with the parameter ‘$UserDetails’ which will be filled with the Bamboo HR data received from their API and send over to the runbook via the Azure Logic App.
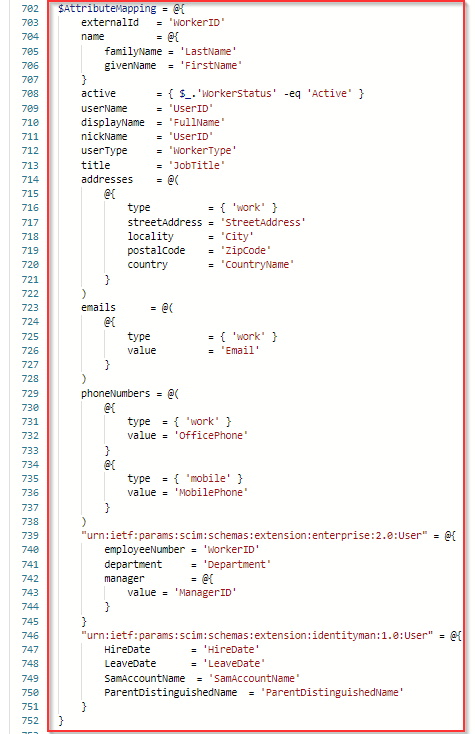
If we look a little bit further, you can see that we’ve added our own ‘custom SCIM schema’ at rule 12. In this case this SCIM schema is called ‘urn:ietf:params:scim:schemas:extension:identityman:1.0:User’ and contains all the details required for four additional attributes which aren’t present by default in the SCIM schema (like SamAccountName, HireDate and LeaveDate for example).

Secondly, it’s important to verify the AttributeMapping variable, this AttributeMapping will be used build the individual SCIM payloads and contains all standard attributes, but also the custom SCIM schema extension as you can see.
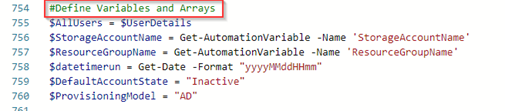
All other content before line 754 is provided by the standard PowerShell script of Microsoft and wasn’t changed. From line 754 we have defined several variables and arrays, whereby we retrieve values from the Azure Automation Account and for example configure the default account state as ‘inactive’ (meaning disabled) and set the provisioning model to ‘AD’ as some attributes have a different value requirement for AD then for Entra ID.
Once the variables are defined, we run through all the users which are being put into this process via the Azure Logic App as described earlier. For each user we will define and eventually alter the attribute values. As you can see, we build the samaccountname values and make sure it’s shortened, define the HireDate and LeaveDate.

Once all is defined, we build the array for the output and add a new row for each user.

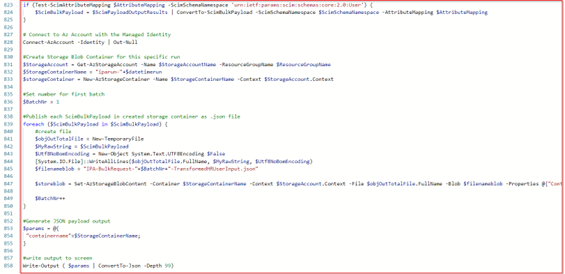
Once all users are processed the last part of the script will connect with the System-assigned managed identity of the Azure Automation account to the Storage account and will create a directory and within that directory the SCIM bulk JSON payloads created via this runbook.
Now all the work in the runbook has been completed, let’s make sure we have configured the ‘Bamboo HR API-driven provisioning to on-premises Active Directory application’ so it will only process users with the department set to ‘IT’. For that go to the ‘Provisioning’ tab, go to ‘Mappings’ and hit the ‘Users’ mapping.

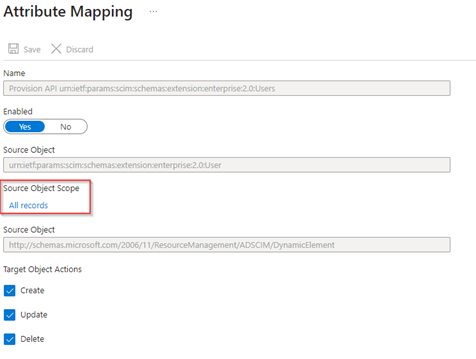
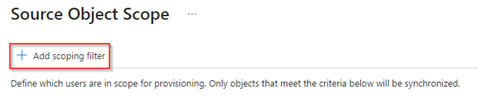
In the ‘Attribute Mapping’ hit ‘All records’ beneath ‘Source Object Scope’.
In the ‘Source Object Scope’ hit ‘+ Add scoping filter’.
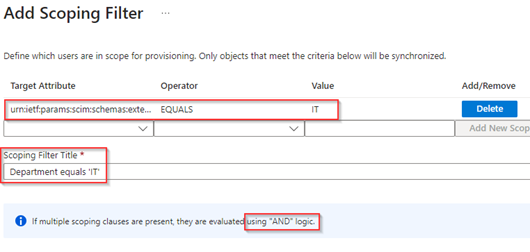
Now add the ‘Scoping Filter’ whereby the target attribute ‘urn:ietf:params:scim:schemas:extension:enterprise:2.0:User:department’ equals ‘IT’ and provide the ‘Scoping Filter Title’ a friendly name. Once ready hit ‘OK’.
NOTE: If you add more filters here, they will be evaluated using the ‘AND’ logic.
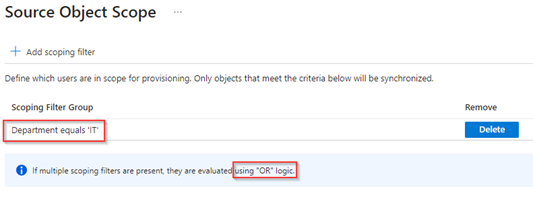
Verify the overall ‘Source Object Scope’ and once ready hit ‘OK’.
NOTE: If you add more filter groups here, they will be evaluated using the ‘OR’ logic.
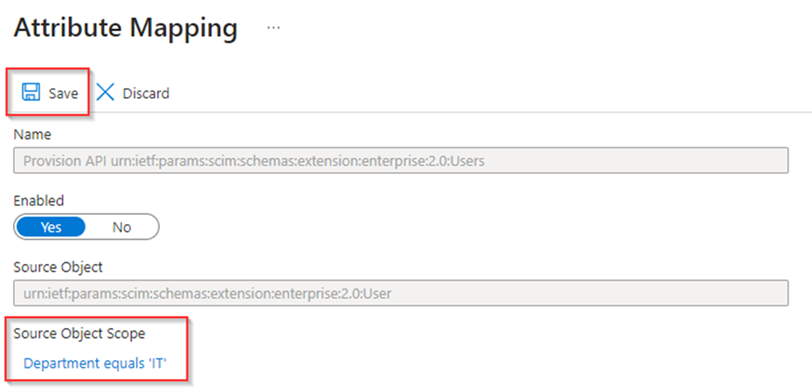
Now first hit ‘Save’ to apply these changes before continuing to the final step which is altering the ‘Attribute Mappings’.
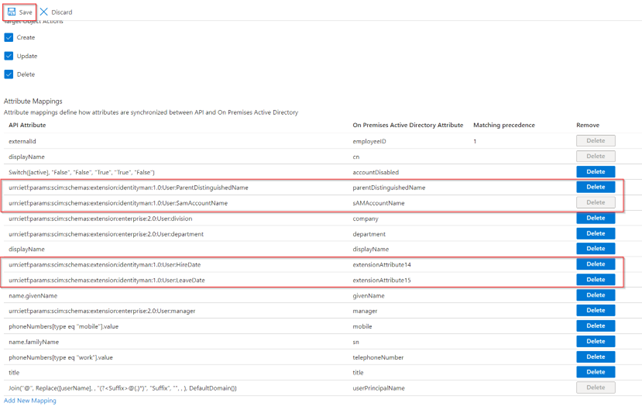
Once the filtering configuration has been saved, let’s continue with the ‘Attribute Mappings’, for that again go to the ‘Provisioning’ tab, go to ‘Mappings’ and hit the ‘Users’ mapping. In here hit ‘Show advanced options’ and hit ‘Edit attribute list for API’.
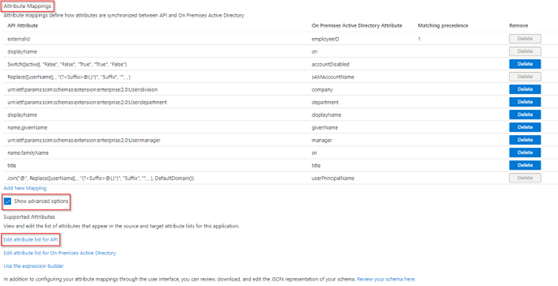
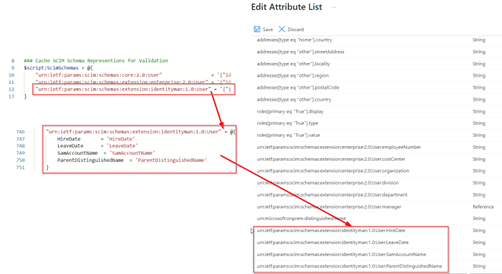
In here we need to add the custom SCIM schema attributes we’ve defined within the runbook as well. In this case we are talking about the following SCIM attributes:
- urn:ietf:params:scim:schemas:extension:identityman:1.0:User:HireDate
- urn:ietf:params:scim:schemas:extension:identityman:1.0:User:LeaveDate
- urn:ietf:params:scim:schemas:extension:identityman:1.0:User:SamaccountName
- urn:ietf:params:scim:schemas:extension:identityman:1.0:User:ParentDistinguishedName
Once ready hit ‘Save’.
Once the additional attributes have been added and the full ‘Attribute Mappings’ have been saved as well, hit ‘Add new Mapping’.
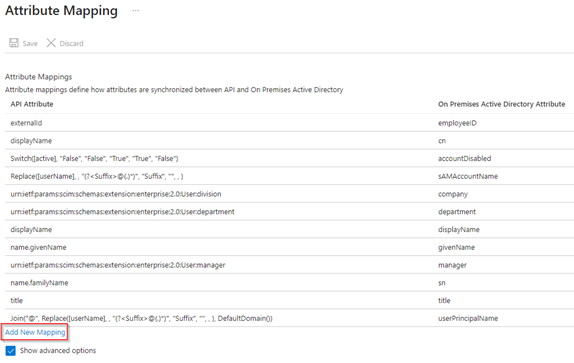
Now it’s time to use the custom SCIM attributes we just added in the API attribute list and make the mapping with Active Directory. For that select ‘Direct’ as the mapping type, select the ‘Source Attribute’ (from the API attribute list) and ‘Target attribute’ (from the Active Directory attribute list) and hit ‘OK’.
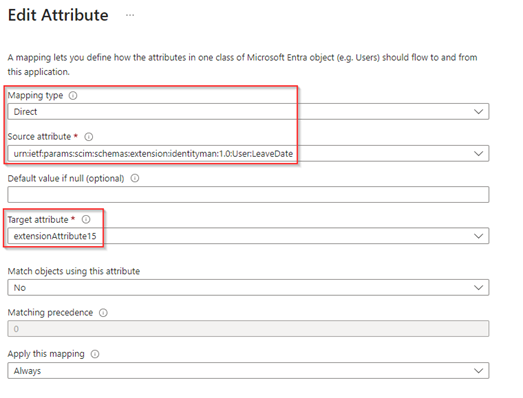
Do this for the attributes ‘sAMAccountName’, ‘HireDate’, ‘LeaveDate’ & ‘ParentDistinguishedName’. Eventually you can also ‘Delete’ unused or non-required attributes from this list as well. Once ready hit ‘Save’.
As a last step, make sure that some of the attributes are only edited on ‘creation’ for that select the attributes ‘sAMAccountName’, ‘userPrincipalName’ & ‘accountDisabled’ one-by-one.
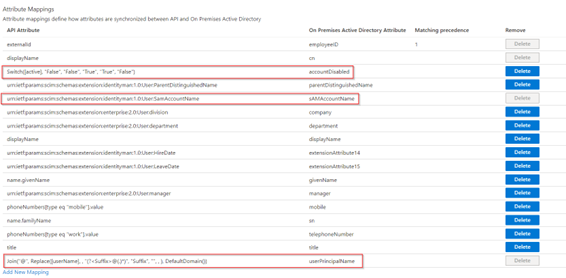
And for each of these attributes set the ‘Apply this mapping’ setting to ‘Only during object creation’ and not during the whole lifecycle of the identity to prevent continuous updates for these values.

Now we have created the Microsoft Entra Inbound Provisioning API, we’ve created the Azure Logic App and all other required resources to provide details to the Microsoft Entra Inbound Provisioning API and at last we’ve fully customized the attributes and mappings.
This means we are now ready for the last step in the process, which is enabling the Microsoft Entra Inbound Provisioning API endpoint and Azure Logic App. This with as result, users being provisioned correctly in Active Directory from the Bamboo HR source, with that we will verify if the solutions works as designed and we will have a look at how to validate this with the Provisioning Logs in Microsoft Entra.
Step 4: Enabling provisioning for identity creations and updates and verify the provisioning logs
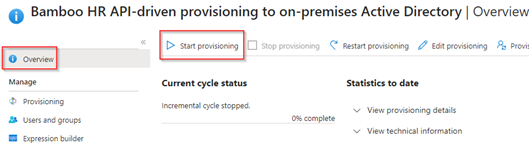
Once all configuration parts are in place and you’re ready to test the provisioning flow, let’s enable the provisioning by hitting ‘Start provisioning’ on the ‘Overview’ blade of the Entra Inbound Provisioning API application. With this step the Inbound Provisioning API starts accepting SCIM Payloads and once the user is in scope it will provision or update the user.
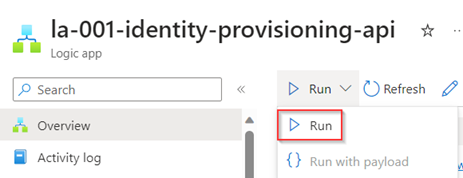
Once the Inbound Provisioning API is accepting SCIM Payloads, let’s enable and run the Azure Logic App we created.
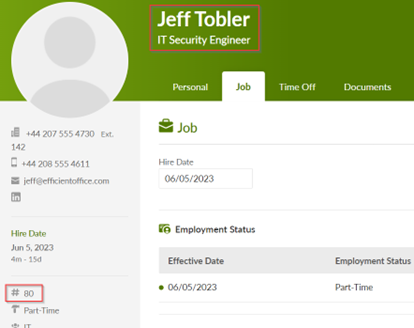
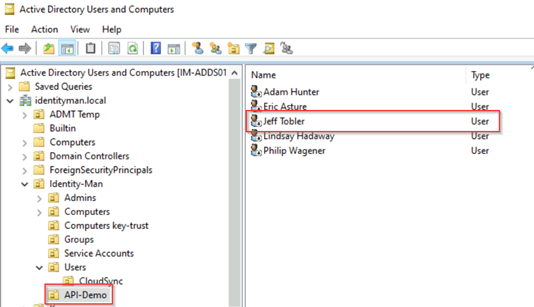
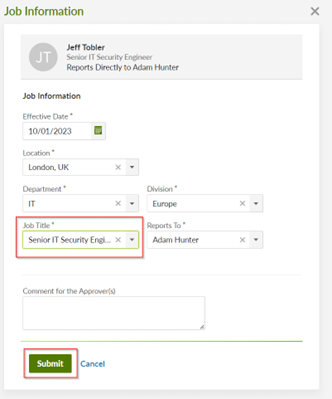
In the meantime, while the Azure Logic App is running, let’s grab one user from Bamboo HR which is in scope for provisioning, in this case ‘Jeff Tobler’. As we can see the EmployeeID of Jeff is ’80’.
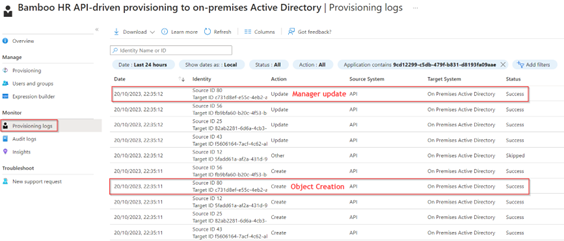
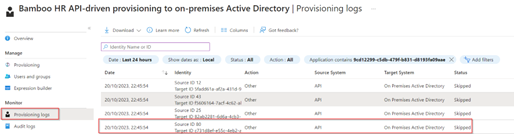
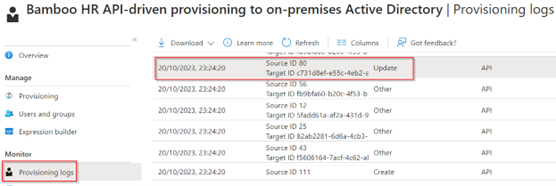
Once the Azure Logic App run is finished successfully, we can also see the ‘Source ID 80’ coming in twice within the Provisioning Logs beneath the application in Microsoft Entra.
If we have a closer look at the first record, we can see on the ‘Steps’ tab that this user (Jeff Tobler) was indeed in scope for provisioning and all boxes are ‘ticked’ for Inbound Provisioning

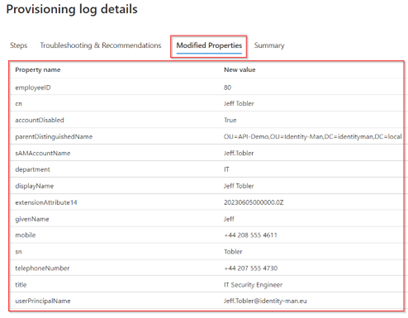
If we go to the ‘Modified Properties’ tab, we can see in detail the properties with the ‘New Values’ and we can in this case indeed see it’s Jeff who is provisioned.
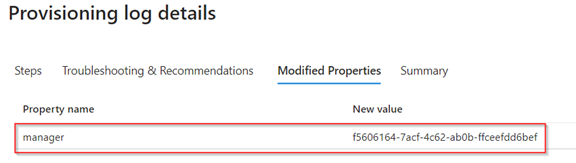
In the second request we can see that the ‘Manager’ is added for ‘Jeff Tobler’.
NOTE: Important to know is that for the manager to be added to on user objects, the manager needs to be provisioned as well via the Inbound Provisioning API, having just the user without the manager in scope won’t configure the manager object (even though the object exists in Active Directory or Microsoft Entra ID).
If we now look in Active Directory we can see that ‘Jeff Tobler’ is being created as ‘Disabled’, which is correct as that’s what we defined.
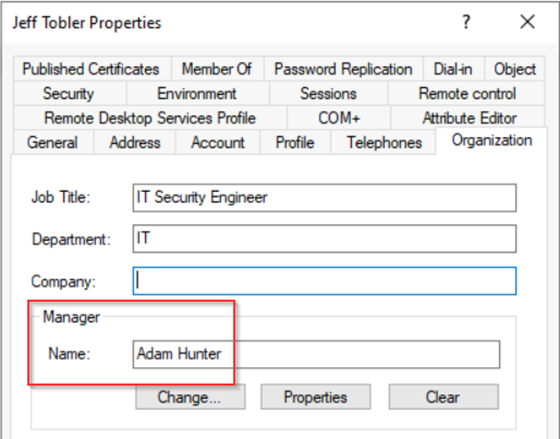
If we open the user details, we can see that the properties are filled and the manager has been configured correctly as well on this account.
IMPORTANT NOTE: From this moment forward the user can be onboarded correctly with the user of Lifecycle Workflows. If you want to know how to proceed with these steps for onboarding, please do check my blogs around Lifecycle Workflows which will help you further configuring the mandatory steps for on- and offboarding.
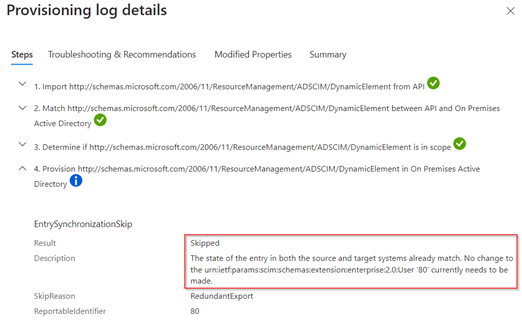
Now the user is created a new recurring cycle of the Azure Logic App will run and if nothing has been changed in HR, we can see the object isn’t updated again but ‘Skipped’.
In the ‘Provisioning log details’ we can also notice this in the ‘Result’ and ‘Description’ fields.
Now let’s see what happens when a user gets promoted with a new jobTitle, in this case Jeff Tobler is promoted from ‘IT Security Engineer’ to ‘Senior IT Security Engineer’. And once ready let’s hit ‘Submit’ in HR.
NOTE: Please be aware that if you’re testing this out in a lab environment of Bamboo HR, this step requires a second approval before it becomes active.
Now let’s wait for the Azure Logic App to trigger, and once triggered in the ‘Provisioning Logs’ we can see that ‘Source ID 80’, Jeff Tobler, had an ‘Update’ which is successfully applied.
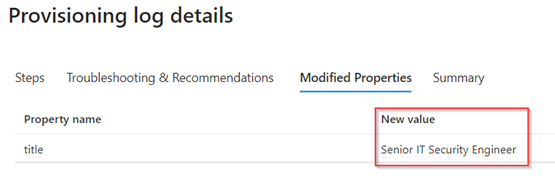
In the ‘Provisioning Log Details’ we can see under the ‘Modified Properties’ tab this is indeed the jobTitle which has been changed including the new value.
And indeed, within Active Directory we can see the same change has been applied to the user account of Jeff Tobler.

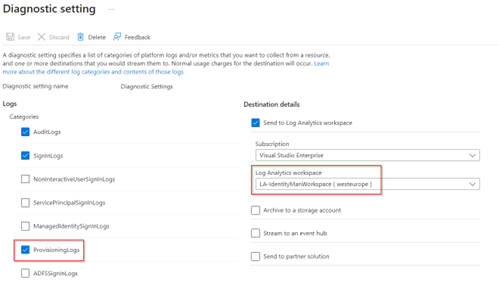
If you want to have better insights on the provisioning process using the Inbound Provisioning API to Active Directory or Microsoft Entra ID. Go to the Microsoft Entra Admin portal, hit ‘Monitoring & Health’ and select ‘Diagnostic settings’. In here either change the configuration or add one which is using a ‘Log analytics workspace’, as shown in the image below and make sure that at least the category ‘ProvisioningLogs’ is checked.
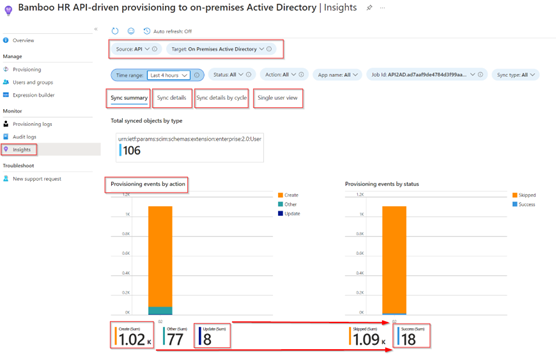
Once configured let’s go back to the ‘Bamboo HR API-driven provisioning to on-premises Active Directory’ and now hit the ‘Insights’ tab. In here the source should be set to ‘API’ and the target to ‘On Premises Active Directory’ and as you can see there are several tabs available ‘Sync summary’, ‘Sync Details’, ‘Sync details by cycle’ and ‘Single user view’.
In my results I’ve got a great amount of creates and updates. However, looking at the ones which are successful I’ve got only 18. This indicates that I’ve scoped out a lot of users, which is correct as I’ve only included users who have set the department to ‘IT’.
Now the Microsoft Entra Inbound Provisioning API is successfully deployed and up and running, you can decide to extend the scope to Department ‘IT’ or ‘Marketing’ for example. With that being said, let’s wrap up to a conclusion.
Conclusion
Now we’ve walked through all the four steps required to deploy the Microsoft Entra Inbound Provisioning API in your environment. You know how you can create the Provisioning API Endpoint, you know how to create the required Azure Resources as example to automate this process and how to enable the process for your organization. Besides you know how to ‘customize’ the ‘PowerShell Runbook’ and the ‘Provisioning settings’ to provide additional attributes from HR to Active Directory or Entra ID. And at last, you know how to verify all the incoming user creations and updates within the Provisioning Logs in Microsoft Entra ID.
With this we can conclude that the use of the ‘Microsoft Entra Inbound Provisioning API’ is indeed able to connect to any HR source and is able to automatically create and update identities in Active Directory and Microsoft Entra ID when you create your own logic around it. With that it’s of importance to provision the EmployeeHireDate and EmployeeLeaveDateTime values as well in Active Directory or Microsoft Entra ID.
With these values properly configured for inbound provisioning we can trigger Microsoft Entra Lifecycle Workflows to on- or offboard the account. This would for example enable the account, provide the required birth rights, and will make sure there is a Temporary Access Pass generated and send over to the manager of the user. Besides it can make sure to disable the account in time and eventually delete the account when the user has left the organization 60 days or more. If you want to kick-start the use of Microsoft Entra Lifecycle Workflows check my blogs serie.
With that being said, I hope you enjoyed reading this new blog within the Microsoft Entra Identity Governance series! Stay tuned for more Identity Governance blogs coming soon!
- An Introduction to Azure AD Identity Governance
- Identity Governance 1 of 10: Implementing a Strong Identity Foundation
- Identity Governance 2 of 10: Implementing Identity Lifecycle management for guest users – part 1
- Identity Governance 2 of 10: Implementing Identity Lifecycle management for guest users – part 2
- Identity Governance 2 of 10: Implementing Identity Lifecycle management for guest users – part 3
- Identity Governance 3 of 10: Configuring Provisioning in 3rd party apps for (guest) users
- Identity Governance 4 of 10: Implementing LifeCycle Workflows – Configure the basics
- Identity Governance 4 of 10: Implementing LifeCycle Workflows – Configure onboarding workflows
- Identity Governance 4 of 10: Implementing LifeCycle Workflows – Configure offboarding workflows
- Identity Governance 5 of 10: Using the hidden gems in Azure AD access packages, all you need to know! – Part 1
- Identity Governance 5 of 10: Using the hidden gems in Azure AD access packages, all you need to know! – Part 2
- Identity Governance 5 of 10: Using the hidden gems in Azure AD access packages, all you need to know! – Part 3
- Identity Governance 5 of 10: Using the hidden gems in Azure AD access packages, all you need to know! – Part 4
- Identity Governance 6 of 10: Using the brand new Entra Inbound Provisioning API for Identity Lifecycle Management!
- Identity Governance 7 of 10: Recertify access by using Microsoft Entra Access Reviews! – Part 1
- Identity Governance 7 of 10: Recertify access by using Microsoft Entra Access Reviews! – Part 2
- Identity Governance 8 of 10: Implementing Privileged Identity Management
- Identity Governance 9 of 10: Implementing a Terms of use
- Identity Governance 10 of 10: Review by Monitoring and reporting

Thanks for doing these, it has been very helpful with my journey trying to use the provisioning service. I have a PowerAutomate Flow that creates the AD abject and a workflow that enables the account etc. But I am stuck, I need to use a logic app to set come extension attributes and I cant find any easy instructions on how to acheove this. Would you mind doing an article on how to use Logic Apps in the workflow. I amready set some attributes in the mapping, but this needs to be done outside.
LikeLike
I’m using Logic Apps already (only in combination with Azure Automation), could you please explain a bit more on what you’re suggesting here?
LikeLike
I have a workflow but need to update some extension attributes on users, I think the only way to do this is going to be with logic apps. I am also going to be looking at offboarding processes soon and again I think I will need some logic apps but I have no idea how to achieve this yet, in a basic form without needing to use Azure Automation unless I need to.
LikeLike
Hi Pim,
Some of your links dont seem to work, especially those which are linking to the Powershell code so it makes it difficult to follow some of the steps.
Otherwise it is a great blog!
LikeLike
Thanks for this feedback, just changed the URLs and it should all be working now :-)!
LikeLike
Thanks for this blog, it helped me a bunch in doing a similar process, but in Powershell. Have you had any problems posting more than 50 users at a time? If I try to send more than 50 users the API endpoint gives me an error. The provided powershell script from Microsoft does break the CSV into batches of 50, but then I also get an error by posting that.
LikeLike
Hi there,
My script is based on the one from Microsoft and indeed creates JSON files with a max up to 50 users per JSON file (having more than 50 users per bulk request is not supported and will be rejected by the provisioning API. I never had problems with that (although there was a bug recently which is fixed right now and was related to a full storage bucket). What’s the error message you’re receiving?
LikeLike
Hey thanks for the response,
I ended up breaking the script down into batches of 40 users at a time, similar to what you did above and that did the trick for me. Thank you!
[cid:jde-logo_4501184b-62ce-4884-99af-63e2a4643bf4.png]https://www.jonesanddemille.com
Hayden Johnson IT Manager
Jones & DeMille Engineering, Inc. p: (435) 896-8266 | m: 435-609-0642 Shaping the Quality of Life.
LikeLike
Hi Pim!
Thank you very much for this guide. I was able to follow it and get this working in our tenant.
I’d like to only pull data from current/active users, but it seems that I’m still pulling all users in the directory.
I’ve changed the URL in the Post Request to: “https://api.bamboohr.com/api/gateway.php/”Company”/v1/reports/custom?format=JSON&onlyCurrent=true
However, It still seems to pull all the data. Is there anything I can do to fix this problem?
Thanks!
-Tom
LikeLike
Hi Tom,
Good question, I just looked at the api documentation of Bamboo which you can find here:
https://documentation.bamboohr.com/reference/get-company-report-1
If you read what it says the ‘onlycurrent’ setting would only filter the report based on a ‘false’ setting (not true as per my understanding). Could you check if setting the value to ‘false’ makes any difference?
If that does make a difference, I would create a support call with Bamboo as that seems to me like a missing feature (or maybe a bug?).
Hope this helps, curious on the outcome of course!
LikeLike