Programming tutorial: Part 2–Development environment

Atari Lynx programming tutorial series:

This is the second part of the tutorial to learn how to program Atari Lynx games. In the first part we looked at what you will need to get started. One of the requirements is a development environment.

Historically there have been three development environments that I know of:

  1. Original Epyx development kit with an Amiga 2000 machine.
    Consists of special hardware and Amiga based development tools. This is unavailable to almost everyone and less practical in general.
  2. BLL (Behind Lynx Lines) kit combined with newcc65 from Bastian Schick
    Bastian has recently started modernizing his tooling which can be found on GitHub here: https://github.com/42Bastian/. In particular the repositories for lyxass, sprpck, new_bll, lynx-encryption-tools and lynx_hacking are of interest.
  3. CC65 with some additional tooling from BLL (sprpck in particular).
    The CC65 compiler suite is still in active development and seems the most modern suite. The source code can be found on GitHub at https://github.com/cc65/cc65.

Installing CC65 compiler suite on Windows

There is a Windows 32-bit specific snapshot made available at https://sourceforge.net/projects/cc65/. This download contains the binaries for the C compiler, assembler, linker and other tooling, as well as the configuration files, libraries and drivers (mouse, for various target machines it supports, include files for developing in C or assembler and documentation. It does not contain the sources for the tooling or the library files.

You can start by downloading the latest Windows snapshot of CC65 from https://sourceforge.net/projects/cc65/. Unzip all files into a single directory, such as ‘C:\Program Files\cc65’. Even though the CC65 suite is not 64 bit yet, having the Program Files folder eliminates the differences between 32 and 64 bit Windows OS machines. The result should be something like this:

CC65Snapshot

It is convenient to have access to the bin folder from CC65, where all the executables (compiler, assembler, linker and more) are located. This requires editing the Path environment variable. Go to your Computer properties page (Right-click the Computer icon in Windows Explorer) and select “Advanced system settings”. From there, click on the bottom button that says “Environment Variables…”.

EnvironmentVariables

Pick the Path variable from the System variables list and click Edit…

EditEnvironmentVariable

Add the full path to the bin folder inside the folder where you extracted the CC65 files. This is probably ‘C:\Program Files\CC65\bin’. Also, add the path ‘C:\Program Files (x86)\Microsoft Visual Studio 14.0\VC\bin’ to the nmake.exe tool, so you can later run builds from the command-line as well. Close the dialog and return to the Environment Variables.

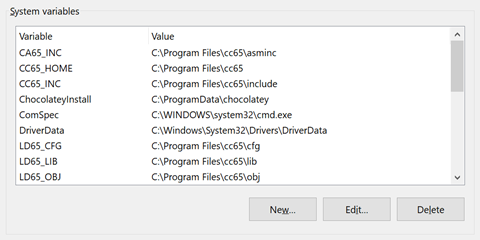
Additionally, create new environment variables that the CC65 tooling will use itself. Click the New… button in the System Variables section and add each of the variables listed below.

AddEnvironmentVariable

  1. CA65_INC: C:\Program Files\CC65\asminc
  2. CC65_INC: C:\Program Files\CC65\include
  3. CC65_HOME: C:\Program Files\CC65
  4. LD65_CFG: C:\Program Files\CC65\cfg
  5. LD65_LIB: C:\Program Files\CC65\lib
  6. LD65_OBJ: C:\Program Files\CC65\obj

The end result should look similar this:

CC65EnvironmentVariables

The CC65 suite should now be ready for development. Try typing ‘CC65 –version’ from a console windows or terminal and see if something like this pops up:

CC65CommandPrompt

As you can see CC65.exe was available. You can also try the other tools, such as ca65, ld65 and sp65.

Although you can work from here with Notepad and command prompts, we can make life easier for ourselves. The next step is optional. Pick whatever text editor you like and your favorite GUI environment like Code::Blocks, Mono, Visual Studio 2019 or Visual Studio Code.

Setting up Visual 2019 for Atari Lynx projects

First, you need to download the free Microsoft Visual Studio 2019 Community Edition from the Microsoft website: https://visualstudio.microsoft.com/. After the download, run the setup program and install Visual Studio. This should be a pretty straight forward process.

VisualStudioInstaller

Make sure you select the Desktop Development with C++ workload. You only need the MSVC v14.2 Build tools from the optional installation details.

VisualStudioCPPFeatures

After the installation you have a GUI for source code and resource file management, that can work together with the CC65 compiler to provide a rich and productive environment.

If you want to give Visual Studio a spin for CC65, clone the repository at https://github.com/AtariLynx/HelloWorldCC65. You can do this easily from Visual Studio by choosing File, Clone Repository from the top-level menu:

VisualStudioFileCloneRepositoryMenu

Copy and paste the repository URL ‘https://github.com/AtariLynx/HelloWorldCC65’ in the dialog and pick a location on your development machine to store the repository and its files.

VisualStudioCloneRepository

This should automatically open the solution.

VisualStudioSolution

You can double-click the main.c source file from the Solution Explorer and inspect the contents. Do the same for the helloworld.mak and lynxcc65.mak files that NMake uses to build the project. In order to compile the Lynx rom image, open the Build menu, choose Build Solution or press Ctrl+Shift+B and check the Output window at the bottom.

VisualStudioBuildOutput

If the red squiggly lines in the code editor are bothering you, you can turn off IntelliSense information for C/C++ projects. This will help not getting too many warnings and errors from Visual Studio trying to understand what your C code is all about. IntelliSense works great for C programs targeted for Windows and not so much for CC65 tooling targeting the Atari Lynx. The option is found under the menu Tools, Options, Text Editor, C/C++, Advanced in the IntelliSense section on the right:

VisualStudioDisableIntelliSense

Simply change the value from False to True and you are good to go.

Next time

The next part of the tutorial will focus on the files inside this project, how Visual Studio and CC65 work together and what we need to do to build a working rom image.

Posted in Tutorial | 19 Comments

Programming tutorial: Part 1–Getting Started

Atari Lynx programming tutorial series:

  • Part 1: Getting started

So, you want to develop a game or program for the Atari Lynx, right? Well, join me on my journey to learn how to program for this game console. This tutorial series will be expanded and updated as my knowledge of the platform grows, when feedback from the community is given. Some things in this tutorial might be wrong. Let me know and help grow this tutorial, so people can benefit from it.

I will write this so others can also start developing games. At this point in time I think I will use a set of helloworld-ish samples to explain concepts, but also build a real game to explore the various aspects of Lynx game development. This means that I am not sure how the tutorials will be structured. I anticipate that they will be like living documents that grow and get better content over time.

The ingredients for a game

These are the things you will need to build, test and run your game for the Atari Lynx:

  • The actual hardware of an Atari Lynx device
  • A programmable cartridge onto which you can transfer the game and test it in the real Lynx
  • An emulator to make dry runs without needing the hardware and the time to transfer and test a cartridge
  • A development environment that can produce the correct 65SC02 code that the Lynx console can run
  • The idea for a game
  • Basic understanding of programming
  • Dedication, patience and perseverance

Let’s briefly look at each one of these.

Actual Atari Lynx device

You probably have one already. Why else would you want to write a game for this device? If not, there are plenty of Lynx console to be bought in your neighborhood or on the Internet. Ebay is probably a good place to start if no one around you has one for you.

There is no particular preference for the Atari Lynx Mark I (Classic) or II model. The games should run on both. The most noticeable difference in the hardware is the support for stereo in the Lynx II, where the Lynx I only has mono sound. The form factors are different as well. Here, there is a slight bias towards the Lynx II, because it has an open cartridge slot that allows for easy insertion of odd-shaped cartridges. This will help with the flashable cartridges as well (see later).

A programmable cartridge

There are a couple of ways to get a game binary image onto a cartridge. One of them is an EEPROM-burner. I have seen these out there. Or you can use the Flashcart by Karri Kaksonen. My personal favorite is the FlashCard by Lynxman. I own one and have used it extensively to try my games on a real Lynx device. Works like a charm and it is highly recommended. It’s affordable. Check with Lynxman for availability and pricing. Make sure you have a Lynx II or are willing to remove the cartridge bay door of your Lynx I.

Emulator to quickly test a game

There are two main emulators out there:

  1. Handy (with incarnations for about every platform and device) 

    image_38007CC0

  2. Mednafen (Multi-system emulator based of Handy source code with improvements) 

    image_44FA5CD1

I have always used Handy, but recently found that Mednafen has flawless sound support. It is a bit trickier to use (command-line based), but is well worth checking out.
When you choose Handy, do pick the Developer version, as it includes debugging support and has more features. Pick up the source code for the emulator as well, which is for the developer version. I have written a blog article on how to compile the source for Handy on Visual Studio 2010.

Development environment for building 65SC02 code

In my book a development environment encompasses everything that you need to build games. This ranges from your operating system, to tooling and documentation.

You have got the operating system taken care of already. How else would you be browsing this page? I cannot judge whether this will be the OS for game development of your choice. I know that it is possible to get a working and productive environment for Windows and Linux and not so sure for MacOS. Everything else will have slimmer chances. If you use one of the first two then your in luck. Otherwise you might need to switch. My operating system is Windows, and have nothing against the others. However, I do focus on Windows and Microsoft technology. I will not compare this with other operating systems and manufacturers thereof. You be the judge of what is better.

My list of things for the Atari Lynx development environment:

  1. Documentation
  2. Tooling
    • Compiler, assembler and linker for 65SC02 source code
    • Text editor and/or GUI for source code and resource files
    • Framework specifically for creating Atari Lynx games

We’ll get into each of the tooling later on.

The idea for a game

Surely, to develop a game you will need to have an idea of what the game is like. That is not what this tutorial is about. It is meant to give you the knowledge on how to use the platform, hardware, tooling and programming environment to accomplish writing a game. As far as the game is concerned: that is your idea mixed with the things in this tutorial.

Basic understanding of programming

There are so many books, internet sites, people, training companies and schools out there that can teach you how to program, it’s not even funny anymore. If you are not comfortable writing code and haven’t got your head around it yet, this tutorial might not be for you. I do assume you have programming experience and skills. Then again, reading this might help you learn more about programming. You’ll notice if it can help you develop your skills. For me, it has been very educational to program in a low level way, instead of the high level languages and frameworks that I use every day.

Dedication, patience and perseverance

Being a developer of software can be a very rewarding task. Whether it is monetary gain, or personal satisfaction of solving a problem or completing a game, for everyone there is something to be had from developing. If there isn’t you should really reconsider starting development or being a developer.

But, the other side of the medal is that there will almost certainly be moments where things get tough. You might not get the results you want, or not as quickly as you’d like. There will be bugs in your code that you need to hunt down and fix. There is not as much documentation as you will need and the developer community is small to say the least. You have been warned and should be prepared to deal with this. On the upside, take a look at the fun games that the homebrew community of the Atari Lynx has developed the past couple of years. And I must say after having spent a couple of evenings experimenting: it is really fun to program for the Lynx. Amazing what this little console can do. Little code, big results. I am enthusiastic. I hope you are too.

From this point on

This first part has not a whole lot to do with programming yet. But we’ll take it step by step. The next part will cover the various tools that you will need and could use. We’ll discuss the compilers, editors and frameworks. So, stay tuned for more on the Atari Lynx programming tutorial.

Posted in Tutorial | 9 Comments

Dracula the Undead walkthrough

Below follows the complete solution to the graphical adventure on your Lynx, Dracula – The Undead.

Dracula the Undead - Box Front

Included are all the possibilities of exploration available in the game. You need not go through the list of commands given below. Stick to the bold commands and only execute the others if you’re interested in seeing what happens. Omitted are the commands that result in remarks like ‘there’s nothing unusual about it.’ or ‘I don’t think that’ll work’. Some are quite interesting (and that’s the main reason I included them), since they more or less show the path of exploration you might have followed solving the game yourself. For instance, when you first try and climb out of the window in Jonathan’s antechamber he doesn’t believe it possible, whereas when he has seen Dracula do it, he does climb out, convinced it can be done.

snap24_69B23B1D snap33_68D9D533 snap55_081C7C07

Use the map in combination with the italic headers. The headers give the name of the location where you should be or move to before trying any of the actions given below them. If you would want to finish the game as quickly as possible, you should only execute the commands printed in bold.

A note of caution: if something happens, like an animation of some sort or a narration by Bram Stoker, and the list prompts you to use notebook, make sure you execute no other command. If you do, you might not be able to finish the game victoriously. Sometimes, however, you might be lucky if you accidently execute a false command, because in some instances you can examine something again and then use the notebook (like at Dracula’s coffin or in his study).

snap64_554C7592 snap66_0D8AECAB snap67_3F165A40

On the other hand

Finishing the game in only two days (more like one) after about three go’s I really started wondering whether the solution given below is the only one. If you’ve read the original novel by Bram Stoker (which I can really, really recommend for all you English books readers or students who need a good book for their reading list), you find that the DRACULA – THE UNDEAD only covers about a seventh of the novel. Some arguments to confirm my doubts: in the sewing room where you fall asleep and nearly get killed by the three brides you come across several objects I cannot seem to use in any way. There are more of those unusable objects, by the way. Furthermore, most doors that are locked can be opened later on in the game. Some, however, not. What about the coins you carry, but do not seem to need? Although being warned several times to escape before the brides ‘claim you with their voluptuous kisses’ I never got killed by them.

I imagine this to be the result of always having broken open the window of Jonathan’s bedroom, so I could exit the room later in the game, when the door to the antechamber from the bedroom is locked. Does anybody know if this is really so? And last and certainly not least: if you happen to have GAMEZONE issue four handy, look on page 91, the LYNX previews. You’ll notice a picture from the DRACULA game showing Jonathan bending over Dracula in his coffin, stake in hand pointing towards Dracula’s chest. The text reads: ‘Finding a handy stake he is ready to end Draculas reign of terror.’ I certainly did not find this picture anywhere in the game, so where did it go? Cancelled in a later version because Atari ran out of memory on the card, or did I miss out on a part of the game?

snap43_3EAA274B snap61_0B6DEDE2 snap59_7E07DADB

Walkthrough (Spoiler alert)

The actual walkthrough is too long for this blog post. I have uploaded it to the Media area of this blog.

You can find the PDF file for the walkthrough here.

Posted in Tutorial | 1 Comment

Completing Chip’s Challenge game

To be honest, I do not remember whether I completed the Atari Lynx game Chip’s Challenge myself back at the time. Anyway, yesterday evening I sat down, looked up the level start code for the final level and gave it a spin. I quickly realized that I either had to use every memory muscle in my brain to finish this level, or make some notes. Well, some notes turned into a complete level map. Here is the layout of the final level:

Chip4before_7C403959

You start off at the place where Chip is shown. You first need to get the four keys to consecutively open the yellow, blue, red and green door. Then you head into the teleporter and find out you need to shove some bricks/boxes, brown thingies. Easy enough, except: underneath some of the boxes is fire, roasting your fine, nerdy buttocks. By trial and error you can find out which ones are safe to use, which ones are not. You will have to remember those. That’s possible because there is no randomization involved. You will have to try each and every box until you find the exit to finish the game behind one of them.

Spoiler alert!!!

You can save some time looking at the map below. It shows what is beneath a box, if something is there at all. So the fire indicates hotness beyond your ability to handle. The question marks will say: “This spot would be too obvious!”. Finally, the exit is shown to be at the top row, slightly off to the left side of the middle (second block from the middle). Here’s the map with the locations:

Chip4after_220639F0

Once you reach the exit, you are welcomed by the end sequence. Melissa is hugging you for completing this quest and takes you to the prom “E-prom”.

snap31_181122B8 snap32_3753C98B snap33_0FAD4D61

For your entertainment I also uploaded a speedrun of the level to Youtube.

Speedrun of level 149 “Special” of Atari Lynx game Chip’s Challenge

Have fun!

Posted in Tutorial | Leave a comment

Maps of “Todd’s Adventures in Slimeworld”

These maps have been in my folder for a very, very long time (around 1992). I thought it would be a shame to see them go to waste.

When I was still in university I had too much time and an Atari Lynx with “Todd’s Adventures in Slimeworld” to boot. A great combination. I drew all maps of the single player adventures by hand and stuck them in a folder. Today, I used my scanner to scan each of them. Then I stitched together the individual pages and came up with the maps you can see here. I hope you enjoy them and find them useful. Pay special attention to the map for adventure 6 (Arcade): it shows the easter egg to the zit-popping game.

snap30_406919E4

Let me know what you think.

Adventure 1: Easy

SlimeWorld-Adventure-1---Easy-25percent_31523B0A

Adventure 2: Exploration

SlimeWorld-Adventure-2---Exploration-25percent_0E41C99A

Adventure 3: Action

SlimeWorld-Adventure-3---Action-25percent_02E88F90

Adventure 4: Suspense

SlimeWorld-Adventure-4---Suspense-25percent_24DBA231

Adventure 5: Logic

SlimeWorld-Adventure-5---Logic-25percent_280D8A19

Adventure 6: Arcade

SlimeWorld-Adventure-6---Arcade-25percent_5DAAF989

Legend

Key Description
Number Spawn point (see lookup list at right of map for start code)
G Gem
SG Super gem
M Megabomb
V Snapper
B Bait
S Shield
P Gun powerup
J Jetpack
C Cleanser (changes slime pool to water)
R Mushroom
Blue Water
Green Slime
Green (marked M) Moving slime
Double line Passway (door or ceiling)
Brown edge Bouncy slime
Red edge Sticky slime
Blue edge Ice
Posted in Tutorial | 5 Comments

Running Atari Lynx emulator on a Windows Phone 7

The implementation of the emulator for the Atari Lynx has been progressing steadily. I thought it would be a good time to show a particular point of progress: a working implementation of the emulator running on a Windows Phone 7.

Todd’s Adventures in Slime World running on Windows Phone 7
Update: here is another video of the emulator running in Windows Phone 7 emulator.
Two other games (Dirty Larry and Electro Cop) running on WP7

Some details:

The emulator core is used in a XNA Game Studio 4.0 implementation for Windows, Phone 7 and Xbox 360 client. The Windows and Phone 7 implementations work correctly (give and take the remaining bugs and mayor performance issues), but the Xbox 360 variant doesn’t work.

As you can see in the video the framerate is pretty dramatic with an estimate of 2 fps (where 0.2 would probably be more accurate). The Windows version can run at 60 fps, but the Windows Phone 7 doesn’t even come close. The Windows Phone 7 emulator can run most games at 25 fps. This is something that needs to be investigated. There were no performance optimizations made just yet.

You can find the source code for the emulator at lynxemulator.codeplex.com. Suggestions for improvement are very welcome.

Pepijn Sitter helped develop part of this code. He refactored the controller handling implementation and did some first, rough implementation of the gestures for the Phone, so we could at least get past the start screen. (Which didn’t work out as expected). Thanks Pepijn.

Posted in Tutorial | Leave a comment

Encryption of Atari Lynx ROM programs

The Atari Lynx uses cartridges that hold the programs that are loaded into memory. The bootstrap process of the Lynx uses a bit of built-in ROM that will read the contents of the cartridge. It would seem that it is easy to create your own ROMs, put them on a cartridge and use them in a real Lynx device. Atari wanted to prevent this kind of homebrew development in order to maintain high quality. Therefore, they programmed the bootstrap process in the built-in ROM to read and check the contents of the cartridge. It uses a encryption algorithm to encrypt the header of the game and calculate a checksum for the entire contents.

In 2001 the encryption programs for the Atari Jaguar and Lynx were released into the public. The content is no longer available at the location mentioned in the Atari Lynx FAQ: http://cgexpo.com/encrypt/lynx.htm, but has moved here: http://cgexpo.com/encrypt/lynx.htm. The Web Archive still lists the content here.

Harry Dodgson has a part of his website dedicated to the Lynx and explains the encryption on an Amiga machine. He once created a program that will add a 420 byte loader in front of an unencrypted ROM image. This can be found here at his homepage of 2001.

  1. Perform the original encryption on the ROM file.
    You will need the Amiga programs for now. These can be found here. You will also need a Amiga emulator like WinUAE or Amiga Forever. It seems like a good idea to convert the source code into a Windows program that is easy to use.
  2. Use the Gauntlet 3 flawed header.
    Two strategies here: Load the game in unchecked areas or a trojan file that bypasses ROM check. You can find more about the Gauntlet glitch at Bastian Schick’s BLL page. Bastian has captured the header code in two files that are inside of his BLL toolkit: bll\history\lynxboot.asm (the original header for Gauntlet 3) and lynxboo2.asm (
  3. Cheat with a general purpose header
    Add Harry’s loader in front of game.
    Use Karri’s files to built ROM header. See his
Posted in Tutorial | Leave a comment

Compiling Handy 0.95 for Windows

Quick run-through to get the Handy sources to compile for Windows using Microsoft Visual Studio 2010 (or Microsoft Visual C++ 2010 Express, which is a free download).

handylogo_69FF22D3

Download these first:

Install Visual C++ and the DirectX SDK. Unpack the sources of Handy.

Open the folder of the Handy sources and find the Handy.dsp file. Doubleclick to the open it in Visual C++. It will prompt you to convert the project. Choose Yes in the dialog.

image_1D2B3670

Save the solution. You must specify the location of the .sln solution file. The root of the project will be an appropriate location.

image_48EB6492

Right-click the Handy project and open the Properties dialog. Go to the C/C++ section and enter a new entry under “Additional Include Directories”. This should be “C:\Program Files (x86)\Microsoft DirectX 9.0 SDK (August 2005)\Include” if you installed the DirectX 9 SDK to the default installation directory.

image_16FBC1D7

Next, go to the Linker section and add “C:\Program Files (x86)\Microsoft DirectX 9.0 SDK (August 2005)\Lib\x86” to the “Additional Libraries Directories”.

image_06CBE5DF

When you first try to compile the sources you will get a number of errors. Fix each of these, bullet by bullet and recompile in between:

  • 22 errors: error C1083: Cannot open include file: ‘strstrea.h’: No such file or directory
    Apply fix 1.
  • 96 errors: related to endl, ostream&, ostrstream and ostrstream& references and declarations in error.h
    Apply fix 2.
  • 43 errors:

    error C4430: missing type specifier – int assumed. Note: C++ does not support default-int
    error C2664: ‘CWnd::OnActivateApp’ : cannot convert parameter 2 from ‘HTASK’ to ‘DWORD’
    error C2440: ‘static_cast’ : cannot convert from ‘void (__thiscall CLynxWindow::* )(WPARAM,LPARAM)’ to ‘LRESULT (__thiscall CWnd::* )(WPARAM,LPARAM)’
    error C2065: ‘loop’ : undeclared identifier
    error C2065: ‘endl’ : undeclared identifier

    Apply fixes 2 to 6

This is the list of fixes you will need to make to get the sources to compile.

  1. Replace #include “strstrea.h” in error.h with these two lines:
    #include <iostream>
    #include <strstream>
  2. Prefix endl, ostream&, ostrstream and ostrstream& declarations with:
    std::
  3. Change line 1192 in Lynxwin.cpp to
    static bool firsttime=0;
  4. Change HTASK hTask in line 2365 of Lynxwin.cpp and line 325 of Lynxwin.h to
    DWORD hTask
  5. Comment out the lines 868 and 869 of Lynxwin.cpp. I do not know how to really fix these errors yet.
  6. Add a new line at 1552 in Lynxwin.cpp with:
    ULONG loop=0;
  7. Change line 195 of Debuggerwin.cpp to:
    for(int loop=0;loop<mWinHeight;loop++) LineOutput("");
  8. Change line 550 of Debuggerwin.cpp to these two:
    int loop;
    for(loop=0;loop<mLineInput-1;loop++)
  9. Change line 487 of codewin.cpp to these two:
    int loop;
    for(loop=0;loop<MAX_CPU_BREAKPOINTS;loop++)

After that you should have a Handy C++ project that compiles, links and runs correctly.

For the developer version of Handy you should add a preprocessor definition _LYNXDBG to the project:

image_0D0EA86E

The developer version gives you a Code, Debugger and Graphics dump window and ability to debug/step-through the 65SC02 code. You do not have to change this if you switch to another configuration “Debug Dbg” or “Release Dbg”. You will have to go through the process of setting the Include and Library directories again.

You will also get new compile errors. To fix these, apply fix 7 to 9 to get rid of those.

Run the Handy emulator, find yourself LYNXBOOT.IMG if you have got the boot image and some rom images for (homebrew) games.

image_19F5105A

For your convenience, you can download the revised sources here:

To be determined

Posted in Tutorial | Leave a comment

Come Lynx with me

One of the differentiating features of the Atari Lynx was its ability to link together up to 18 Lynx devices using a set of cables. This allows for multiplayer games,

You need at least two Lynx devices and at least one ComLynx cable to make a connection. For more Lynxes you require an additional ComLynx cable for every extra Lynx. The ComLynx cable has two male connectors at either end. One end has a split cable with a female connector.

IMAG1690_22FE3BD6

The single male side of a new cable can be connected to the female connector and to the next Lynx at the split end. This way you can connect an potentially unlimited chain of Lynxes. The practical limit is around 18 because of communication overhead and something called “pull-ups”.

IMAG1686_28D8DF6FIMAG1684_2E475013IMAG1684_2E475013IMAG1684_2E475013IMAG1684_2E475013

and so on.

There were several games that used this capability for multiplayer support. Each Lynx will need a separate copy of the game. There is a possibility to game

Title Players Title Players
Awesome Golf 1-4 Pit-Fighter 1-2
Baseball Heroes 1-2 Raiden 1-2
Basketbrawl 1-2 Rampage 1-4
Battlewheels 1-6 Rampart 1-2
Battlezone 2000 1-4 Robo-squash 1-2
Bill and Ted’s Excellent Adventure 1-2 Shanghai 1-2
California Games 1-4 Super Off-Road 1-4
Checkered Flag 1-6 Super Skweek 1-2
Double Dragon 1-2 Todd’s Adventures in Slime World 1-8
European Soccer Challenge 1-2 Tournament Cyberball 2072 1-4
Gauntlet: The Third Encounter 1-4 Turbo Sub 1-2
Hockey 1-2 Warbirds 1-4
Jimmy Connors Tennis 1-4 World Class Soccer 1-2
Joust 1-2 Xenophobe 1-4
Lynx Casino 1-2 Xybots 1-2
Malibu Bikini Volleyball 1-4 Zarlor Mercenary 1-4
NFL Football 1-2

The ComLynx-able games can be recognized by the yellow triangle at the bottom-right corner of the box. This shows that players can “Lynx Up” and the maximum number of players. The game “California Games” is an exception, in that is says “1 To 2 Players” on the box, where a total number of 4 players are possible.

Todd's Adventures in Slime World - Box Front image_66F1FA20

and pay special attention to the corner.

Here is a video that shows two Lynxes connected together:

Remarks found all over the Internet:

  • “The ComLynx does not have any hardware bugs. But the format is pretty much fixed to start bit, 8 data bits, even parity, 1 stop bit. And the only sensible baud rates are 9600 and 62500. The ComLynx has a combined Rx/Tx pin and it can sense if two Lynxes transmit at the same time. … The Lynx has +5V on one pin that is enough to power up the communications cable.” – AtariAge forums
  • ComLynx was originally developed to run over infrared links (and was codenamed RedEye).[4] This was changed to a cable-based networking system before the final release.” – Wikipedia
  • “UART (for ComLynx) (fixed format 8E1, up to 62500 Bd)” – Wikipedia

Bugs in the ComLynx (from the Lynx development manual):

  • “A design error causes the power up state of the output to be TTL high, ALL code must set the TXOPEN bit in order to fix this”
  • “Well, we did screw something up after all. Both the transmit and receive interrupts are ‘level’ sensitive, rather than ‘edge’ sensitive”

Links that seemed useful to me:

Here are some observations I made, which I hadn’t read on the Internet anywhere:

  1. Some (maybe all?) ComLynx-able games can connect players while the start-menu/animations is displayed.
    In other words: as long as no player has started the game, other players can join by switching their Lynx on. Bear in mind the next observation. I always believed that the Lynxes needed to be powered on at the (near-exact) same time.
  2. When multiple Lynxes are linked together, the outsides of the chain can switch off, without disrupting the other connected Lynxes. The same goes for switching the Lynxes on at a later time (see previous point)
  3. You can disable the cartridge detection of the Lynx. In theory this should allow for multiple Lynxes to connect on one cartridge, provided that the Lynx have detection disabled and that the cartridge is read only at the startup of the game. Did anyone try this?

From the Lynx Frequently Asked Questions:

Q. What does “ComLynx” mean, exactly?
A. Some Lynx games allow multiple players to play together simultaneously. This works when each player has a Lynx game machine, and all of the machines are connected to each other via cables. The connection is the ComLynx port, and the cables are ComLynx cables. Games that support this mutiplayer simultaneous play are usually identified by the phrase “1 to N players Lynx up” on the box, the instruction manual, and/or the game card.

Q. Do all players “Lynxed up” via the ComLynx need a copy of the game being played?
A. Yes. All players need a copy of the game card.

Q. What’s the ComLynx port like?
A. There is limit of 18 players via ComLynx. In practice it may be possible to connect more units together, but to operate within specifications, the drivers in the Lynx cannot drive over more than 17 units with pull-ups on the serial ports. ComLynx runs from 300.5 to 62.5K baud. It works on a “listen and send” structure. Data transmission between Lynxes is done in the background, freeing up the CPU to run the game instead of communicating. It’s called “RedEye” in-house at Atari, named after an early idea of having Lynxes communicate with infra-red transmissions. It uses a three-wire cable (+5V/Ground/Data) and allows for bi- directional serial communications. The system frames messages in terms of 11-bit words, each consisting of a start bit, eight data bits, a parity bit, and a stop bit. The ComLynx port is used solely for communications; it can’t be used to control other aspects of the Lynx, though in theory it can be used to send signals to external devices.

Q. Sometimes a multiplayer ComLynx game will freeze up. Why?
A. A ComLynxed game will freeze if communication between the Lynxes is interrupted. If communications can be restored, the game will continue. The most common cause of this problem is a fray in one of the ComLynx cables, or a loose seating in one of the ComLynx jacks. Communication is broken, and the game “freezes”. Jiggling the cable or reseating the jacks may fix the solution temporarily, but the best cure is a new cable.

Q. I hear there’s a ComLynx port on the Atari Jaguar. How does that work? Can I connect my Lynx to it? Will there be a Lynx adaptor for the Jaguar?
A. The ComLynx port allows communication between Jaguar units and Lynx units. In theory, it would be possible to daisy-chain multiple units of either machine type for multiplayer games. At the current time, however, no such plans are in the works. Instead, it is seen as allowing Lynxes to be used as peripherals: software can be developed to allow Lynxes to be part of a Jaguar game as controllers. An adaptor to allow the Jaguar to play Lynx games is not currently planned.

Posted in Tutorial | Leave a comment

Dirty Larry Renegade Cop

Some time ago I decided to finish some of the Atari Lynx games that I hadn’t played that much or hadn’t completed. This post is on Dirty Larry Renegade Cop, a nice side-scrolling shooter/bash’m up in the tradition of games like Double Dragon (also a Lynx title). In a future post I will explain how I managed to complete the game.

On a personal note: I pretty much enjoyed the game after some practice, but was glad I could play the game with the Handy emulator to save the game at different points of progress. Especially defeating the first boss (Mr. Snuff) was pretty much impossible without being able to reload the game at level 5. The bullets are your lifeline as much as your health is. No bullets means a certain death. You will (almost) always take damage using your fists. The more difficult villains like the machinegun toting Rastafarian are hard to beat.

For now, here is some information and nowhere to be found screenshots of the game. Enjoy.

Synopsis (spoiler-alert!)

You are a police cop with an attitude and a will of his own. You are just gotten yelled at by your boss and learned that you do not get a car anymore.

Larry’s boss: “And darn it Larry, that’s the third car this week! You need to learn to respect police property! As of this moment, you walk or take the subway! Judge Smite just threw out another case! Get to the Knight Shade Hotel, this time with a proper warrant, and bring in Harold Snuff, A.K.A. Mr. White, an iceman boss. The charge is drug trafficking…

So, off you go to the Knight Shade Hotel on foot. First you travel to the subway, ride a cart on the sub and deal with a lot of criminals and scoundrels along the way. You face gun and knife wielding gang members, big mommas with chains, biker dudes, baseball club swinging crazies (like in the movie The Warriors) and self-igniting pyromaniac  and arrive at the hotel armed with a machine gun you found in the subway. In the meantime someone known as Mr. Big has a conversation with Harold Snuff.

Mr. Big: “Mr. Snuff, I require a favor of you. There is a cop that I need out of the way.
Mr. Snuff: ”Consider it done, Mr. Big…

You work your way through three levels of the hotel with assorted baddies and end up in a confrontation with Mr. Snuff/White. After you have defeated him you acquire grenades and head back to the office.

Larry’s boss: “Congratulations, Larry, you finally did something right! Mr. White goes on trial today. We got the address of a warehouse from one of his papers. Check it out and remember, ask questions first!

So, foot patrol to the warehouse along the sidewalks of Steelburg and through the subway. As you leave the subway there is another conversation, this time between Mr. Big and Dr. Electro.

Mr. Big: “Dr. Electro, it seems that Mr. Snuff was unable to do his duty. Would you mind showing Larry the light?
Dr. Electro starts blinking with electricity.

You enter a warehouse and get confronted with more villains, including grenade throwing mad scientists. At the far end of the warehouse you discover a trap door and open it to descend into the sewers. Near the end you battle against Dr. Electro. His electrifying rays may hurt you, but he is no match against the awesome power of your grenades and machine gun. You exit the sewers and find you are in… the courthouse of Judge Smite.

Yet another conversation takes place. Mr. Big has a talk with

Mr. Big: “Office Stobbe, one of your detectives has been harassing my men. Could you see that it stops?
Office Stobbe: “Yes sir, I’ll get a few of my men to have a talk with him…

Office Stobbe must be a quick guy, because you are faced with a dozen or so corrupt cops that want to have a “talk” with you. They use a lot of bullits to do the talking. Finally, you reach the office room of the courthouse and find that none other than Judge Smite is waiting for you. He starts throwing his wooden hammer at you and hammers the floor to make earthquakes. A big man and hard to defeat. You manage to do so any way.

As it turns out, Judge Smite is actually Mr. Big! Your actions will put Judge Smite behind bars for a long time.

The levels

Level 1 and 6, 2 and 7, 4 and 5 are pretty much the same levels. The levels 5, 9 and 10 have Boss battles with Mr. Snuff, Dr. Electro and Judge Smite. After defeating the corrupt judge you have finished the game and end credits are displayed.

Level 1: The Steelburg Sidewalks

snap71_5209B69D snap72_14B8DC09 snap95_1DC5678A

Level 2: The Steelburg Subway

snap96_70D004AE  snap98_79042A45 snap29_0B849E97

Meanwhile

snap01_2DE109B6

Level 3: The Knight Shade Hotel Ground Floor

snap02_51B9BB43 snap05_432E9951 snap04_5281FB60

Level 4: The Knight Shade Hotel Second Floor

snap07_7EBE8244 snap11_6D1E71AC snap09_70DC167C snap94_7B4CC4CF

Level 5: The Knight Shade Hotel 3rd Floor

snap08_1297C941 snap18_419A0518snap19_1360095E snap21_42624535

Back at the office

snap22_1F51D3C5

Level 6: The Steelburg Sidewalks

snap23_29C28218 snap25_6AA151BC  snap27_0F526934 snap28_4CFF50F0

Level 7: The Steelburg Subway 2

snap00_76E72B7C

Meanwhile

snap30_2982AC8B

Level 8: The Warehouse

snap31_66572E5D snap33_02383D89  snap36_5A45185C snap38_3AD2C1C9

Level 9: The Sewers

snap39_545A4EF6 snap41_3698C437 snap40_28E6082F 

Level 9: Boss battle with Dr. Electro

snap46_78DBB6AD snap47_3041C7DC  snap44_555F1248 snap50_0C58F082

Meanwhile

snap51_2B2F6460

Level 10: The courthouse

snap52_4F7448E2 snap54_6C99F0EC snap55_1791DEF2

Level 10: Boss battle with Judge Smite

snap56_7C790FE3 snap59_212A275B snap60_502C6332

End credits

snap61_60C45E20 snap64_1D98DFF3 snap69_300130A8

Regular villains (in order of appearance)

image_35036E57 image_3F5492B7 image_4CBAA5BD image_1E612010 image_53017C4B

image_5DBED3A0 image_52291661 image_75E23DFB image_0A678D7A image_305D3DD0

Posted in Tutorial | Leave a comment