
Description: IBM’s failed aim at the home computer market.
Manufacturer: International Business Machines
Made in year(s): 1984-1985
Country of origin: U.S.
Status: Working
Ah yes, the Peanut… pardon, the Model 4860. The only x86 “PC” that has cartridge slots, cassette input, infrared keyboards and a plethora of issues at the same time. It is the son of the PC senior, except the apple fell far away from the tree this time. But let’s not blame the parent nor the upbringing. To start with, the 5150 was a business machine, but the 4860 never aimed to be – in the home computer segment, the plan was to shove away Apple and the popular 8-bit toys of the era, such as the Commodore 64, or perhaps ZX Spectrum over the pond. As we all know, bad design, marketing and engineering choices, cost-saving measures that made the Junior incompatible with the PC, whilst sporting a hefty price tag, spelled doom for this branch of development of the PC, pulling it out of production in just over a year. So, why the hell would I bother with one? 🙂
 During BIOS POST and the 128K ramcheck
And the answer to that rhethorical question is, of course, the general quirkiness! But firstly, to put things into perspective, similarly as I have done in the article about the IBM PC, I have to say that there’s tons of good material about the Junior available online. So I won’t be mentioning all the quirks and features of the machine, as that would be far off the scope of this article. So, without further ado, let’s start!
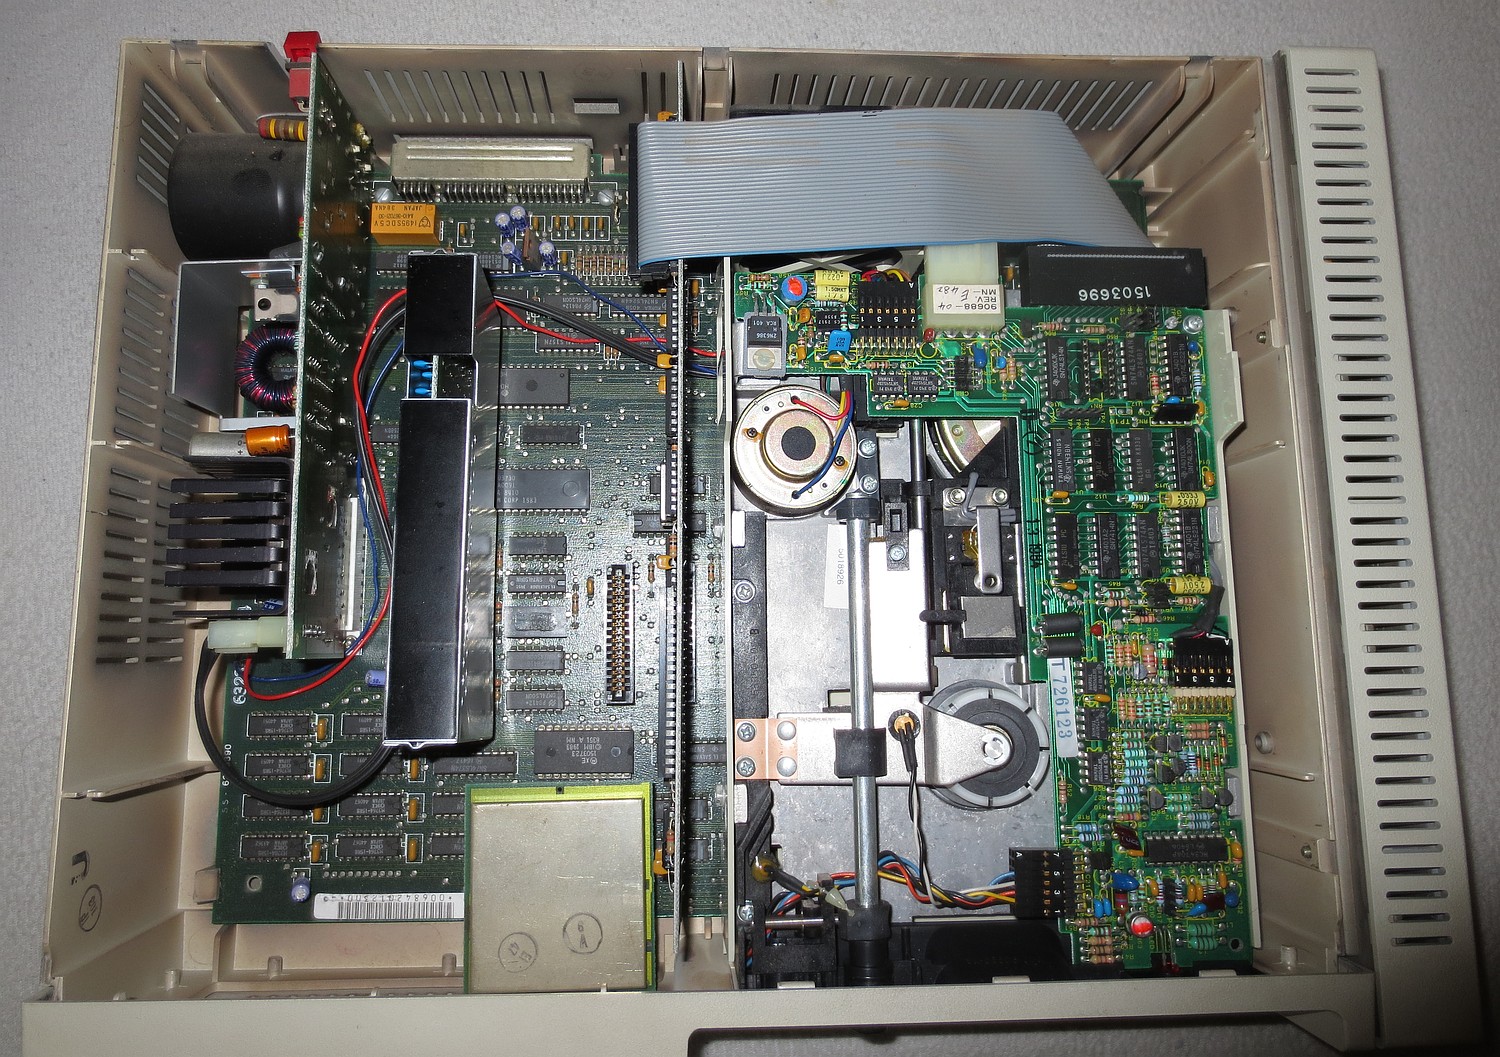 Taking out the only major metal part of the computer case: the top cover…
From left to right: an AC-to-DC converter (+5V, +12V, -6V),
original 64K RAM addon card, another 64K on mainboard underneath,
an empty slot for a proprietary modem card, keyboard IR receiver underneath,
the DD floppy controller,
a Qume Qumetrak 142, 360K half-height drive, in a plastic caddy,
and an IBM expansion “sidecar” offering just 1 (one) parallel port. Yay!
Build: And here’s one of the primary distinctions against the IBM 5150: the build quality. The Junior is so cheap in this that it just feels like a broken gypsy toy! The case is so miniature, which makes the floppy drive look like some kind of a mutated beast, as it covers more than half of the mainboard.
Metals are used only where absolutely necessary, such as the electronic components, bus and I/O pins, the bare minimum of screws, and finally the floppy drive and the top cover, accomodated for a heavy CRT monitor to rest on top. Plus perhaps some shielding between the expansions (“sidecars”). Endut. Hoch hech.
The rest is ABS and polystyrene, nicely brittle after all those decades, ready to crack and snap on the first occasion, or if you are eyeballing it. That includes all the case panels, mainboard mounts, top cover tabs, separators between connectors, you name it. Internal expansion cards, including the thick PSU part, have no mounting tabs and screws like in a proper PC; they just sit there and wobble in their respective slots, with the top cover down. And, where some shielding is necessary, there’s conductive spray paint on the plastic panels. Done.
 Bottom panel of the PCjr.
Yes, these two push-in spacers are used to hold the whole floppy drive and fan.
Had this piece seen any serious usage, the grille would have snapped all the way.
Even the caddy, where the floppy drive sits in, is ABS plastic. How does it sit inside the chassis? Through two plastic snaps that go through the holes of the mainboard, pictured above. You push them in with the top cover off, and the whole thing comes flying out from the case if you’re not careful. Do it enough times and eventually, the spacers will snap off completely, allowing the heavy drive and fan to just move around freely. It’s fantastic!
Same thing with the back panel connectors. The plastic spacers between these will break off readily if you push on a connected cable from the wrong side, and it’s very easy to bend the pins if you don’t take care. Also, the pins are recessed, and they’re right out there and unprotected – i.e. not something that you would just connect once and forget, like an internal component.
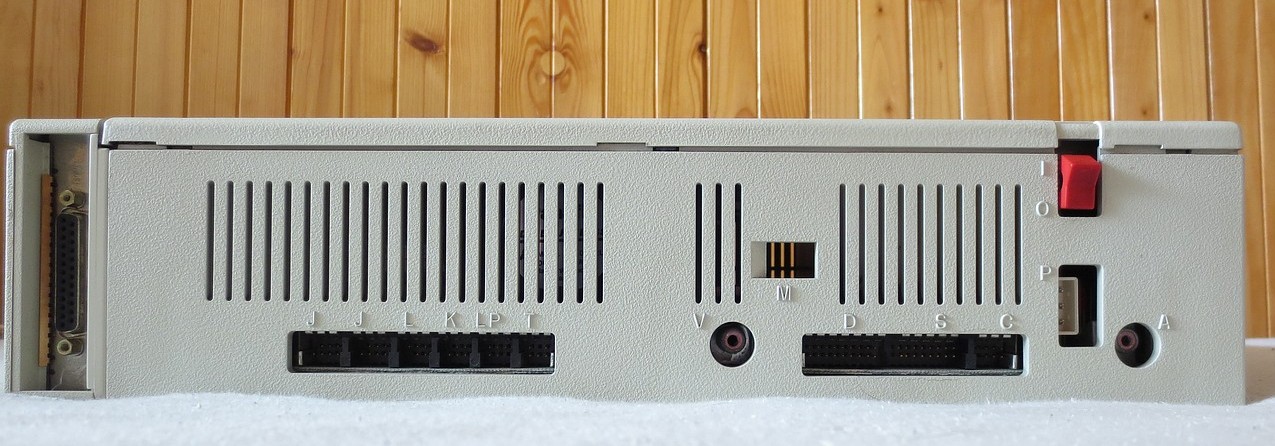 The cryptic markings of the back panel features. From left to right:
a classic parallel interface from the expansion sidecar (hurray!),
2 joystick ports “J”, an undocumented “spare” connector “L”,
external “K” keyboard connector, “LP” for a light pen,
external RF modulator “T” (for “Television”), composite NTSC video “V”,
an “M” hole for the optional modem card,
“D” is TTL video for the 4863 monitor or a CGA-compatible through an adapter,
“S” for a serial device, “C” is the cassette interface,
power supply switch and the mains transformer AC connector,
and finally, the 3-channel audio chip output “A”.
Mainboard: This has been quite consistent during the production’s short run. The heart of the machine is a socketed Intel 8088 with 64K DRAM soldered onboard; the more expensive models came from the factory with another pre-installed 64K RAM addon card for a maximum of 128K, and a floppy drive with a controller card.
The board does not have an accessible ISA interface – it contains four custom card slots that are all accustomed to fit exactly one PCjr component and nothing else. The very first mandatory interface card is the AC/DC converter (yes, the PCjr runs from a small mains ac transformer), the three optional ones are designed to fit the 64K RAM addon, a PCjr modem card and a floppy interface. In this order.
This means that the only way to add new functionality to the PCjr was through an external “sidecar” bus, which was a stackable expansion interface, unique to the PCjr, to the right of the case. From the factory, PCjr usually came with one sidecar and that’s the Printer Attachment. The measly internal power supply was good enough for two sidecars at maximum, then you’d need a “booster”. Also, stacking these sidecar modules on each other, increased the total width of the Junior’s case. Externally, the modules were plastic and not load-bearing, so the monitor had to sit on the metal top cover of the Junior only, i.e. with too many expansions, not nicely in the center. Now you know why they named them “sidecars”… they are quirky. Just like driving a real sidecar 🙂
The assumed “compatibility” with an IBM PC was adhered to only at the BIOS level, i.e. utilizing the real mode interrupts. The memory and I/O port layout of a Junior is completely different than that of a PC, with new features added and the others missing.
 The IBM-branded Qume floppy drive contains a mechanical interlock which won’t close the door without a disk in
Graphics: The video interface is on-board and, as known, shares video RAM with the system RAM… this means that the higher the resolution is, the lower the available free memory is. For this reason, the cheaper, floppy-less 64K models were limited to a 40×25 text mode, and low resolution graphics only, practically rendering them useless to run anything besides ROM BASIC.
The video interface (internally called a “Video Gate Array”, not to be confused with a VGA) is practically an improved CGA, using the same Motorola CRTC, and is also responsible for the DRAM refresh, introducing additional wait states. This means that anything running under 128K actually runs slower than on an IBM PC… Compared to a vanilla CGA, the PCjr graphics add a couple of new video modes, such as 320×200 with 16 colors, and 640×200 with four colors; these two were limited to 4 and 2 colors in the CGA respectively. I’m not including the 160×200 16-color mode here, as that’s practically a hack of the 80×25 text mode.
 The Cluster Attachment sidecar, allowing the Junior to be connected to the (long forgotten) IBM Cluster network.
I use the empty shell to hold a 640K SRAM memory expansion module.
RAM expansion: As the PCjr only came with either 64K or 128K of stock RAM, the only way to expand the memory was to use a third party sidecar, which – at the same time – could also contain more connectivity options, or various ROM patches to address Junior’s quirks. However, the non-standard memory layout of the Junior creates a video RAM memory hole at address 128K minus the video buffer size (depending on current graphics resolution), so the Junior requires a special DOS device driver for memory relocation – otherwise, DOS won’t see the extra memory at all, despite the BIOS POST RAM check going through it.
Usually, the onboard RAM under 128K can be then reserved for a RAM disk or similar, and it is colloquially called the “slow memory” as it is plagued with the slow DRAM refresh of the video controller. In the Junior, anything above 128K, incl. the system or cartridge ROMs, can run at least as fast as on a proper 5150 PC, because the memory expansion sidecar takes over its hardware memory management. (Or static RAM can be used.)
However, the RAM expansion sidecars cannot be used in the cheapest Junior that has only 64K of base RAM – they require the IBM 64K addon card in order for the memory to be contiguous between the 64K and 128K offsets.
There’s also an internal bug in the PCjr Diagnostics invoked with the Ctrl+Alt+Ins keypress. If there’s more than 128K of RAM on the system, the RAM check that goes through slowly through the Diagnostics main screen, overwrites the video buffer and corrupts the screen. However, since the Diagnostics are executed from a ROM above 640K, the system has not crashed at this point, and the screen can be refreshed again by making a selection and going back to the main menu. The Diagnostics’ RAM check continues past the video buffer.
 Makeshift cables for the PCjr back-side connectors, as adapters to more standard interfaces.
The rightmost one is an exception: it fits the PCjr monitor plug, for it to be able to connect to a classic CGA video card, with optional audio.
Connectors: Here’s how IBM kept the production costs low and tried to increase sales profits: you want to connect something yourself, purchase our optional adapter. But, compared with a certain competing fruit company, the Junior was not a sealed black box full of proprietary connectors and crazy vendor lock-ins. Similar to the PC, they kept the architecture open too. Hell, the PCjr Technical Reference even contains a full disassembly of the system BIOS… and a “service plug”, that allows burn-in tests and advanced diagnostics, just shorts a couple of lines of the joystick interface. The same goes with the bus connectors and their pinout – it’s all there, and the interface is a classic 2,54mm DuPont/Berg pin-header.
The original “chiclet” keyboard on the left, a revision on the right
Keyboards: Without a functioning one, a PCjr is of so much use as a door stopper… Well, almost. These communicate via a different protocol than the standard XT keyboard, through an IR link, and they also require batteries or an optional adapter to connect them to the mainboard via a cable, disabling the infrared interface. In addition, the system handles them not through IRQ1, but via the non-maskable interrupt. And, since the vanilla PCjr does not have a DMA controller, and performs all disk operations through PIO mode, keystrokes get lost during floppy access.
Originally, the Junior came with the “chiclet” Freeboard… IBM later upgraded these to a more conventional layout, sometimes even for free. Both of them are mushy rubber-dome keyboards with long key travel, so they might have gotten the ridicule in the world of heavy-duty, clicky Model M’s, but really – I have seen worse. Just look at keyboards of cheap laptops nowadays. The inability to use a normal PC keyboard in a Junior, however, persists. At least, without an external hack perhaps.
The infrared link has some issues if exposed to mains-frequency lighting, i.e fluorescent tubes ran through a choke and starter. However, utilizing modern high-frequency inverters, or those found in CFLs, and having the keyboard in a reasonable distance within the infrared sensors, does not seem to cause major problems.
If using the IR link and not the cable, it’s a good idea to remove batteries from the keyboard when not in use – or, at least keep the RJ11 connector plugged, which will disconnect them. The keyboard circuitry is CMOS, nevertheless, the batteries will drain out someday, eventually resulting in “reverse charging” caused by different potentials of batteries in series, and subsequent electrolyte leakage. PCjr keyboards can be scarce nowadays!
 Shutting up noisy brush action in a Qumetrak 142, 5.25″ DD floppy drive.
It’s an El Cheapo with a commutated motor and a belt-driven spindle, but at least the front bezel is narrow enough to fit inside the hole of the front panel…
Video and audio options: A PCjr is best coupled with its monitor, the IBM 4863, itself a variant of the Mitsubishi AT-1332A, with a small audio amplifier and speaker added. The second option is to use a classic TTL monitor supporting CGA video, such as the IBM 5153, through an adapter. And last but not least, NTSC video out, either from the “V”-marked RCA jack, or through an external RF modulator through the “T” pin header.
Inside the PCjr, there’s a small piezospeaker for the PC Speaker output only. It does not utilize the output of the 3-channel audio generator chip, the SN76489 – this needs to be obtained from the combined “Display” pin-header, or from the “A” RCA jack.
Needless to say, the NTSC composite video can only be normally used with low resolution text or graphics only – there’s not enough bandwidth for the higher resolutions and things turn into a rainbow-colored mess. However, some CGA-supporting games utilize this quirk to extract more than 4 colors when used with composite video… but the PCjr video supports 16 colors natively already.
 PCjr monitor on top of a PCsr, connected into a CGA through a makeshift adapter cable.
The speaker inside the monitor was connected into an Ad Lib card inside the PC.
IBM 4863: This was the PCjr color monitor equipped with a small speaker, introduced shortly after the official release of the PCjr. Unlike the PC CGA monitor, the 5153, this one was specifically designed to sit on top of the Junior. According to the PCjr Technical Reference, the 5153 CGA monitor had to be placed away from the system unit of the Junior because of problems with interference. Sadly, I don’t own a 5153, but I had a plethora of EMI issues with the very monitor the PCjr was designed for, messing up floppy drive transfers. Also, unlike the 5153 CGA monitor, the 4863 PCjr monitor is designed to run from a 110v ac mains only. I’m running mine from a primary tap of a transformer, that came from some kind of a Soviet oscilloscope…
 Mitigating CRT monitor EMI issues with copper tape and a shielded-head Tandon floppy drive, instead of the Qumetrak one
Combined with the shielding, one of the actions that helped mitigate floppy data errors with the CRT monitor on top, was an addition of a blocking capacitor on the bus decoder of the Junior floppy controller card, and the wiring revision made in later controllers. (Come on, CRT monitors are huge by today’s standards, I didn’t want it to occupy more space by sitting next to the Junior…)
In addition, I’ve also drilled two holes into the back panel of the 4863 monitor, to adjust focus and maximum brightness on the flyback without having to dismantle the monitor, as it’s a pain in the rear end to “slot” the main PCB back into the plastic rails of the back panel. I have also performed a partial recap of the electrolytics as the monitor developed a blinking image or it gets out of focus sometimes. I presume the flyback might be on its way out, unfortunately – that might explain the EMI problems.
 The internals of the 4863 PCjr monitor
Cartridge and cassette BASIC: Yes, the PCjr supports two custom 2x32kB ROM cartridges in their respective front panel slots, just be careful that inserting or removing them triggers a reboot.
One of the special cartridge types, except certain games and ROM patches to address the quirks in the system BIOS, was the so-called cartridge BASIC. Yes, the vanilla PCjr contains a classic, cassette BASIC in an internal ROM on the mainboard, just as an IBM PC would, and it would also run after a failed boot attempt from a floppy drive – with the only difference being a different version number, and the default video mode of 40×25.
However, on a PCjr, to be able to use BASIC from DOS, the cartridge BASIC would have been required to be present in the slot. That means, calling IBM Disk Basic (BASIC.COM/BASICA.COM) under DOS on a PCjr would trigger a routine that would detect the presence of a cartridge BASIC and immediately halt the system with an error message “Cartridge Required” if it does not. This is in stark contrast with an original IBM PC, that only searched for the cassette (internal) ROM BASIC, which the PCjr also has, it’d then allow the Disk BASIC/BASICA to load properly (unlike on non-IBM PC clones that had to use Microsoft GWBASIC, or later QBASIC, because of the missing ROMs). Ah well, another attempt to extract money from the Junior users 🙂
The cartridge BASIC also adds a memory hook that detects if the user is in a DOS prompt session and runs itself after detecting “BASIC” or “BASICA” as a command typed in the DOS prompt. That means, it doesn’t even try to locate the two executables on the DOS diskette – on a Junior, the Disk BASIC executables do absolutely NOTHING except detect the cartridge BASIC slot presence.
 IBM Cartridge BASIC in a 27256 32K PROM.
The Cassette BASIC PROM is on a mainboard, like in the IBM PC.
Up front, there’s a piece of PU foam that blocks gunk from getting in.
This is a primal candidate for replacement, as the foam can get chemically aggressive over time, corroding the gold fingers off
With the cartridge BASIC in slot, it takes over the cassette BASIC ROM on the mainboard and it loads automatically if there’s no OS on a floppy disk present. However, it will only allow you to load and store BASIC apps on a cassette only, same as the cassette ROM BASIC would. And here’s the kicker: if you do run cartridge BASIC on a Jr from a DOS session, you get the very same screen and prompt – but this time with a hidden feature, you can also load and save BASIC apps to a floppy disk. And, the only way to get back to DOS is to reboot the computer.
To add insult to injury, attempting to execute cartridge BASIC in a DOS session which has a device driver to utilize the extra RAM over 128K by relocation, the system crashes outright with an “Out of memory” error. The only way to make cartridge BASIC work from DOS with the memory expansion sidecar, is to launch a DOS session without the expanded memory device driver.
And finally, the cassette ROM BASIC contains a Keyboard Adventure demo, which would have been used to teach children on keyboard usage, by pressing Escape right after a failed floppy boot. But by having the cartridge BASIC in slot, the cassette BASIC ROM never loads, and the Adventure does not trigger at all. And now my kids won’t know how to use a keyboard. I want my money back.
 FreeDOS booted from a vinyl record on the PCjr.
Screengrab from the composite NTSC out.
You can observe the low-bandwidth “rainbow mess” in 80×25
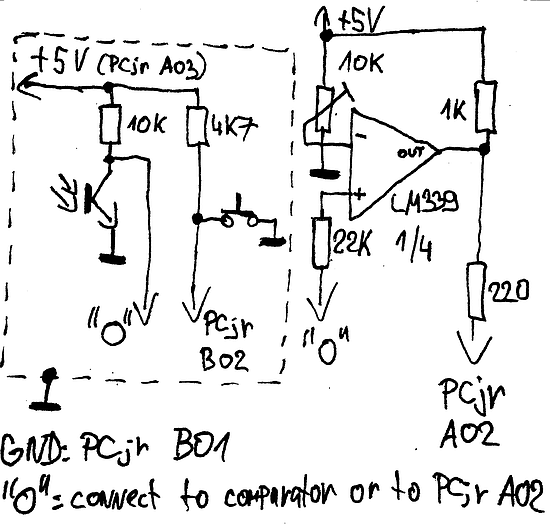
Vinyl record boot: The very same experiment I did with the IBM PC, also worked together with a Junior, since the software cassette modem is just direct copy-paste from the 5150. In here, I’ve modified the Cartridge BASIC PCB by soldering in an empty DIP socket for a second ROM, instead of installing the ROM into an unused extension like in the IBM PC. The makeshift cable between the “C” pinheader and a DIN cassette connector can be found above. Also, the vinyl bootloader PROM code was modified to coexist with the cartridge BASIC, and to move the FreeDOS vinyl diskimage far above the video buffer.
However, FreeDOS does not really like the way how the keyboard interrupts are handled in the Junior, and the 128K memory hole leaves a lot to be desired too, so it leaks memory through the video buffer after a couple of keystrokes and just crashes outright after that 🙂
Utilizing the light pen interface inside PCjr Diagnostics and Micrografx PC-DRAW for DOS
Light pen interface: perhaps one of the lesser known PCjr interfaces, but common to CGA cards employing the CRTC controller, usually they had an internal pinheader connection. I didn’t have a light pen, so I made one out of a broken bic pen, with some kind of Iron Curtain type phototransistor, TESLA KPX 81, a micro-switch, some copper shielding to drive the static electricity from the CRT monitor to ground, and a jack-to-PCjr adaptor.
 Light pen under Windows 1.01
It works, but I have to say that a rusty AK-47 on 300 yards is more precise than this contraption. In addition, since it works on the principle by determining which line is currently being scanned on the phosphor, it requires a CRT monitor, cranked on maximum brightness. Plus, it’s not that comfy to have your arm held up to a fat monitor, unless you fancy a “gorilla arm”… 🙂
 My makeshift light pen (dashed part) + a small adjustable comparator circuit to increase sensitivity, to work with reduced brightness.
However, the latter adds a delay to the pulse, so the hits are being registered off-set to the right, and also adds sputtering issues.
5150CAXX: Yes, the Junior will run the DOS cassette tape interface program, just as on a 5150. Here’s an example: loading a DOS game Ms. Pac Man that has been stored on a tape through 5150CAXX using its BASIC loader stub (option /WB). More on that in the original article.
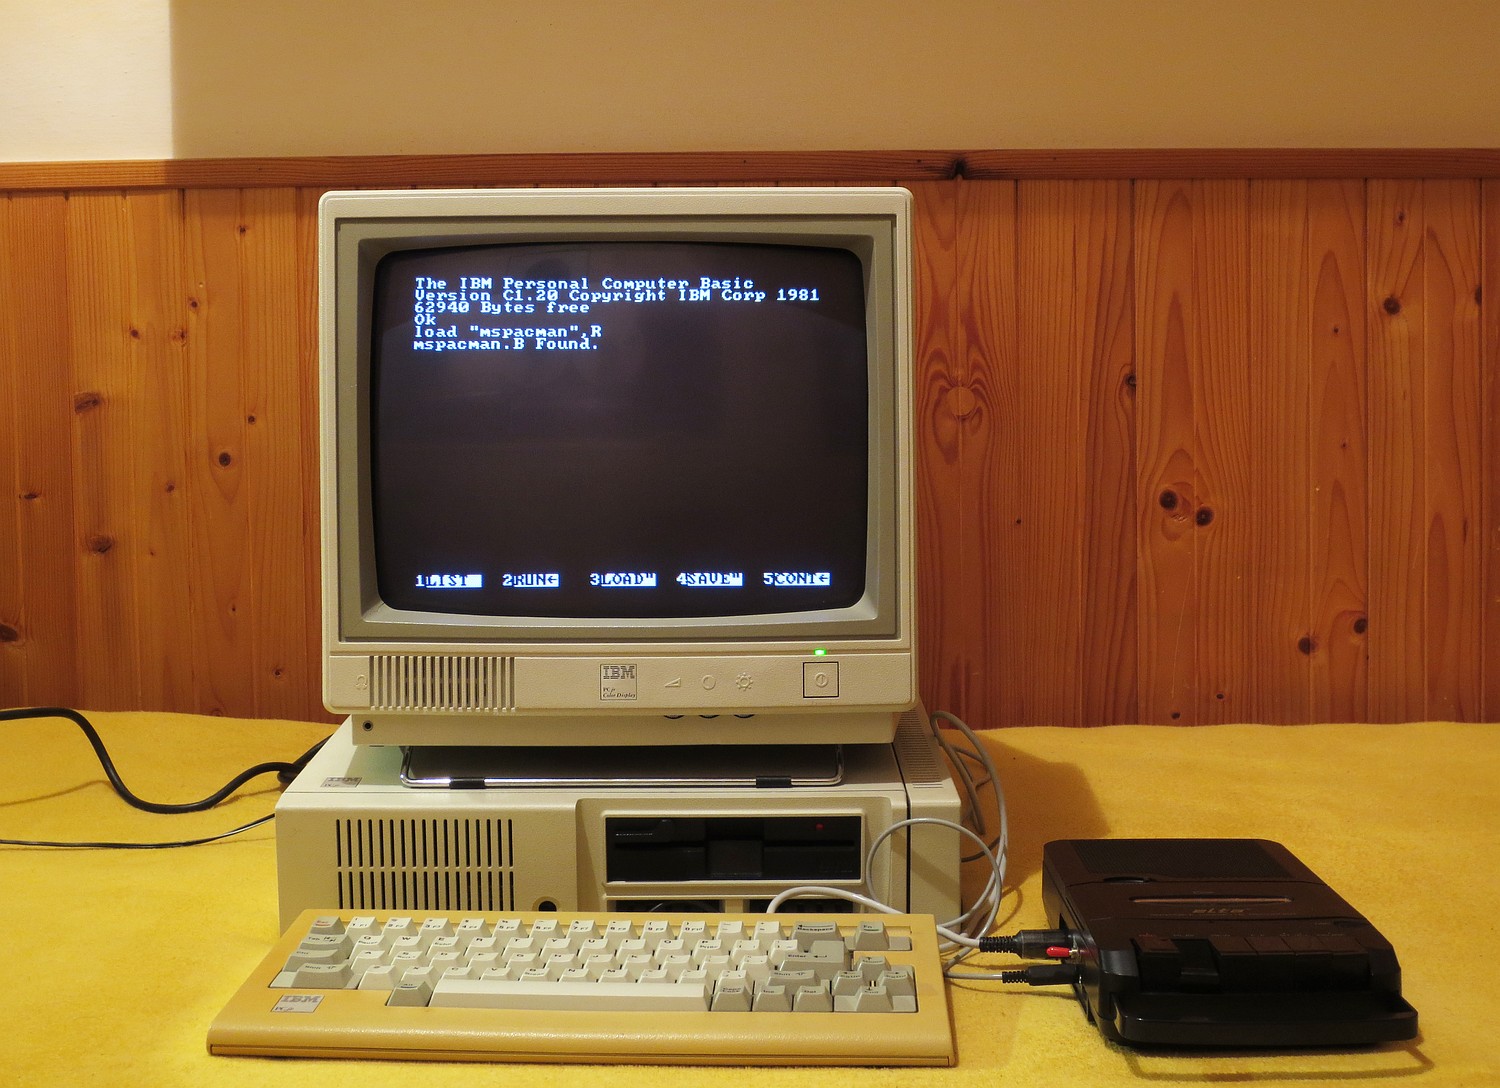 Loading MSPACMAN.COM, saved from DOS with 5150CAXX, from a tape recorder, under PCjr cassette BASIC
PCjr on the internet: Here’s an oddity – a Web browser on a PCjr, connected to the internet through a serial null modem cable to a Linux dialup server, running the pppd daemon.
This makes use of a DOS PPP stack and the Microweb web browser; a 360K floppy image with configuration is available here – check the readme for more details. This setup runs on an IBM 5150 just as fine, even on a more modern PC running the Windows Dial-Up Networking (DUN). However, on a PC you have the luxury of adding an Ethernet card, instead of simulating some woefully slow concoction over the serial port.
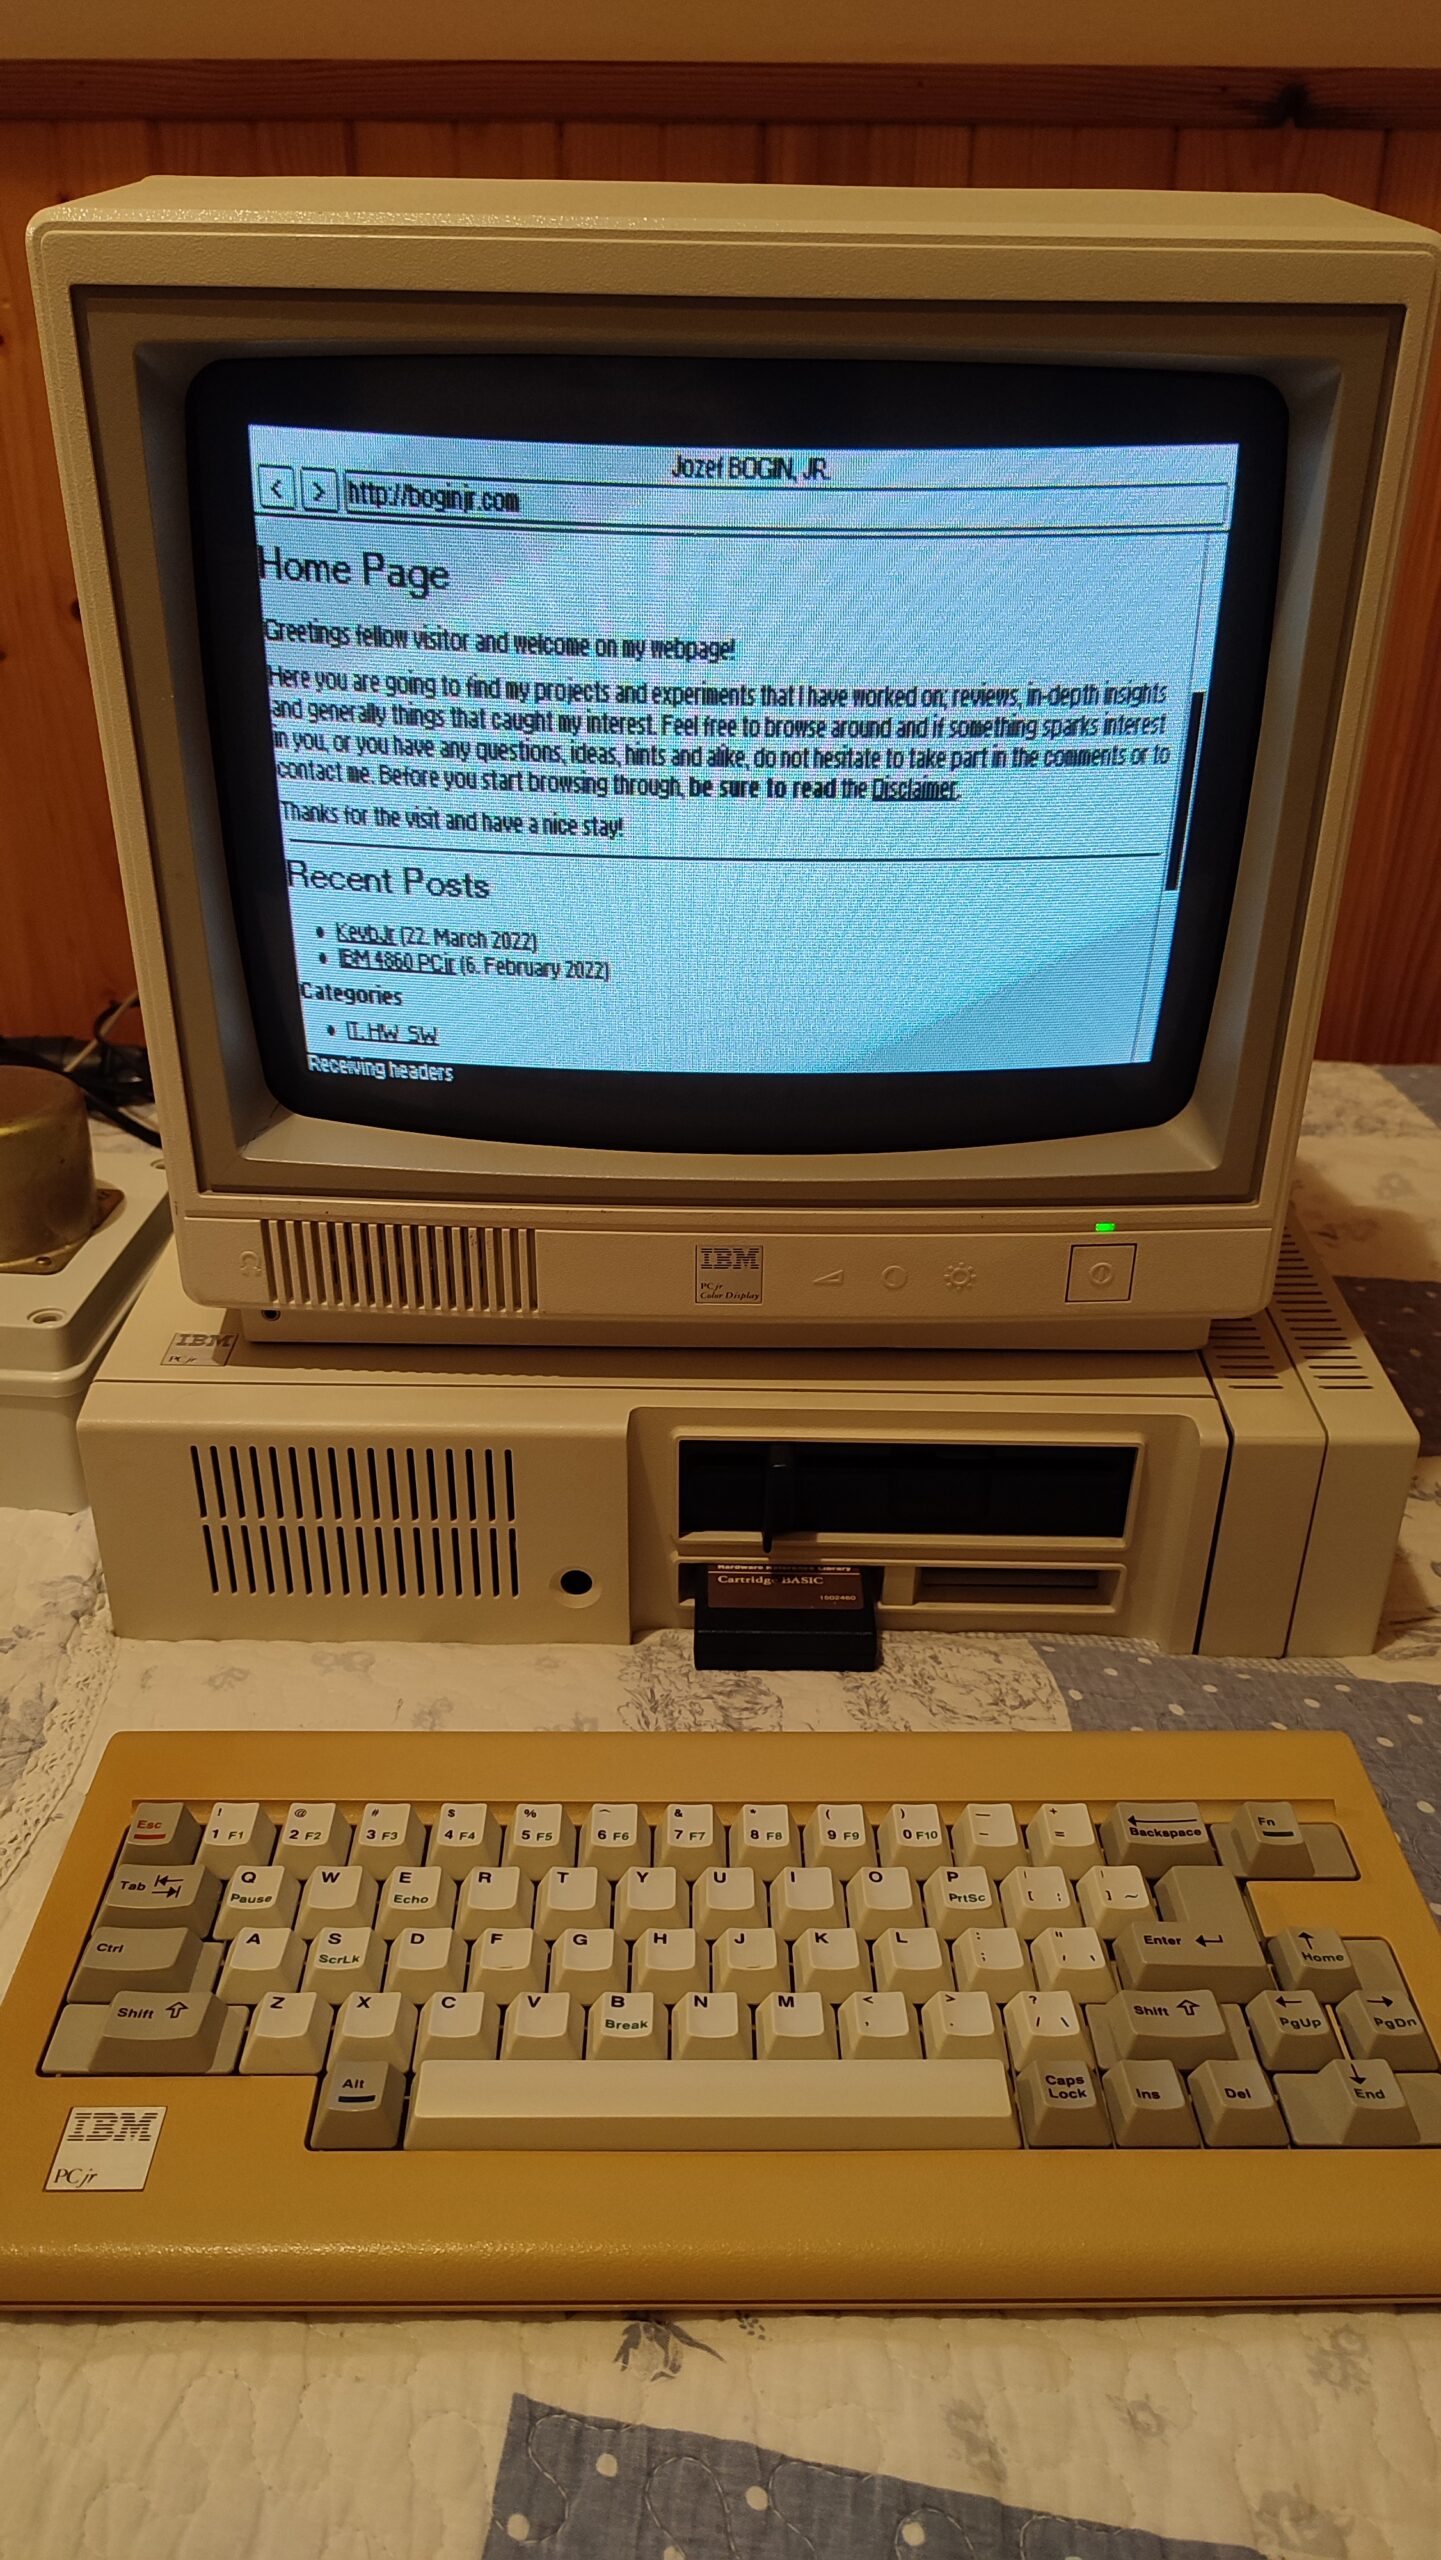 BOGINJR on PCjr 🙂
Use cursor keys to scroll the page, Tab to follow hyperlinks, Enter to make a selection, F6 (Fn+6) to type into the address bar, F2 to invert the graphics, Esc quits the browser. Note that the address bar will not scroll properly with long links. Also, the PCjr does not have a DMA channel, so, avoid using the keyboard during serial transfers or else the site might cut out during loading. The 4800bps baud rate doesn’t help much either 🙂
Behold the interwebs
Great article, comrade!